Accessories
Crochet Bandana With Beads Pattern
By Looplader · Tested row by row · Updated
- Skill
- Easy
- Hook
- 4.0 mm (G/6)
- Yarn
- DK-weight cotton (CYC 3)
- Time
- One relaxed day or two short evenings
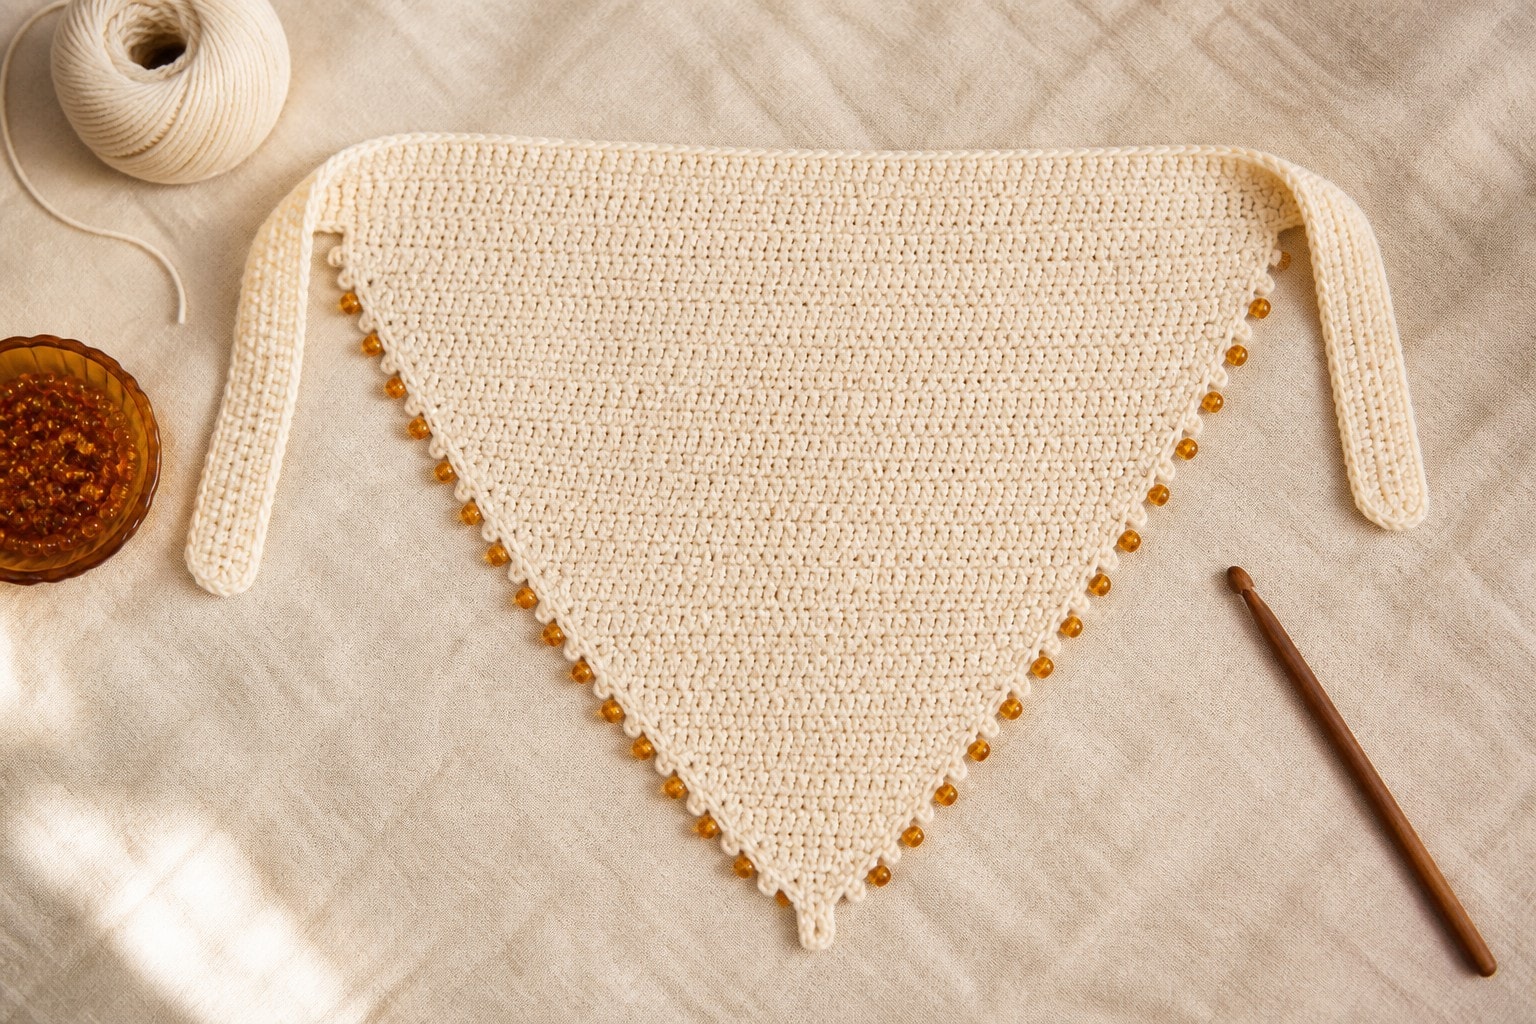
This crochet bandana with beads is a solid DK-cotton triangle with 21 small beads sewn only onto its outside edge after the fit is set. Keeping the beads off the center panel and away from the ties makes the scarf comfortable against the head while still giving it a decorative finish.
The triangle grows from its point with two half-double-crochet edge increases per row. Once the top edge fits, add flat returned-single-crochet ties, work a small picot border down the two slopes, and stitch the beads through that firm border instead of through loose openwork.
Why you’ll love this pattern
- The body is a simple one-piece triangle, so the beadwork never changes the sizing repeat.
- All 21 beads sit on the outside border rather than under the knot or across the scalp.
- The placement plan uses ten beads per side plus one at the point, making a balanced finish easy to check.
- The growing triangle can stop at any measured row before the edging is added.
Instructions
- 1
Start with a washed gauge swatch in the same cotton. Work 17 hdc and 13 rows, wet it, press it in a towel, and dry it flat. Aim for 17 hdc and 13 rows = 4 in / 10 cm after drying. The bead line is added after the fabric is complete, so do not sew any test beads into the swatch until you know the yarn and thread behave well together.
- 2
Test one bead before committing to the full border. Thread it onto a short piece of the beading thread, pass the needle through the bead, and make sure it moves freely without splitting the thread. If the hole is too tight, choose a bead with a larger hole or use a finer thread; never force yarn through a bead intended for a needle.
- 3
Foundation: with cotton, ch 2. Row 1: work 3 hdc in the 2nd ch from hook. Ch 2, turn; the turning ch does not count as a stitch here or anywhere in this pattern. (3 hdc) This small row is the point of the finished bandana.
- 4
Row 2: 2 hdc in the first st, hdc in the next st, then 2 hdc in the last st. Ch 2, turn. (5 hdc) Row 3: 2 hdc in the first st, hdc in every stitch across to the final st, then 2 hdc in the final st. Ch 2, turn. (7 hdc) Mark the first and last stitch if you find the two edge increases difficult to spot.
- 5
Body increase row: work 2 hdc in the first st, hdc in every stitch across to the final st, then 2 hdc in the final st. Ch 2, turn. Each row adds 2 hdc. Starting with Row 1 = 3 hdc, Row n has 2n + 1 hdc, which is the fastest way to catch a missed edge increase before the triangle becomes large.
- 6
Rows 4-12: repeat the body increase row. The counts are 9, 11, 13, 15, 17, 19, 21, 23, and 25 hdc. Lay the work flat after Row 12: the point should sit directly below the midpoint of the top edge. If it leans, find the first row with a wrong count before continuing.
- 7
Rows 13-24: repeat the body increase row. The counts are 27, 29, 31, 33, 35, 37, 39, 41, 43, 45, 47, and 49 hdc. Hold the straight top edge across the back of your head at Row 24. This is the useful fit checkpoint, because the bead border and ties should only be added after you choose the scarf depth.
- 8
Rows 25-33: repeat the body increase row. The counts are 51, 53, 55, 57, 59, 61, 63, 65, and 67 hdc. At the stated blocked gauge, Row 33 is about 15¾ in / 40 cm across the top and 10 in / 25 cm deep, excluding ties. Stop earlier for a shallower scarf or continue the same row for more coverage. Do not ch 2 after the final body row.
- 9
Stabilize the top edge: with the RS facing, work 1 sc in every hdc across the straight top edge. (67 sc) First tie: at the left top corner, ch 80, then sc in the 2nd ch from hook and in every remaining chain back to the corner. (79 sc) Sl st to the corner. The returned-sc tie stays flatter than a bare chain and keeps beads away from the knot.
- 10
Picot border: switch to a matching contrast yarn if you like. From the left top corner, work 1 sc in the row end of each row from Row 33 down through Row 2. (32 sc) At the foundation point, work [sc, ch 3, sl st in the first ch, sc, sc] around the point; the ch-3 loop is one small picot. Then work 1 sc in the row end of each row from Row 2 back up through Row 33 on the second slope. (32 sc) Sl st to the right top corner. The border has 67 sc total plus the picot chain.
- 11
Second tie: at the right top corner, ch 80, then sc in the 2nd ch from hook and in every remaining chain back to the corner. (79 sc) Fasten off and weave all crochet tails through the dense top-edge stitches on the WS. Keep the side border flat before you add beads; a curled edge makes the bead placement look uneven.
- 12
Mark the bead positions while the bandana lies RS-up: on each slope, mark border sc number 3, 6, 9, 12, 15, 18, 21, 24, 27, and 30, counting from the top corner toward the point. Mark the center sc of the three sc around the point. This gives 10 beads on each side plus 1 at the point, with three border stitches between adjacent beads.
- 13
Sew the beads onto the marked border stitches. Thread about 24 in / 60 cm of fine thread, knot the tail inside the WS of one border sc, bring the needle out through that sc, pass through one bead, then return through the same sc and one neighboring border stitch on the WS. Repeat the path once more for a secure attachment, then move to the next marker with the thread hidden under the back loops. Do not stitch through the main hdc body.
- 14
Wet-block gently after the beadwork is complete. Press water from the cotton in a towel, pin the top corners and point into a symmetric triangle, and smooth the border without pulling the beads. Let it dry flat, then check the WS: no thread knots should sit where the bandana touches the head. The beads should frame the two outside slopes, not weigh down the top edge or ties.
Tips for success
- Choose smooth round beads with no sharp rim. A sharp hole can cut beading thread as the scarf moves.
- Keep the beadwork on the outer slopes and leave the top edge and ties bead-free. Those are the parts that sit against the head and form the knot.
- Use a fresh short length of beading thread for each side if it starts to twist. Untwisting thread is easier before beads are attached than after.
- If the edge pulls inward after sewing, the bead thread was tightened too much. Remove that bead, sew it again with the thread just snug enough to stop it spinning.
Pattern at a glance
- Time to make
- One relaxed day or two short evenings
- Skill level
- Easy
- Hook
- 4.0 mm (G/6)
- Yarn weight
- DK-weight cotton (CYC 3)CYC standard
- Yardage
- ~175 yd / 160 m DK-weight cotton plus 21 small beads
- Gauge
- 17 hdc x 13 rows = 4 in / 10 cm after wet blocking
- Finished size
- About 15¾ in / 40 cm across the top edge and 10 in / 25 cm deep after blocking, excluding ties
Free ebook
Get new patterns, and the ebook
New patterns as they land, plus our free beginner's crochet stitch guide. No daily blasts, unsubscribe in one click.
Frequently Asked Questions
Can I crochet the beads directly into the bandana?
You can, but this pattern deliberately sews them onto the finished border instead. That keeps the triangle easy to size, lets you test bead placement before it is permanent, and prevents beads from sitting under the top edge or tie knot.
How do I make the beaded bandana bigger?
Repeat the body increase row beyond Row 33 before working the top edge, ties, or border. Each extra row adds 2 hdc. Make the final decision from the blocked triangle measured across your head, then space ten beads along each completed slope as written.
Why is my bead border curling?
The sewing thread is usually pulled too tight, or the beads are too large for the small border stitches. Remove the tightest bead, resew it with relaxed thread tension, and use smaller, smoother beads if the border still buckles.
Can I use wooden beads?
Yes, if they are smooth, lightweight, and their holes accept your needle and thread. Test one bead first. Seal or avoid beads with rough drilled holes because abrasion can weaken the thread over repeated wear.