Accessories
Crochet Checkered Bandana Pattern
By Looplader · Tested row by row · Updated
- Skill
- Easy
- Hook
- 4.0 mm (G/6)
- Yarn
- DK-weight cotton (CYC 3)
- Time
- One relaxed day or two short evenings
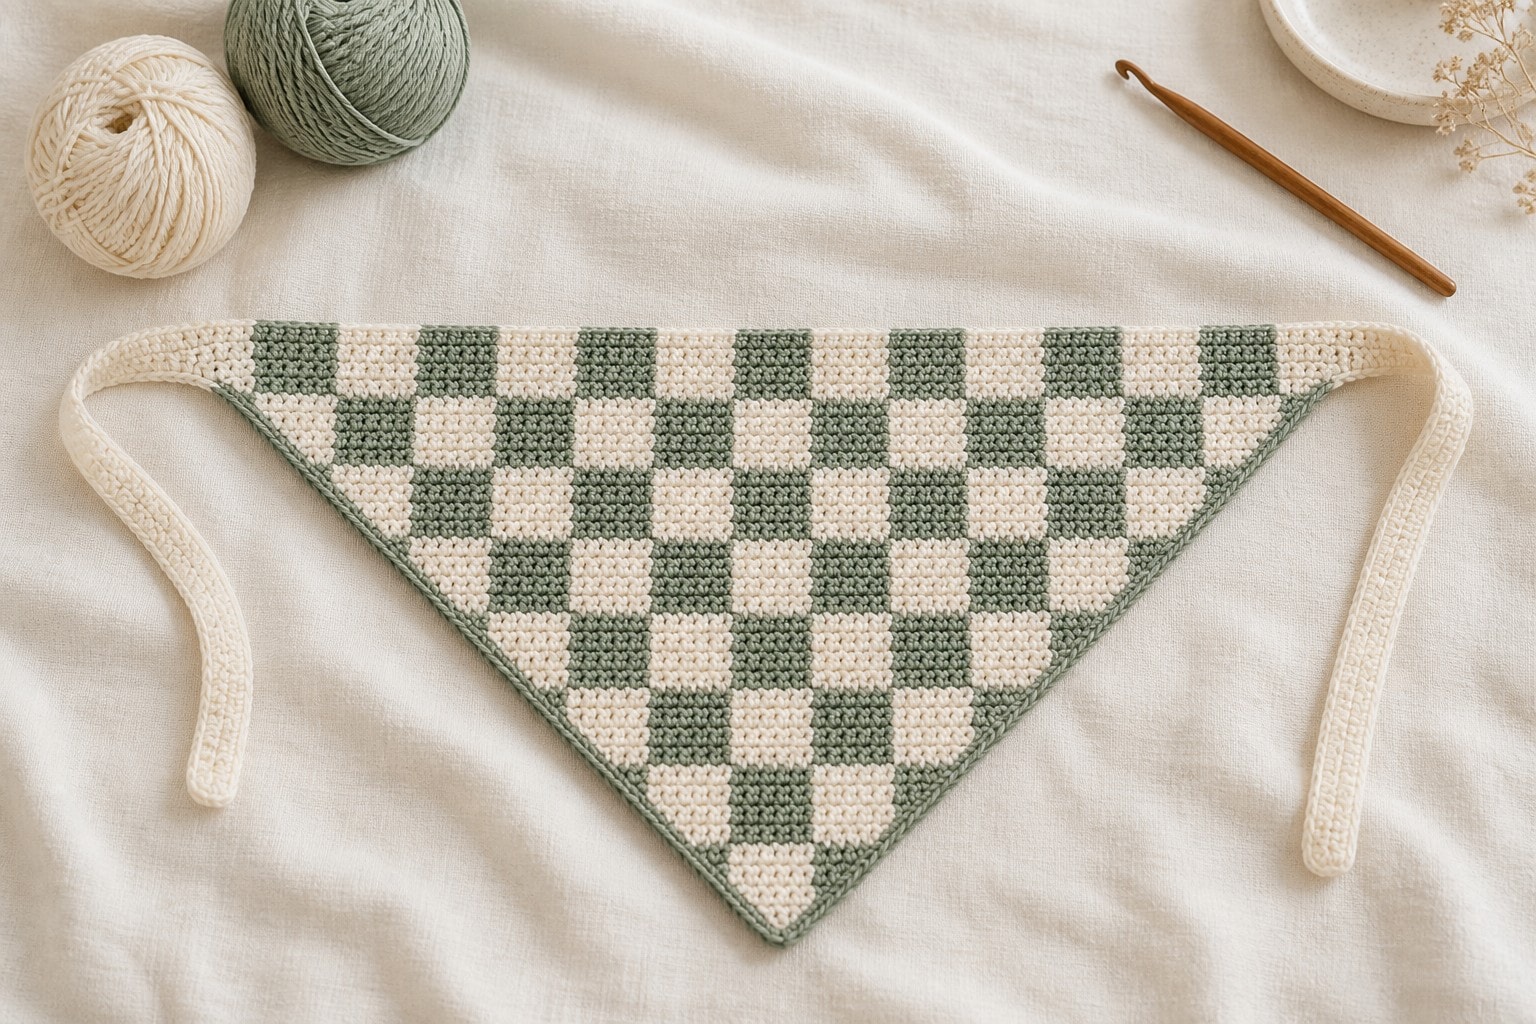
This crochet checkered bandana is a solid, one-piece triangle worked in two colors with four-stitch-by-four-row checks, a narrow contrast edge, and adjustable ties. The bandana grows from its point, so the checker grid gets wider naturally while the carried color stays hidden inside the single crochet stitches.
The color plan is a rule, not a separate chart to memorize: begin each four-row section with the color opposite the section before it, then switch colors every four stitches. That creates a readable checkerboard without cutting yarn at every block.
Why you’ll love this pattern
- A simple four-stitch, four-row repeat creates the checkerboard without separate squares to join.
- Both colors travel inside the fabric, so the reverse stays tidy and there are only the two final tails to weave in.
- The triangle gains exactly two stitches per row, which makes it easy to check the shaping before every color section.
- You can stop after any four-row section, then add the same edge and ties for a smaller or larger fit.
Instructions
- 1
Make a colorwork swatch before starting. With both colors, work a 16-stitch-wide, 12-row single-crochet sample using four stitches of CA followed by four stitches of CB. Carry the unused color along the WS inside each stitch. Wash and dry the swatch flat; aim for about 16 sc and 16 rows = 4 in / 10 cm. Check that the carried yarn does not pull the fabric narrower than the front.
- 2
Set up the two colors. Make a slip knot with CA and leave CB attached as a second working strand behind the fabric. When you are about to change color, work the next stitch until 2 loops remain on the hook, yarn over with the new color, and pull through both loops. Lay the old color across the WS before beginning the next stitch so it is caught inside the fabric rather than floating loosely behind it.
- 3
Foundation: with CA, ch 2. Row 1: sc in the 2nd ch from hook. (1 sc) Ch 1, turn. Keep CB loose behind the work from this point forward. Row 2: work 2 sc in the first st, then 1 sc in the last st. (3 sc) Ch 1, turn. The first two rows establish the point before a full four-stitch check can appear.
- 4
Triangle increase rule: every body row begins with 2 sc in the first st, continues in sc across, and ends with 2 sc in the final st. Each row therefore adds 2 sc. The count on Row n is 2n − 1: Row 3 has 5 sc, Row 4 has 7 sc, and Row 5 has 9 sc. Keep the increase stitches in the same current color as their four-stitch block; an edge block can be shorter than four stitches and still belongs to the correct color.
- 5
Color rule for Rows 1-4: start every row with CA. Work the triangle increase rule, changing color after every 4 completed sc: 4 CA, 4 CB, 4 CA, 4 CB, and so on. If fewer than four stitches remain at an edge, work the partial block in the color that is next in sequence. Rows 1-4 form the first horizontal band of checks; the short blocks near the point are expected and disappear into the triangle shape.
- 6
Color rule for Rows 5-8: start every row with CB, then continue in blocks of 4 stitches: 4 CB, 4 CA, 4 CB, 4 CA, and so on. The start color changes after four rows, which moves each new check above the opposite color and makes the checkerboard. At the end of Row 8, count 15 sc. Lay the work flat: you should see the first complete 4-by-4 checks in the center, with partial checks only along the two sloping sides.
- 7
Rows 9-12: repeat the Rows 1-4 color rule, starting each row with CA. The stitch counts are 17, 19, 21, and 23 sc. Rows 13-16: repeat the Rows 5-8 color rule, starting each row with CB. The stitch counts are 25, 27, 29, and 31 sc. Do not tighten the carried strand at a color change; spread the completed stitches across the hook-side edge before you make the next block.
- 8
Continue the two-section repeat: Rows 17-20 start with CA; Rows 21-24 start with CB; Rows 25-28 start with CA; Rows 29-32 start with CB; Rows 33-36 start with CA; Rows 37-40 start with CB. Use the triangle increase rule on every row and change color every 4 completed sc. The Row 40 count is 79 sc. At the stated gauge, the top edge is about 19¾ in / 50 cm and the center depth is about 10 in / 25 cm. Stop after any completed four-row section for less coverage, or add another CA/CB section pair for more coverage.
- 9
Stabilize the top edge in CA. With the RS facing, work 1 sc in each top-edge stitch, keeping the same count: 79 sc for the stated size. Do not carry CB across this row. This plain line keeps the checker fabric from stretching at the forehead and gives both ties a firm base.
- 10
First tie: at the left top corner with CA, ch 82. Sc in the 2nd ch from hook and in every remaining chain back to the corner. The return gives the tie 81 sc and enough body to knot without becoming a thin cord. Do not fasten off.
- 11
Contrast edge: switch to CB and work 1 sc in every side row-end down the first slope, 3 sc in the point, and 1 sc in every side row-end up the second slope. Keep the carried yarn out of this round. This is an intentionally quiet finish: it frames the checks without competing with them. At the right top corner, switch back to CA for the second tie.
- 12
Second tie: with CA, ch 82, then sc in the 2nd ch from hook and in every remaining chain back to the corner. Fasten off both colors. Weave each tail through several stitches of the matching color on the WS; do not pull a cream tail through a sage check where it can show through the fabric.
- 13
Wet-block the bandana only lightly. Soak it briefly, press out excess water in a towel, and pin the top edge straight with the point centered below it. Smooth each check with your fingers instead of stretching it. Let it dry flat; harsh stretching can distort the square checks into rectangles.
Tips for success
- Change to the new color on the last pull-through of the stitch before the next block. Changing one stitch late gives every check a visible color bump.
- After each four-stitch block, gently spread those stitches to their finished width before continuing. A carried strand that is too short creates a tight vertical line in the fabric.
- Keep the two yarn balls in separate cups or zip bags. Turn the work in the same direction at every row end to reduce twisting.
- Use high-contrast smooth yarns for the first version. Similar values or fuzzy yarn make the four-stitch checks much harder to read.
Pattern at a glance
- Time to make
- One relaxed day or two short evenings
- Skill level
- Easy
- Hook
- 4.0 mm (G/6)
- Yarn weight
- DK-weight cotton (CYC 3)CYC standard
- Yardage
- ~95 yd / 87 m each of two colors
- Gauge
- 16 sc x 16 rows = 4 in / 10 cm after light blocking
- Finished size
- About 19¾ in / 50 cm across the top edge and 10 in / 25 cm deep after light blocking, excluding ties
Free ebook
Get new patterns, and the ebook
New patterns as they land, plus our free beginner's crochet stitch guide. No daily blasts, unsubscribe in one click.
Frequently Asked Questions
How do I make the crochet checkered bandana larger?
Add whole four-row sections, alternating a CA-start section with a CB-start section. This preserves the checkerboard and keeps the color bands aligned. Stop after any section, then work the top edge, ties, and contrast edge using the same finishing instructions.
Why are my checks pulling in or looking narrow?
The unused yarn is being carried too tightly. Before beginning the next four-stitch block, spread the completed block to its natural width and leave the carried strand relaxed along the WS. Do not compensate by using a much larger hook, which makes the checks uneven.
Do I have to carry yarn inside every stitch?
For this two-color checkerboard, yes. Carrying the unused color prevents a large number of tails and keeps the next color ready after every four stitches. Because the fabric is a solid single crochet, the carried strand is hidden well when the tension is relaxed.
Can I use more than two colors?
Yes, but add only one new color at a time and carry it only through the blocks where it will return soon. For a first checkered bandana, two colors are cleaner and easier to untangle. Use the same four-stitch-by-four-row rule for every color pair.