Accessories
Crochet Strawberry Bandana Pattern
By Looplader · Tested row by row · Updated
- Skill
- Easy
- Hook
- 4.5 mm
- Yarn
- DK-weight cotton (CYC 3)
- Time
- Two relaxed sittings
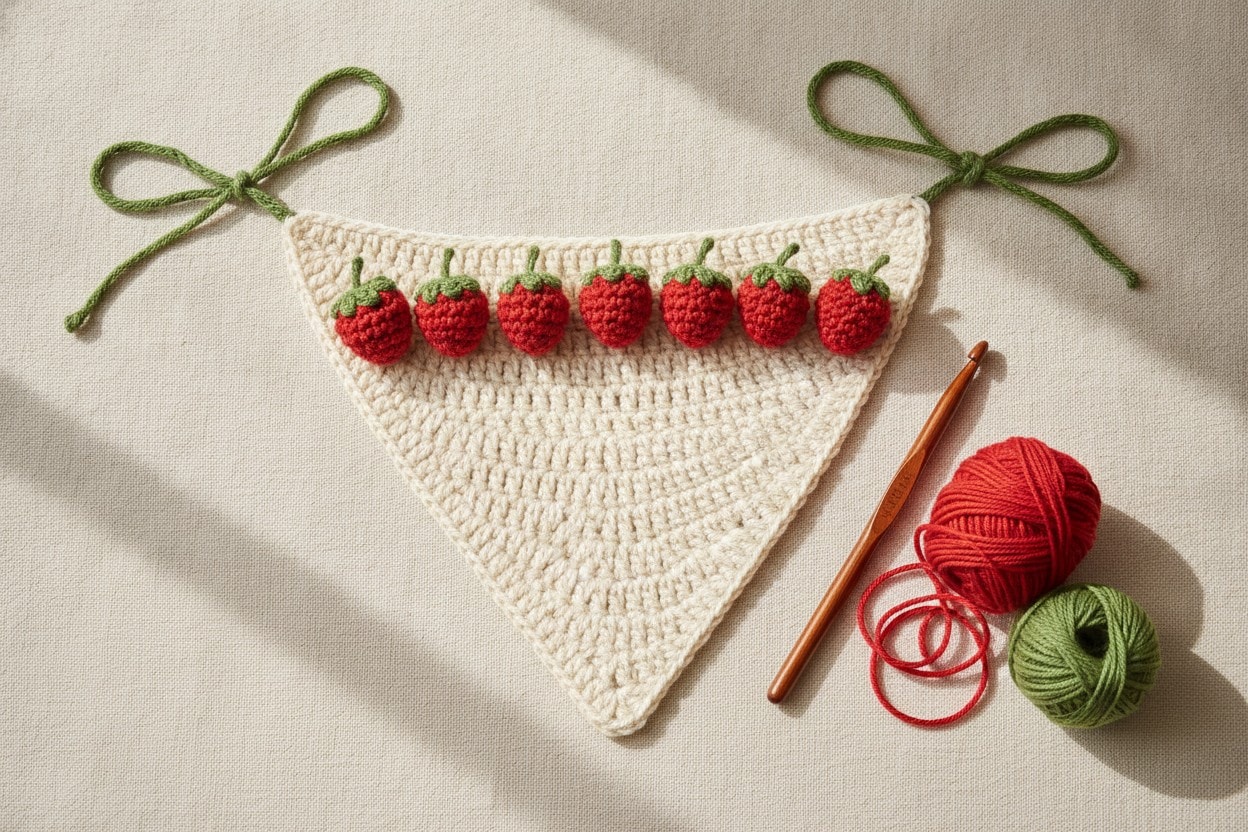
This crochet strawberry bandana begins as a soft cream triangle, then gets its fruit detail at the end. You will crochet seven small red strawberries separately, embroider simple white seeds, and pin them onto the finished triangle before sewing. That order matters: you can make the bandana fit first, then decide exactly where every berry looks happiest.
The base uses only half double crochet and grows by four stitches on every row. The strawberries are small flat triangles with a green leaf cap, so they add cheerful color without making the bandana stiff or bulky. Use cotton for a crisp warm-weather accessory, or use another smooth yarn at the stated gauge and adjust the number of triangle rows for your preferred coverage.
Why you’ll love this pattern
- The plain one-piece triangle is easy to count, easy to enlarge, and easy to try on before the decorative work begins.
- Each strawberry is a separate flat appliqué, so the fruit stays upright and you can move the layout before sewing anything permanently.
- The red fruit, green leaf caps, and tiny embroidered seeds create the strawberry effect with basic stitches rather than complicated colorwork.
- Returned single-crochet ties are narrow, strong, and adjustable without needing elastic or hardware.
Instructions
- 1
Read the pattern in US crochet terms. Make a 4 in / 10 cm swatch in cream using hdc and your 4.5 mm hook before you begin. The stated gauge is 15 hdc and 12 rows = 4 in / 10 cm. If your swatch is wider than 4 in, go down a hook size; if it is narrower, go up. Your finished top edge will change with gauge, so the row count is a guide and the measurement is the final fit check.
- 2
Set up the base triangle: with cream, ch 3. Row 1: work 2 hdc in the 3rd ch from your hook. The skipped 2 ch count as the first hdc, so you have 3 hdc. Ch 2 and turn. Keep the turning chain loose enough that you can clearly find its top on the next row.
- 3
Row 2: with the turning ch-2 counting as the first hdc, work 2 hdc in the first st, hdc in the next st, then work 3 hdc in the top of the turning ch-2. (7 hdc) Ch 2, turn. The extra stitch at each end is what begins the two matching slopes.
- 4
Row 3: work 2 hdc in the first st, hdc in every st across until the final turning ch-2, then work 3 hdc in the top of that turning ch-2. (11 hdc) Ch 2, turn. From now on, the first and last stitch groups are the only increases; do not add stitches in the middle of a row.
- 5
Rows 4-27: repeat Row 3. Your count increases by 4 hdc each row. To make checking easier, your top-edge counts are: Row 4 = 15; Row 5 = 19; Row 10 = 39; Row 15 = 59; Row 20 = 79; Row 25 = 99; Row 27 = 107 hdc. After Row 15, lay the triangle flat and compare the two slopes. After Row 27, do not ch 2; measure the straight top edge and the center depth before deciding whether to continue.
- 6
At the stated gauge, 27 rows make a triangle about 28.5 in / 72 cm across the top edge and 9 in / 23 cm deep. For less coverage, stop after Row 23; for more, repeat Row 3 until you like the depth. Each extra row adds 4 hdc across the top edge. Keep a note of your final row number because it makes the strawberry placement easier to rebalance later.
- 7
Make Strawberry 1: with red, ch 2. Row 1: work 2 sc in the 2nd ch from hook. (2 sc) Ch 1, turn. Row 2: work 2 sc in the first st, sc in the next st, then 2 sc in the last st. (4 sc) Ch 1, turn. Start at the narrow point and widen both sides; this gives the fruit a clear tapered bottom.
- 8
Row 3: 2 sc in the first st, sc in each of the next 2 sts, 2 sc in the last st. (6 sc) Ch 1, turn. Row 4: 2 sc in the first st, sc in each of the next 4 sts, 2 sc in the last st. (8 sc) Ch 1, turn. Row 5: 2 sc in the first st, sc in each of the next 6 sts, 2 sc in the last st. (10 sc) Ch 1, turn.
- 9
Row 6: 2 sc in the first st, sc in each of the next 8 sts, 2 sc in the last st. (12 sc) Fasten off red, leaving an 8 in / 20 cm tail for sewing. Flatten the tiny triangle with your fingers. It should have a narrow point, two gently sloping sides, and a straight 12-stitch top; if it curls sharply, make the next motif with a looser tension.
- 10
Add the green cap: turn the strawberry RS up, with its 12-stitch red top edge nearest you. Join green in the first top-edge stitch. *Ch 3, sc in the 2nd ch from hook, sc in the next ch, sl st in the next red top-edge stitch.* Repeat from * three more times, then sl st once more in the last red top-edge stitch. You now have four small leaves spaced across the top. Fasten off, leaving a 5 in / 13 cm tail to secure the cap if needed.
- 11
Add the seeds before sewing: thread white yarn or floss on a needle. From the WS, bring the needle up through the red about one row below the leaves. Make two or three tiny vertical straight stitches, spaced across the upper half of the berry, then take the thread back to the WS and secure it under two red stitch bars. Do not pull the seeds tight enough to pucker the fruit.
- 12
Make 6 more strawberries exactly the same way, for 7 total. Weave in the short starting tails now. Leave the long red finishing tails attached; those tails are the cleanest way to sew each berry to the bandana. Set the seven berries in a row with their leaf caps all facing the same direction before you begin placement.
- 13
Plan the layout: lay the cream triangle RS up with the top edge nearest you. Mark its center at about the 54th top-edge stitch. Pin one strawberry with its leaf cap about 2 rows below that center mark. Place the remaining six berries in a shallow, even arc: three on each side, with about 12–14 top-edge stitches between neighboring berry centers. Keep the outer berries at least 10 stitches away from either top corner so the ties have space to knot.
- 14
Sew the strawberries on one at a time. Thread the long red tail of the center strawberry through your tapestry needle. Starting on the WS, bring the needle through the red stitch at the berry's pointed bottom, then take tiny whipstitches through the outer red edge and the cream base, travelling up one side and down the other. Add two small anchoring stitches through the top red row just beneath the leaves. The berry should lie flat, but the green leaves may remain free at their tips. Repeat for all seven berries, checking the arc after the third and fifth berry.
- 15
Work the first tie and top edge: join green at the left top corner. Ch 75. Sc in the 2nd ch from hook and in every chain back to the bandana corner; this returned row makes a narrow tie. Without turning the bandana, work 1 sc in every hdc across the cream top edge. Work 2 sc in the far corner so the edging turns without pulling.
- 16
Work the second tie: ch 75 from the far corner, then sc in the 2nd ch from hook and in every chain back to the corner. Fasten off. Weave every cream, red, and green tail through several stitch bars on the WS, change direction once, then trim close to the fabric. Do not cut a tail directly beside a corner or motif edge.
- 17
Finish and block gently. Follow the care instructions for your yarn. For cotton, wet the bandana, press it between towels without wringing, and lay it flat with the top edge straight and the point centered. Smooth each strawberry into a neat triangle and fan the green leaves outward. Let it dry completely before tying it on; blocking is what makes the seven berries look like one intentional design rather than separate patches.
Tips for success
- Treat the stated 27 rows as a fit checkpoint, not a rule. Tie a strand of yarn around your head where the finished top edge will sit, then compare that length to your measured top edge before you add the strawberries.
- Pin the center berry first, then match the left and right pairs outward. This prevents the row from drifting to one side of the triangle.
- If your berries look too pointy, add one plain sc row of 12 sc before the green cap. If they look too wide, stop after the 10-stitch row instead of working Row 6.
- Keep the white seeds small and sparse. One overly long stitch can read as a stripe rather than a seed and can pull the red fabric out of shape.
- For a lighter, more open base, use a larger hook only after swatching. Changing hook size changes both drape and the measured placement spacing.
Pattern at a glance
- Time to make
- Two relaxed sittings
- Skill level
- Easy
- Hook
- 4.5 mm
- Yarn weight
- DK-weight cotton (CYC 3)CYC standard
- Yardage
- ~259 yd / 237 m total, including a small amount of white for seeds
- Gauge
- 15 hdc x 12 rows = 4 in / 10 cm
- Finished size
- About 28.5 in / 72 cm across the top edge and 9 in / 23 cm deep at stated gauge, excluding ties
Free ebook
Get new patterns, and the ebook
New patterns as they land, plus our free beginner's crochet stitch guide. No daily blasts, unsubscribe in one click.
Frequently Asked Questions
How do I make the strawberry bandana larger or smaller?
Repeat the cream base increase row for more coverage, or stop earlier for less. Every added row increases the top edge by 4 hdc. Measure the top edge, then rebalance the seven berries around the center rather than relying on the original stitch numbers alone.
Can I crochet the strawberries directly into the bandana?
You can, but this pattern deliberately uses separate appliqués. They stay upright, are easier to space evenly, and let you correct one berry without reworking the cream base.
Why are my strawberry edges curling?
The increases are likely being worked too tightly. Relax the first and last stitch of every motif row, and flatten the finished fruit before you add the green cap. If it still cups, go up one hook size for the berries only.
Can I use acrylic yarn?
Yes. Acrylic makes a warmer, springier bandana; cotton gives a crisper, lighter result. Use a smooth yarn so the seed stitches and leaf cap remain visible, make a gauge swatch, and adjust the base rows for fit.
Can I use fewer strawberries?
Yes. Three berries centered under the top edge make a simpler version, while five fit a smaller triangle nicely. Keep the outer fruit clear of the top corners so the ties are comfortable to use.