Accessories
Vintage Crochet Head Scarf Pattern
By Looplader · Tested row by row · Updated
- Skill
- Easy
- Hook
- 4.0 mm (G/6)
- Yarn
- DK-weight cotton (CYC 3)
- Time
- One relaxed afternoon or two short evenings
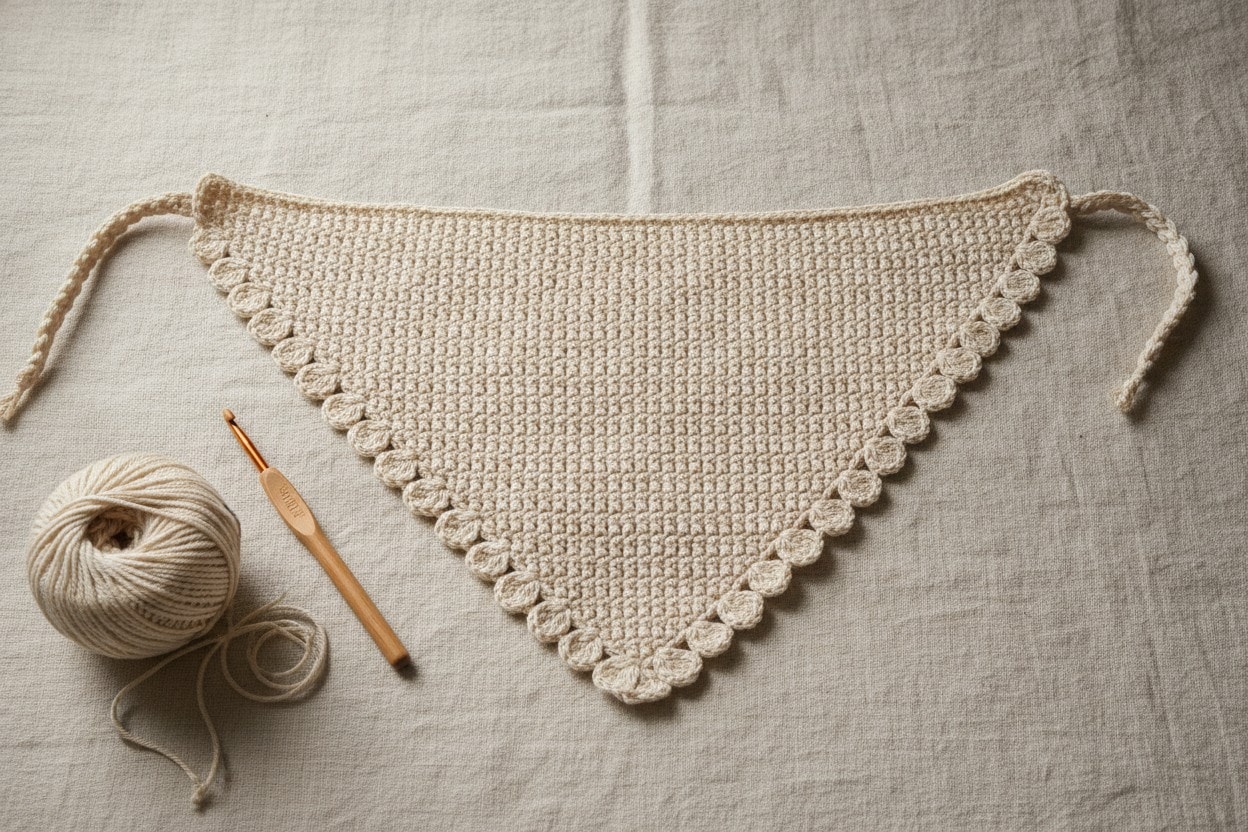
This vintage crochet head scarf is a one-piece, solid cotton triangle finished with a small shell border on the two sloping sides and adjustable returned-crochet ties. The plain body gives the scarf enough coverage to sit neatly over the crown, while the scallops add the old-fashioned detail at the edge instead of making the whole fabric heavy.
The triangle grows by one half double crochet at each end of every row, so the fit is easy to check before you commit to the border. Work to the stated size for a close, classic kerchief shape, or add body rows until the top edge reaches the coverage you prefer.
Why you’ll love this pattern
- A solid half-double-crochet body stays more opaque than a mesh scarf and gives the shell border a clean outline.
- The same two edge increases happen on every body row, so the shaping is easy to audit.
- The shell border is worked after the fit is chosen; it does not change the triangle's size in a meaningful way.
- Returned single-crochet ties are more comfortable to knot than bare foundation chains.
Instructions
- 1
Make and wash a small swatch first. Work 18 hdc and 13 rows in the chosen cotton, wet the swatch, press it in a towel, and dry it flat. Aim for about 17 hdc and 13 rows = 4 in / 10 cm after drying. Cotton relaxes after its first wash, so use the washed measurement when you decide how many body rows to add.
- 2
Foundation: with cotton, ch 3. Row 1: work 2 hdc in the 3rd ch from hook. The skipped 2 ch count as the first hdc, so Row 1 has 3 hdc. Ch 2, turn. This compact point is the center back of the finished scarf.
- 3
Row 2: work 2 hdc in the first st, hdc in the next st, then 3 hdc in the top of the turning ch-2. (7 hdc) Ch 2, turn. Row 3: work 2 hdc in the first st, hdc in each st across to the final turning ch-2, then 3 hdc in the top of that ch-2. (11 hdc) Ch 2, turn. Put a marker in each new outside corner if you find the turning chain hard to identify.
- 4
Body increase row: work 2 hdc in the first st, hdc in every stitch across, then 3 hdc in the top of the turning ch-2. Ch 2, turn. Each completed row adds 2 hdc to the count. The first stitch at the start and the final turning chain are your two shaping checkpoints; missing either one turns the triangle into a lopsided wedge.
- 5
Rows 4-12: repeat the body increase row. The row counts are 13, 15, 17, 19, 21, 23, 25, 27, and 29 hdc. Lay the scarf flat after Row 12. Both sloping sides should match, and the center point should sit directly below the middle of the top edge.
- 6
Rows 13-24: repeat the body increase row. The row counts are 31, 33, 35, 37, 39, 41, 43, 45, 47, 49, 51, and 53 hdc. At this point, hold the top edge gently across the back of your head where you plan to tie the scarf. This try-on is more useful than a circumference measurement because hair volume and preferred placement change the fit.
- 7
Rows 25-37: repeat the body increase row. The row counts are 55, 57, 59, 61, 63, 65, 67, 69, 71, 73, 75, 77, and 79 hdc. After Row 37, the blocked top edge is about 18½ in / 47 cm and the depth is about 11 in / 28 cm at the stated gauge. For less coverage, stop after any earlier row; for more coverage, continue the same increase row and recheck the depth every four rows. Do not ch 2 after your final body row.
- 8
Stabilize the top edge: with the RS facing, work 1 sc in every hdc across the straight top edge. Keep the same number of stitches, 79 sc for the stated size. This row gives the ties a firm, even base and prevents the top edge from stretching while it is worn.
- 9
First tie: at the left top corner, ch 82. Sc in the 2nd ch from hook and in every remaining chain back to the corner. The tie has 81 sc and should lie flat without twisting. Continue directly into the shell border; do not fasten off.
- 10
Vintage shell border: work down the first sloping side. Sc in the first side row-end. *Skip 1 side row-end, work 5 dc in the next side row-end, skip 1 side row-end, sc in the next side row-end.* Repeat to the point. Work 3 sc into the point itself, then repeat the same shell rhythm up the second slope. On a 37-row scarf you will have about 9 shells on each side; if one side has an extra row-end, absorb it next to the corner with an additional sc rather than forcing a sixth dc into a shell. The shells should sit on the edge without curling the fabric.
- 11
Second tie: at the right top corner, ch 82, then sc in the 2nd ch from hook and in every remaining chain back to the corner. Fasten off. Weave each tail back and forth through several solid hdc or sc bars on the WS. Do not weave a tail only through the shell border; the open spaces there can let it work loose.
- 12
Wet-block the scarf to its final shape. Soak it briefly, press out excess water in a towel, and pin the point centered below the two top corners. Smooth the body flat, then open the shells only enough for their arches to match. Let the cotton dry completely before removing the pins; this is what makes the solid body lie flat and the vintage border read as an even line.
Tips for success
- Count the final body stitch before working into the turning chain. The usual shaping error is placing only two hdc there instead of three.
- If the top edge feels too loose during the try-on, go down one hook size for the stabilization row and ties only; do not tighten the body by pulling the yarn hard.
- Use smooth cotton or a cotton-rich blend. A fuzzy yarn hides the row ends you need to find for the shell border.
- If the shell edge begins to wave, replace one shell near the middle of that side with a sc. Do the same adjustment in the mirrored place on the other side.
Pattern at a glance
- Time to make
- One relaxed afternoon or two short evenings
- Skill level
- Easy
- Hook
- 4.0 mm (G/6)
- Yarn weight
- DK-weight cotton (CYC 3)CYC standard
- Yardage
- ~180 yd / 165 m
- Gauge
- 17 hdc x 13 rows = 4 in / 10 cm after wet blocking
- Finished size
- About 18½ in / 47 cm across the top edge and 11 in / 28 cm deep after blocking, excluding ties
Free ebook
Get new patterns, and the ebook
New patterns as they land, plus our free beginner's crochet stitch guide. No daily blasts, unsubscribe in one click.
Frequently Asked Questions
How do I make this vintage crochet head scarf bigger?
Repeat the body increase row beyond Row 37, checking the top width and center depth every four rows. Each extra row adds 2 hdc, so the two sloping sides stay balanced. Add the stabilization row, ties, and shell border only after the triangle fits.
Why is my triangle turning lopsided?
One of the two edge increases has been missed. Every body row needs 2 hdc in the first stitch and 3 hdc in the top of the turning ch-2. Count the row before turning; it must increase by exactly 2 stitches.
Can I use acrylic yarn for this head scarf?
You can, but smooth cotton gives the solid fabric a cooler feel and lets the shell border block into a cleaner line. Acrylic may make a warmer, springier scarf. Swatch and stop by the measured size because its gauge and drape will differ.
Why is my shell border ruffling?
The shells are too dense for your row gauge or the double crochets are being worked too loosely. Replace one shell with a single crochet on that side, mirror the change on the other side, and block the edge straight while it dries.