Amigurumi
Fluffy Chenille Red Panda Crochet Pattern
By Looplader · Tested row by row · Updated
- Skill
- Easy
- Hook
- 5.0 mm (H/8)
- Yarn
- Bulky chenille / velvet (CYC 5)
- Time
- Two or three evenings
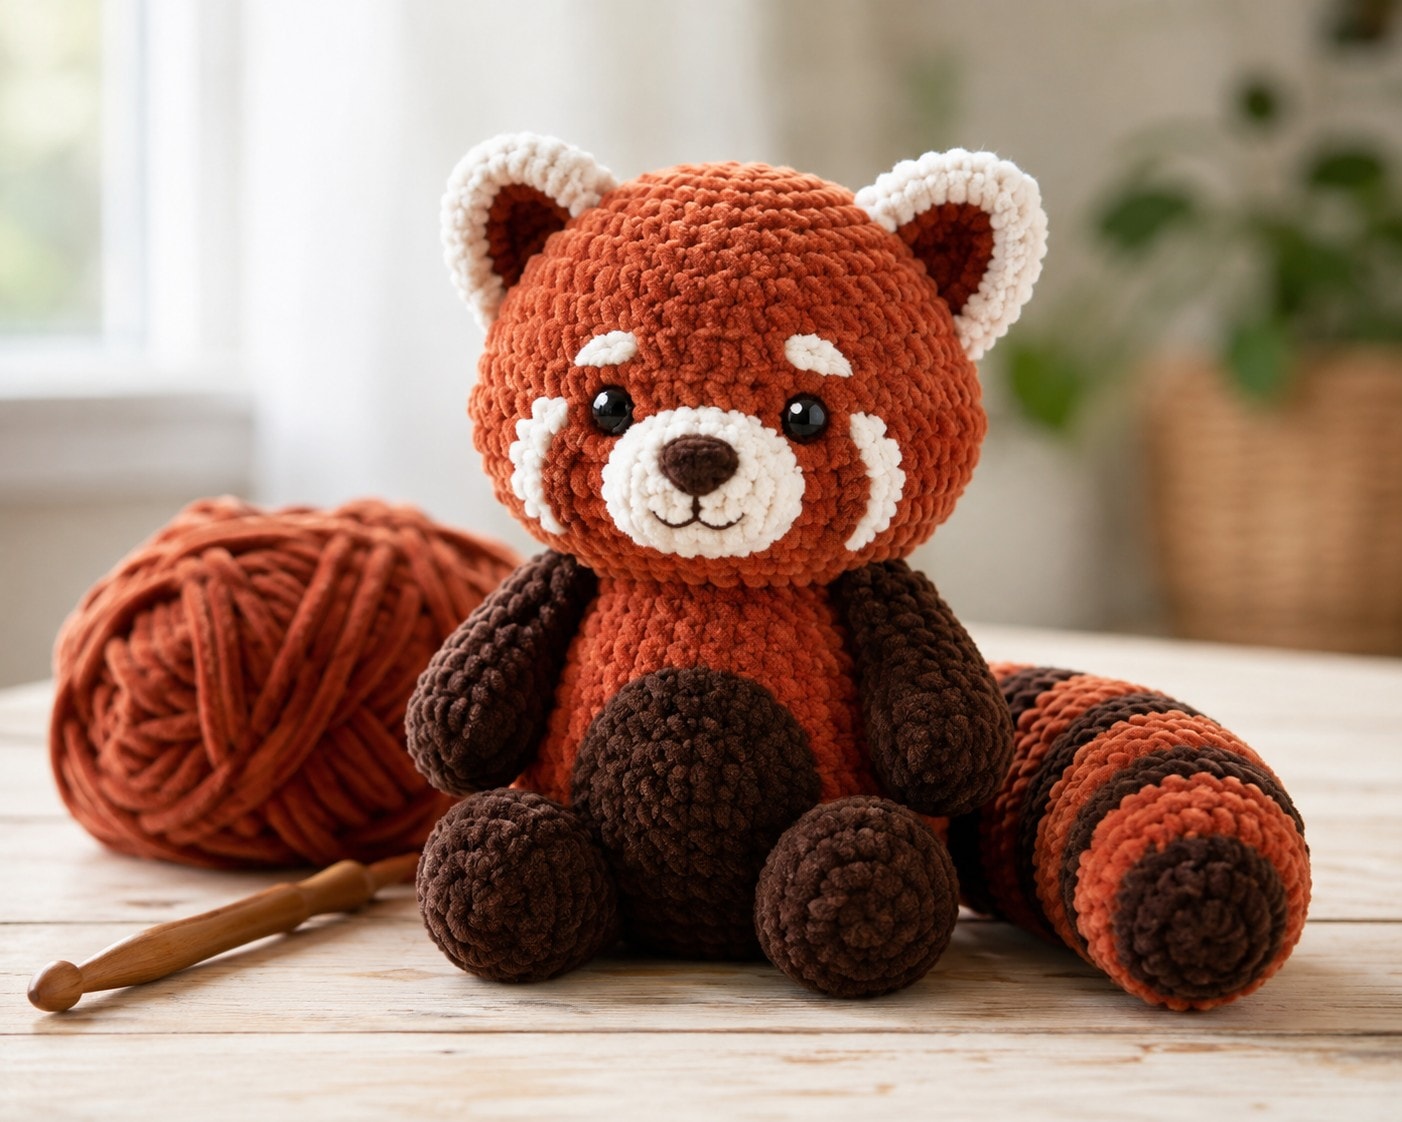
This fluffy chenille red panda is a soft toy amigurumi worked in bulky velvet yarn, with the head and body made as one continuous piece from the crown down through a shaped neck to the base. The ears, muzzle, belly patch, arms, legs, and a striped one-piece tail are made separately and sewn on, and the face is embroidered.
Velvet and chenille yarns are the reason it looks plush, and also the reason a first attempt can go wrong: the pile hides your stitches, the plies split on a sharp hook, and loose tension stays invisible until the stuffing shows through. This pattern is written around those problems, with a smaller hook than the ball band, a firm gauge check, a running stitch count on every shaping round, and a contrasting marker you move up as you go.
Why you’ll love this pattern
- The head and body are one continuous piece, so there is no neck seam to sew or wobble.
- Every shaping round carries a running stitch count, which matters on velvet yarn where the end of a round is hard to see.
- Bulky chenille makes the whole plush about 8 in / 20 cm, and it works up in two or three evenings.
- The ringed tail is worked in one piece with carried colors, so there are no separate rings to attach.
Instructions
- 1
Before you start, wind each chenille color into a center-pull ball and pick a marker in a bright color that stands out against velvet, since dark markers disappear into the pile. Work everything in a continuous spiral with no join or turning chain unless a step says otherwise, and keep the marker in the first stitch of each round, moving it up as you go. A hook with a rounded, inline tip splits the plush plies far less than a sharp lace-style hook.
- 2
Gauge check: with the 5.0 mm hook and bulky chenille, work Rnds 1 to 4 of the head below and measure across. It should be about 2 in / 5 cm wide and firm enough that you cannot see fibrefill through the fabric once it is stuffed. If it is looser than that, drop to a 4.5 mm hook before going on, because chenille hides loose tension until the stuffing shows through.
- 3
Head, with rust. Rnd 1: 6 sc in a magic ring. (6 sts) Pull the ring tight, then give the tail an extra tug after this round so the center cannot work loose in the velvet.
- 424 sts
Rnd 2: inc x6. (12 sts) Rnd 3: (sc, inc) x6. (18 sts) Rnd 4: (2 sc, inc) x6.
- 536 sts
Rnd 5: (3 sc, inc) x6. (30 sts) Rnd 6: (4 sc, inc) x6.
- 6
Rnds 7 to 12: sc in each st around. (36 sts each round) That is six straight rounds for a round head. Count at the end of every round here; the stitch that sits right next to the marker is the easiest one in the project to skip or double on velvet.
- 730 sts
Rnd 13: (4 sc, dec) x6.
- 8
Rnd 14: (3 sc, dec) x6. (24 sts) Rnd 15: (2 sc, dec) x6. (18 sts) These two rounds draw the head in to form the neck. Now place two 10 mm safety eyes between Rnds 10 and 11, about 7 stitches apart and centered on the front, and push the washers on hard because chenille compresses and an eye that feels tight now will loosen a little. For a toy for a child under 3, skip the eyes and embroider them later in dark brown.
- 918 sts
Stuff the head firmly through the neck opening now, shaping it round with your fingers from the outside as you work. Rnd 16: sc in each st around.
- 1030 sts
Body, continuing in rust. Rnd 17: (2 sc, inc) x6. (24 sts) Rnd 18: (3 sc, inc) x6.
- 1142 sts
Rnd 19: (4 sc, inc) x6. (36 sts) Rnd 20: (5 sc, inc) x6.
- 12
Rnds 21 to 29: sc in each st around. (42 sts each round) Nine straight rounds form the barrel of the body. Keep the marker column running straight down; if it pulls hard to one side you have added or missed a stitch.
- 13
Rnd 30: (5 sc, dec) x6. (36 sts) Rnd 31: (4 sc, dec) x6. (30 sts) Start stuffing the body firmly, pressing fill down into the base and out to the sides.
- 14
Rnd 32: (3 sc, dec) x6. (24 sts) Rnd 33: (2 sc, dec) x6. (18 sts) Rnd 34: (sc, dec) x6. (12 sts) Top up the stuffing so the body holds its shape without straining the stitches open.
- 15
Rnd 35: dec x6. (6 sts) Fasten off, leaving an 8 in / 20 cm tail. Thread it through the front loops of the last 6 stitches and pull closed. Run the end back and forth through the base twice before trimming so it cannot pull free through the chenille. You now have the whole head and body in one piece with a defined neck.
- 16
Ears (make 2). With cream, 6 sc in a magic ring. (6 sts) Rnd 2: inc x6. (12 sts) Rnd 3: (sc, inc) x6, changing to rust on the last stitch. (18 sts) Rnd 4: with rust, sc in each st around. (18 sts) Sl st in the next st and fasten off, leaving a sewing tail. Do not stuff. Fold the circle in half with the cream on the inside and pinch the base.
- 17
Muzzle, with cream. Ch 4. Rnd 1: sc in the 2nd ch from the hook, sc in the next ch, 3 sc in the last ch; working along the underside of the chain, sc in the next ch, inc in the last ch. (8 sts) Sl st to join and fasten off with a sewing tail. This little oval sits point-down under the eyes.
- 18
Belly patch, with dark brown, worked in rows. Row 1: ch 6, sc in the 2nd ch from the hook and in each ch across, turn. (5 sts) Row 2: ch 1, inc, sc 3, inc, turn. (7 sts) Row 3: ch 1, sc across, turn. (7 sts) Row 4: ch 1, inc, sc 5, inc, turn. (9 sts) Rows 5 to 7: ch 1, sc across, turn. (9 sts) Row 8: ch 1, dec, sc 5, dec, turn. (7 sts) Row 9: ch 1, sc across, turn. (7 sts) Row 10: ch 1, dec, sc 3, dec. (5 sts) Fasten off, leaving a long sewing tail.
- 19
Arms (make 2), with dark brown. Rnd 1: 6 sc in a magic ring. (6 sts) Rnd 2: (sc, inc) x3. (9 sts) Rnds 3 to 4: sc around. (9 sts) Rnd 5: (sc, dec) x3. (6 sts) Rnds 6 to 9: sc around. (6 sts) Lightly stuff only the rounded paw end. Flatten the opening and sc 3 across through both sides to close. Fasten off, leaving a sewing tail.
- 20
Legs (make 2), with dark brown. Rnd 1: 6 sc in a magic ring. (6 sts) Rnd 2: inc x6. (12 sts) Rnd 3: (sc, inc) x6. (18 sts) Rnd 4: BLO sc in each st around. (18 sts) Rnds 5 to 6: sc in both loops around. (18 sts) Rnd 7: (sc, dec) x6. (12 sts) Rnds 8 to 9: sc around. (12 sts) Lightly stuff the foot. Flatten the opening and sc 6 across to close. Fasten off, leaving a sewing tail. The back-loop round gives the foot a defined front edge so the panda can sit.
- 21
Tail, starting with dark brown. Rnd 1: 6 sc in a magic ring. (6 sts) Rnd 2: inc x6. (12 sts) Rnd 3: (sc, inc) x6. (18 sts) Rnds 4 to 5: sc around. (18 sts) Change to rust. Rnds 6 to 8: sc around. (18 sts) Change to dark brown. Rnds 9 to 10: sc around. (18 sts) Change to rust. Rnds 11 to 13: sc around. (18 sts) Change to dark brown. Rnds 14 to 15: sc around. (18 sts) Change to rust. Rnds 16 to 18: sc around. (18 sts) Rnd 19: (sc, dec) x6. (12 sts) Rnd 20: sc around. (12 sts) Stuff the tail lightly so it still bends. Flatten the opening and sc 6 across to close. Fasten off, leaving a long sewing tail. Carry the resting color loosely up the inside between bands instead of cutting it each time.
- 22
Assembly. Pin every part first, then check the whole layout before you sew anything: the folded ears sit at Rnds 7 to 8 of the head about 12 stitches apart with a slight outward tilt; the muzzle is centered point-down just below the eyes over Rnds 12 to 14; the belly patch runs down the front of the body from the base of the neck; the arms sit at the shoulder around Rnd 18 of the body; the legs sit at the front underside so the panda tips back a little and sits; the tail base is at the lower back over Rnds 31 to 33, angled down and out. Sew each part on with its own tail using small whip stitches, going around twice. On chenille, take each stitch slowly and pull only until the part sits flush, because hard tension buries the stitch and puckers the pile.
- 23
Face. With dark brown, embroider a small filled triangle at the top of the muzzle for the nose, then a short straight line down from it for the mouth. With white worsted-weight yarn, which holds a crisp line on chenille far better than velvet does, embroider a curved tear-track mark from the inner corner of each eye down toward the top of the muzzle, plus a few short straight stitches on each cheek and above each eye for the red panda's markings. Weave every remaining end back and forth through the body, not just under one stitch. Steam the finished plush lightly and finger-brush the tail to lift the pile.
- 24
Safety note: with safety eyes and sewn-on parts this is a decorative plush for ages 3 and up. For a younger child, embroider the eyes, work the parts into the body where you can, and sew every remaining part on twice around with matching sewing thread as well as yarn.
Tips for success
- Use a hook one to two sizes smaller than the chenille ball band suggests. A 5.0 mm hook on bulky velvet gives a dense fabric that holds its shape and hides fibrefill; the band's larger hook is for blankets, not toys.
- If loops start popping out of the fabric, called worming, you are working too loosely or letting the yarn twist. Let the ball hang and untwist every few rounds and keep an even, firm tension rather than yanking each stitch.
- Count at the end of every round with a clicker or by fives. On velvet the stitch next to the marker is the easiest one in the whole project to skip or double.
- Change color on the last yarn-over of the previous stitch so the new band is clean from its first stitch. Carry the resting color loosely up the inside of the tail; pulled tight, it cinches the tube.
Pattern at a glance
- Time to make
- Two or three evenings
- Skill level
- Easy
- Hook
- 5.0 mm (H/8)
- Yarn weight
- Bulky chenille / velvet (CYC 5)CYC standard
- Yardage
- ~120 yd rust, ~55 yd dark brown, ~15 yd cream chenille, plus a few yards of white worsted for the face
- Gauge
- Not critical — Rnds 1 to 4 of the head measure about 2 in / 5 cm across; work tight enough that fibrefill does not show through the pile
- Finished size
- About 8 in / 20 cm tall seated, tail about 5.5 in / 14 cm, worked in bulky chenille
Free ebook
Get new patterns, and the ebook
New patterns as they land, plus our free beginner's crochet stitch guide. No daily blasts, unsubscribe in one click.
Frequently Asked Questions
What yarn works for a chenille red panda?
Any bulky-weight (CYC 5) polyester chenille or velvet yarn, such as Bernat Velvet or a similar baby chenille. Stay in one brand across the colors so the pile length matches. Rust or cinnamon is the main color, with cream and dark brown for the face, belly, limbs, and tail rings.
Why does my chenille keep splitting?
A sharp-tipped hook catches individual plies instead of the whole strand. Switch to a hook with a rounded, inline tip, slow down on each insertion, and aim through the center of the stitch. A polished metal hook splits far less than a pointed lace-style hook.
Can I make the red panda bigger or smaller?
Yes, and the stitch counts do not change. A super-bulky chenille with a 6.0 mm hook gives a roughly 10 in plush; a heavy worsted velvet with a 4.0 mm hook gives about 6 in. Match the safety eye size to the new scale by eye.
How do I stop the tail flopping straight down?
Stuff it lightly, not firmly, so it keeps a soft curve, and sew the base along its whole flattened edge rather than just the tip. Angling the base down and out at the lower back lets the tail rest against the body with an upward hook at the end.