Amigurumi · Worked in the round
Giant Crochet Panda Plush Pattern With Chunky Yarn
By Looplader · Tested row by row · Updated
- Skill
- Easy
- Hook
- 6.5 mm (K/10½)
- Yarn
- Super bulky chenille / blanket yarn (CYC 6)
- Time
- A long weekend or four to five evenings
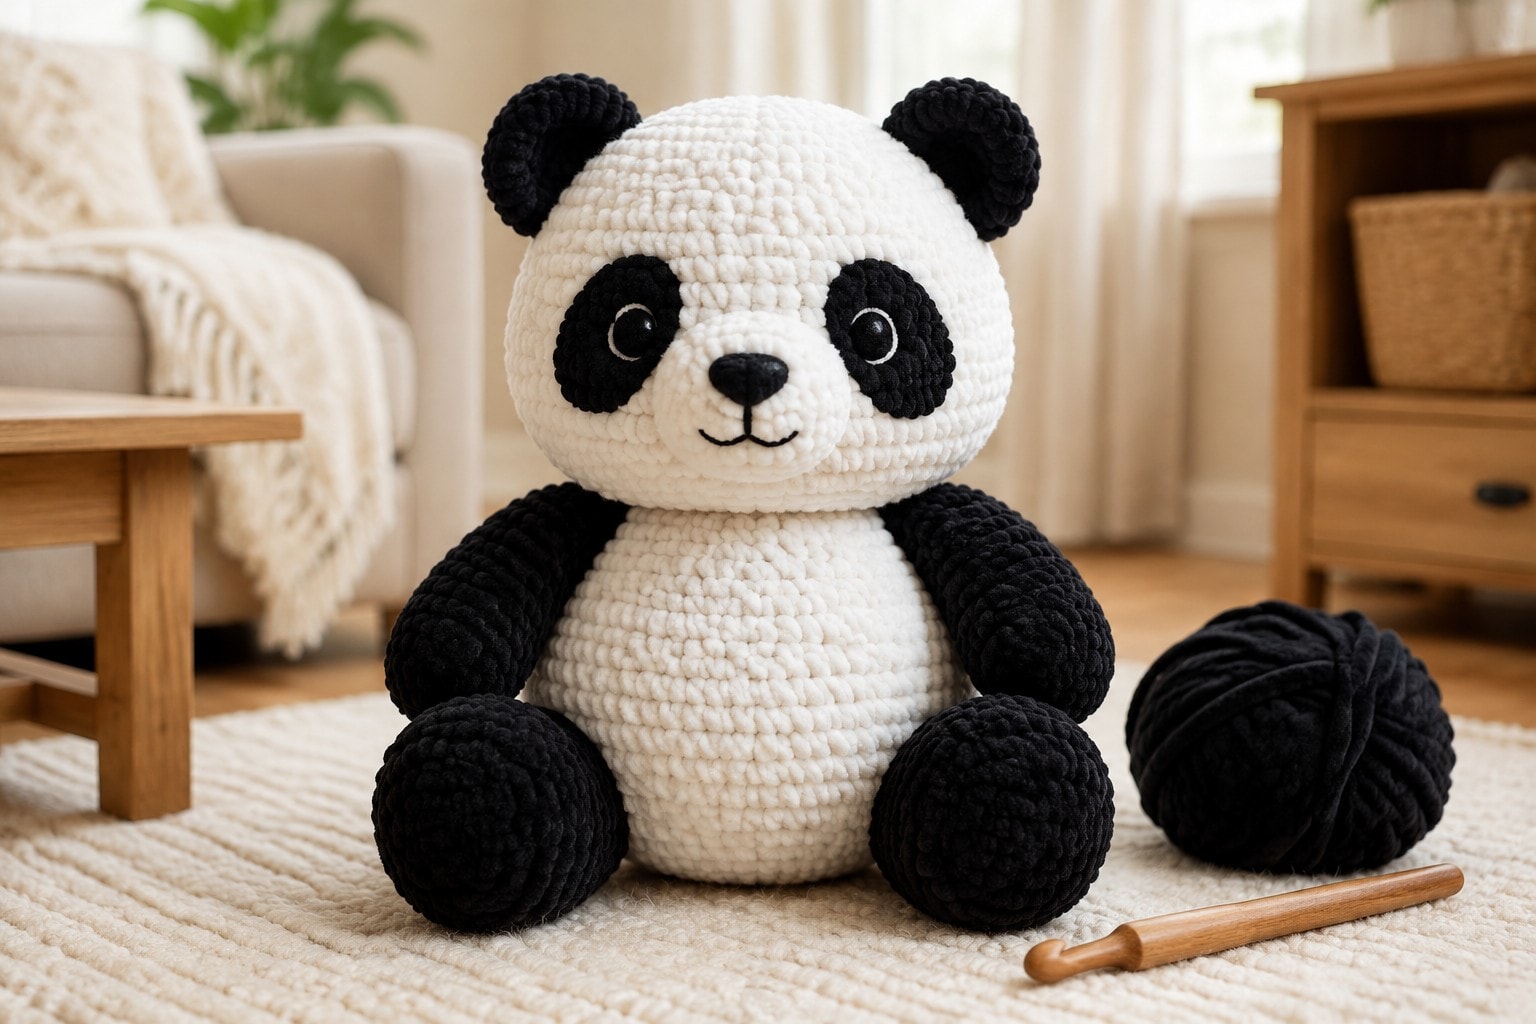
This giant crochet panda plush is worked as one continuous head-and-body shape in super-bulky yarn, then finished with four simple black limbs, ears, eye patches, and embroidered facial details. The joined main shape means there is no heavy neck seam to support once the panda is stuffed.
The pattern is written for a seated panda about 18 in / 46 cm tall at the stated gauge. The oversized fabric needs deliberate stuffing and secure assembly, so each shaping change has a stitch-count checkpoint and the face uses yarn embroidery instead of loose plastic parts.
Why you’ll love this pattern
- The head, neck, and body are one piece, so the plush stays stable when picked up by its head or body.
- Super-bulky yarn makes a truly oversized panda without changing the pattern math.
- The black eye patches, ears, paws, and embroidered face give the panda its classic look without fussy colorwork in the main body.
- The written counts make it easy to stop, check your round, and resume a large project over several sittings.
Instructions
- 1
Choose yarn by weight and swatch before beginning. This pattern uses CYC 6 super-bulky yarn; with the stated hook, 8 sc x 8 rnds should measure about 4 in / 10 cm. Crochet 4 rounds of the head start, measure its diameter, and change hooks if the fabric has visible gaps or feels so tight that the hook is painful to use. Keep one stitch marker in the first stitch of every round and work the entire panda in a continuous spiral.
- 224 sts
Head and body, with white: Rnd 1: Make an MR and work 6 sc into the ring. (6 sts) Pull the ring firmly closed; a loose center is very noticeable once the oversized head is stuffed. Rnd 2: inc x6. (12 sts) Rnd 3: (sc, inc) x6. (18 sts) Rnd 4: (2 sc, inc) x6.
- 3
Rnd 5: (3 sc, inc) x6. (30 sts) Rnd 6: (4 sc, inc) x6. (36 sts) Rnd 7: (5 sc, inc) x6. (42 sts) Rnd 8: (6 sc, inc) x6. (48 sts) Rnd 9: (7 sc, inc) x6. (54 sts) Rnd 10: (8 sc, inc) x6. (60 sts). The circle should lie flat; a ruffle means an increase was added twice, while a tight bowl means one was missed.
- 4
Rnds 11–18: sc in every st around. (60 sts per rnd) This straight section is the full width of the head. Place a removable marker on the front, opposite the round marker at the back; it will keep the face parts centered later.
- 5
Shape the lower head: Rnd 19: (8 sc, dec) x6. (54 sts) Rnd 20: (7 sc, dec) x6. (48 sts) Rnd 21: sc around. (48 sts) Rnd 22: (6 sc, dec) x6. (42 sts) Rnd 23: (5 sc, dec) x6. (36 sts) Rnd 24: (4 sc, dec) x6. (30 sts) Rnd 25: sc around. (30 sts). Begin stuffing the head now, pushing small handfuls out to the crown and sides instead of packing one hard ball in the center.
- 6
Make the neck: Rnd 26: (3 sc, dec) x6. (24 sts) Rnd 27: sc around. (24 sts). The neck is deliberately narrow, but not pinched. Squeeze the stuffed head after Rnd 27: it should keep its round outline while still yielding when pressed. Add stuffing before the opening gets smaller.
- 7
Widen for the body: Rnd 28: (3 sc, inc) x6. (30 sts) Rnd 29: (4 sc, inc) x6. (36 sts) Rnd 30: (5 sc, inc) x6. (42 sts) Rnd 31: (6 sc, inc) x6. (48 sts) Rnd 32: (7 sc, inc) x6. (54 sts) Rnd 33: (8 sc, inc) x6. (60 sts). Check that the front marker still falls in the center; if it has drifted, move it before the body gets tall.
- 8
Rnds 34–42: sc in every st around. (60 sts per rnd) This makes the panda's generous body. Stuff every second round, concentrating filling along the outside first. A large plush is better with many light layers of fibrefill than with a hard center and loose outer walls.
- 9
Shape and close the body: Rnd 43: (8 sc, dec) x6. (54 sts) Rnd 44: sc around. (54 sts) Rnd 45: (7 sc, dec) x6. (48 sts) Rnd 46: (6 sc, dec) x6. (42 sts) Rnd 47: (5 sc, dec) x6. (36 sts) Rnd 48: (4 sc, dec) x6. (30 sts) Rnd 49: (3 sc, dec) x6. (24 sts). Finish stuffing, especially the lower front where the legs will sit. Rnd 50: (2 sc, dec) x6. (18 sts) Rnd 51: (sc, dec) x6. (12 sts) Rnd 52: dec x6. (6 sts). Cut a 12 in / 30 cm tail, weave it through the front loops of the final 6 sts, pull shut, and bury the end through the body.
- 10
Ears, make 2 with black: Rnd 1: 6 sc in an MR. (6 sts) Rnd 2: inc x6. (12 sts) Rnd 3: (sc, inc) x6. (18 sts) Rnds 4–5: sc around. (18 sts per rnd) Fasten off, leaving a 12 in / 30 cm tail. Do not stuff. Flatten each cup with the seam at its bottom edge; the flat ear is lighter and easier to sew securely than a stuffed ball.
- 11
Eye patches, make 2 with black: Ch 8. Rnd 1: sc in the second ch from hook and in the next 5 ch, 3 sc in the last ch; rotate and work 5 sc along the underside of the foundation chain. (14 sts) Rnd 2: inc, 5 sc, inc x3, 5 sc, inc. (20 sts) Sl st to the first st, fasten off, and leave a sewing tail. The small oval intentionally sits on a diagonal so the finished face does not look like a pair of flat circles.
- 12
Muzzle, with white: Ch 9. Rnd 1: sc in the second ch from hook and in the next 6 ch, 3 sc in the last ch; rotate and work 6 sc along the underside. (16 sts) Rnd 2: inc, 6 sc, inc x3, 6 sc, inc. (22 sts) Sl st to join, fasten off, and leave a sewing tail. This low oval fills the lower face without hiding the eye patches.
- 13
Arms, make 2 with black: Rnd 1: 6 sc in an MR. (6 sts) Rnd 2: inc x6. (12 sts) Rnd 3: (sc, inc) x6. (18 sts) Rnds 4–11: sc around. (18 sts per rnd) Rnd 12: (sc, dec) x6. (12 sts). Stuff only the rounded paw end. Flatten the opening, work 6 sc across to close, fasten off with a long sewing tail. Leaving the arm tube unstuffed lets it hang softly instead of sticking rigidly out.
- 14
Legs, make 2 with black: Rnd 1: 6 sc in an MR. (6 sts) Rnd 2: inc x6. (12 sts) Rnd 3: (sc, inc) x6. (18 sts) Rnd 4: (2 sc, inc) x6. (24 sts) Rnds 5–8: sc around. (24 sts per rnd) Rnd 9: (2 sc, dec) x6. (18 sts) Rnds 10–12: sc around. (18 sts per rnd) Stuff firmly. Flatten the opening, work 9 sc across to close, and leave a long sewing tail.
- 15
Assembly: pin everything before sewing. Put the ears at the top of the head around Rnds 6–9, roughly 16 stitches apart, with the flat edge tucked slightly under. Angle the eye patches down toward the center, between Rnds 10–15, then center the muzzle below them over Rnds 15–18. Pin the arms at the outer neck/body join around Rnd 30, and pin the legs to the lower front around Rnds 43–47 so the panda sits with its feet forward. Sew every part with small whip stitches through both loops, going all the way around twice. For a decorative plush that will be handled often, repeat the second pass with matching sewing thread.
- 16
Embroider the face after assembly. With black worsted yarn, make a small horizontal satin-stitched oval on the top of the muzzle for the nose, then take one straight stitch down and two short angled stitches for the mouth. Embroider a small black oval eye in the upper inner area of each black patch with three or four parallel stitches. Pull each stitch only until it sits against the pile; a tight pull dents chenille. Weave the ends through the head in two directions and trim them deep inside.
- 17
Final finish and safety: give the panda a firm shake, then re-check each sewn join and the closure at the base of the body. This pattern uses embroidered features so it avoids detachable eyes or noses; remove the plush from use if a seam opens or stuffing becomes visible. It is a handmade decorative item, not a certified toy. For a child under 3, do not add safety eyes, buttons, pellets, wire, or any removable accessory, and supervise use.
Tips for success
- Use a rounded hook tip and put your stitch marker directly through the first stitch, not around the yarn. On chenille, the marker is more reliable than trying to see the stitch V.
- Stuff the head before the neck is reduced to 24 stitches and the body before the closing rounds. If you wait until the hole is small, you will create lumps instead of an even shape.
- For a giant plush that slumps forward, the cause is usually under-stuffing at the lower front, not the legs. Open the body closure carefully, add filling to the bottom third, and close it again.
- Do not machine wash a large stuffed chenille panda. Spot clean the surface with a damp cloth, press it in a towel, and air dry completely before reshaping the pile with your fingers.
Pattern at a glance
- Time to make
- A long weekend or four to five evenings
- Skill level
- Easy
- Hook
- 6.5 mm (K/10½)
- Yarn weight
- Super bulky chenille / blanket yarn (CYC 6)CYC standard
- Yardage
- About 250 yd / 230 m white and 110 yd / 100 m black
- Gauge
- 8 sc x 8 rnds = 4 in / 10 cm in single crochet, worked in continuous rounds
- Finished size
- About 18 in / 46 cm tall seated at the stated gauge
Free ebook
Get new patterns, and the ebook
New patterns as they land, plus our free beginner's crochet stitch guide. No daily blasts, unsubscribe in one click.
Frequently Asked Questions
What yarn should I use for a giant crochet panda?
Use a smooth super-bulky CYC 6 chenille or blanket yarn in white and black, keeping both colors in the same brand when possible. Matching pile length and stretch matters more than the fiber name. A bulky CYC 5 yarn will make the same pattern smaller; the stitch counts do not change, but the finished size and yardage do.
How big is this chunky yarn crochet panda?
At 8 sc x 8 rnds over 4 in / 10 cm in super-bulky yarn, it sits about 18 in / 46 cm tall. Your size follows your gauge and yarn thickness. Work through Rnd 10 and measure the head start before committing; a smaller measurement makes a smaller finished panda.
Why is my giant panda floppy?
A large plush goes floppy when the body is under-stuffed, especially at the lower front and outer edge. Add fibrefill in thin layers as the tube grows, pressing each layer outward before adding the next. The legs should support a well-filled body, not compensate for an empty base.
Can I use safety eyes on the panda?
You can use them on a decorative plush for older children and adults, placing them through the eye patches before sewing the patches on. For a child under 3, use the embroidered eyes in this pattern instead. A handmade plush is not automatically a tested or certified toy, so inspect seams and filling regularly.