Amigurumi
Crochet Panda With Bamboo Pattern
By Looplader · Tested row by row · Updated
- Skill
- Easy
- Hook
- 3.25 mm (D/3)
- Yarn
- Worsted (CYC 4)
- Time
- One to two relaxed afternoons
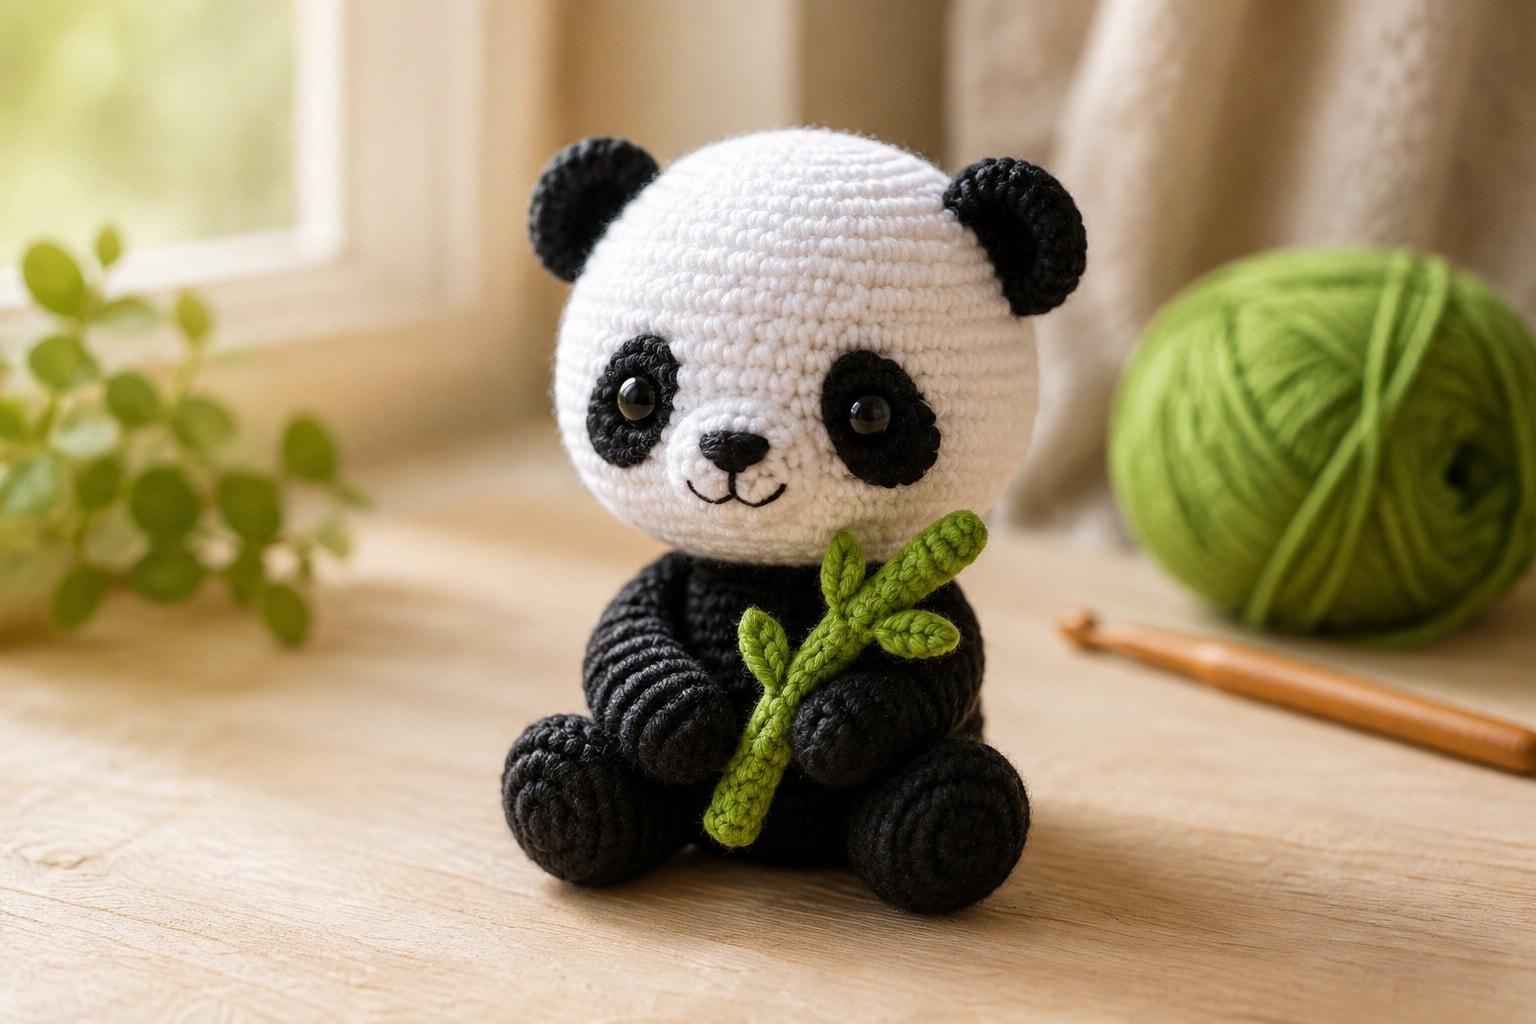
This crochet panda with bamboo is a small, fully three-dimensional amigurumi made from a round white head, a pear-shaped black body, four simple sewn-on limbs, crocheted eye patches, and a flat removable bamboo sprig. The body is worked in one continuous spiral; the contrast pieces are made separately so the face stays crisp without complicated color changes.
The counts below use US crochet terms and are deliberately written one round at a time. Work tightly, mark the first stitch of every round, and use the placement checkpoints before attaching anything: that is what keeps a round panda face and a bamboo-hugging pose from drifting to one side.
Why you’ll love this pattern
- The white head has no stranded black yarn, so its surface stays clean and smooth.
- Every shaping round includes a stitch count for easy error checking.
- The bamboo is a separate flat accessory, making the panda easier to pose and display.
- Embroidered facial details make the finished toy a better choice for makers avoiding loose small parts.
Instructions
- 1
Read through the whole pattern before beginning. Work the panda head and body in continuous spiral rounds; do not join or chain between rounds. Put a locking marker in the first stitch of each round and move it up as you work. At your normal tension, the first 6 head rounds should make a shallow cup with no visible gaps; switch to a smaller hook before continuing if the stuffing will show through.
- 236 sts
Head, with white: Rnd 1: Make an MR and work 6 sc into the ring. Pull the tail firmly to close the center. (6 sts) Rnd 2: inc in every st. (12 sts) Rnd 3: (sc, inc) x6. (18 sts) Rnd 4: (2 sc, inc) x6. (24 sts) Rnd 5: (3 sc, inc) x6. (30 sts) Rnd 6: (4 sc, inc) x6.
- 3
Rnd 7–12: sc in every st. (36 sts per rnd) Pause after Rnd 12 and flatten the open head gently: the marker is the back, and the opposite side is the face. Do not place eyes yet; the black patches go on after the head is closed, which gives you more control over their spacing.
- 4
Rnd 13: (4 sc, dec) x6. (30 sts) Rnd 14: (3 sc, dec) x6. (24 sts) Rnd 15: (2 sc, dec) x6. (18 sts) Add fiberfill a pinch at a time and press it outward to the sides; the head should be firm but the stitches must not stretch. Rnd 16: (sc, dec) x6. (12 sts) Rnd 17: dec x6. (6 sts) Cut the yarn, weave the tail through the front loops of the final 6 stitches, pull closed, and bury the tail inside the head.
- 5
Body, with black: Rnd 1: MR, 6 sc. (6 sts) Rnd 2: inc x6. (12 sts) Rnd 3: (sc, inc) x6. (18 sts) Rnd 4: (2 sc, inc) x6. (24 sts) Rnds 5–7: sc in every st. (24 sts per rnd) Rnd 8: (2 sc, dec) x6. (18 sts) Rnds 9–10: sc in every st. (18 sts per rnd) Rnd 11: (sc, dec) x6. (12 sts). Stuff firmly, then Rnd 12: dec x6. (6 sts). Close exactly as for the head, leaving a short tail for weaving in.
- 6
Ears, make 2 with black: Rnd 1: MR, 6 sc. (6 sts) Rnd 2: inc x6. (12 sts) Rnd 3: sc in every st. (12 sts). Sl st, fasten off with a 10 in sewing tail, and flatten the circle into a soft half-moon. Arms, make 2 with black: Rnd 1: MR, 6 sc. (6 sts) Rnds 2–5: sc in every st. (6 sts per rnd). Flatten each tube, then sc through both layers across 3 stitches to close its end. Legs, make 2 with black: Rnd 1: MR, 6 sc. (6 sts) Rnd 2: inc x6. (12 sts) Rnds 3–5: sc in every st. (12 sts per rnd). Lightly stuff, flatten the opening, and sc through both layers across 6 stitches. Leave 10 in tails on all four limbs.
- 7
Eye patches, make 2 with black: Ch 6. Rnd 1: starting in the second ch from hook, sc in the next 4 ch, 3 sc in the last ch; working along the underside, sc in the next 3 ch, 2 sc in the last ch. (12 sts) Rnd 2: sc in the next 4 sts, inc in each of the next 3 sts, sc in the next 3 sts, inc in each of the last 2 sts. (17 sts) Sl st to the first st, fasten off with a sewing tail. Shape each oval with your fingers. If using safety eyes, insert one through the lower inner third of each patch before sewing; otherwise embroider small satin-stitch eyes after the patches are attached.
- 8
Bamboo stalk, with medium green: Ch 22. Row 1: starting in the second ch from hook, sc across. (21 sts) Ch 1 and turn. Row 2: sc across. (21 sts) Fasten off, leaving a 6 in tail. With dark green, embroider two short horizontal running-stitch bands across the stalk to suggest nodes. Leaf, make 2 with medium green: Ch 10; sl st in second ch from hook, sc in next 2 ch, hdc in next 2 ch, dc in next 2 ch, 5 dc in last ch. Working down the underside, dc in next 2 ch, hdc in next 2 ch, sc in next 2 ch, sl st in last ch. Fasten off and sew both leaves to the upper third of the stalk, angled away from one another.
- 9
Assembly: pin the ears to the head at Rnds 4–6, about 8 stitches apart across the crown. Sew around each ear base twice. Pin the eye patches with their inner lower corners about 4 stitches apart and their upper edges below the ears; sew only around the outer edge so they remain slightly dimensional. Embroider a small triangle nose centered between them, then one short vertical line and a shallow U-shaped mouth. Sew the head to the body with the face centered over the narrowest part of the body; make two complete passes around the neck. Sew legs at the front bottom of the body, angled outward. Sew arms at the upper sides and tack each wrist lightly to the bamboo so the stalk can still slide out. Weave in every tail. The finished panda is about 5 1/2 in / 14 cm tall at this yarn and tension; substitute yarn changes the size, not the stitch counts.
Tips for success
- For the neatest head, use invisible decreases rather than a standard sc2tog; the front-loop decrease keeps the closing rounds from opening up around the stuffing.
- Pin both eye patches and both ears before sewing a single stitch. Look at the face from arm's length, then adjust until the white space around each patch matches.
- If the bamboo bends too much, work the stalk with a hook 0.5 mm smaller or add a second single-crochet row; do not add wire to a toy intended for a child.
- For a young child, embroider the eyes and nose and keep the bamboo as a supervised decorative accessory. Loose small components can be a choking risk.
Pattern at a glance
- Time to make
- One to two relaxed afternoons
- Skill level
- Easy
- Hook
- 3.25 mm (D/3)
- Yarn weight
- Worsted (CYC 4)CYC standard
- Yardage
- ~45 yd white, 30 yd black, 8 yd medium green, and 2 yd dark green
- Gauge
- Not critical — use a dense fabric with no visible stuffing; after 6 head rounds, check for a firm shallow cup
- Finished size
- About 5 1/2 in / 14 cm tall at the stated yarn and tension
Free ebook
Get new patterns, and the ebook
New patterns as they land, plus our free beginner's crochet stitch guide. No daily blasts, unsubscribe in one click.
Frequently Asked Questions
Why is my panda head turning into a cone instead of a ball?
A cone means the increase rounds were missed or placed unevenly. Check that Rnds 2–6 finish at 12, 18, 24, 30, and 36 stitches. The seven straight rounds after that create the head's depth; do not omit them.
Can I use blanket yarn for this panda?
Yes, but it produces a much larger panda and hides stitch definition. Keep the same counts, use a hook that makes an opaque fabric, and embroider the face because safety-eye washers can be difficult to secure in plush yarn.
How do I stop the eye patches from looking uneven?
The oval patches are intentionally identical; the usual problem is placement, not crochet. Pin their inner lower corners first, leave a visible strip of white between patch and ear, and compare the face straight on before sewing.
Is this panda safe for a baby?
Use embroidered facial features rather than safety eyes, avoid wire, and treat the bamboo as a removable decorative part. Handmade items intended for children need material choices and testing appropriate to their age and use.