Amigurumi · Mixed construction
Pumpkin Cat Crochet: An Illustrated Amigurumi Guide
By Looplader · Project guide · Updated
- Skill
- Intermediate
- Hook
- Select with a small stuffed swatch for firm, flexible fabric.
- Yarn
- Smooth medium / worsted cotton, using compatible colours
- Time
- Work in separate sessions for the kitten, shell and hat, then assembly; total making time has not been measured.
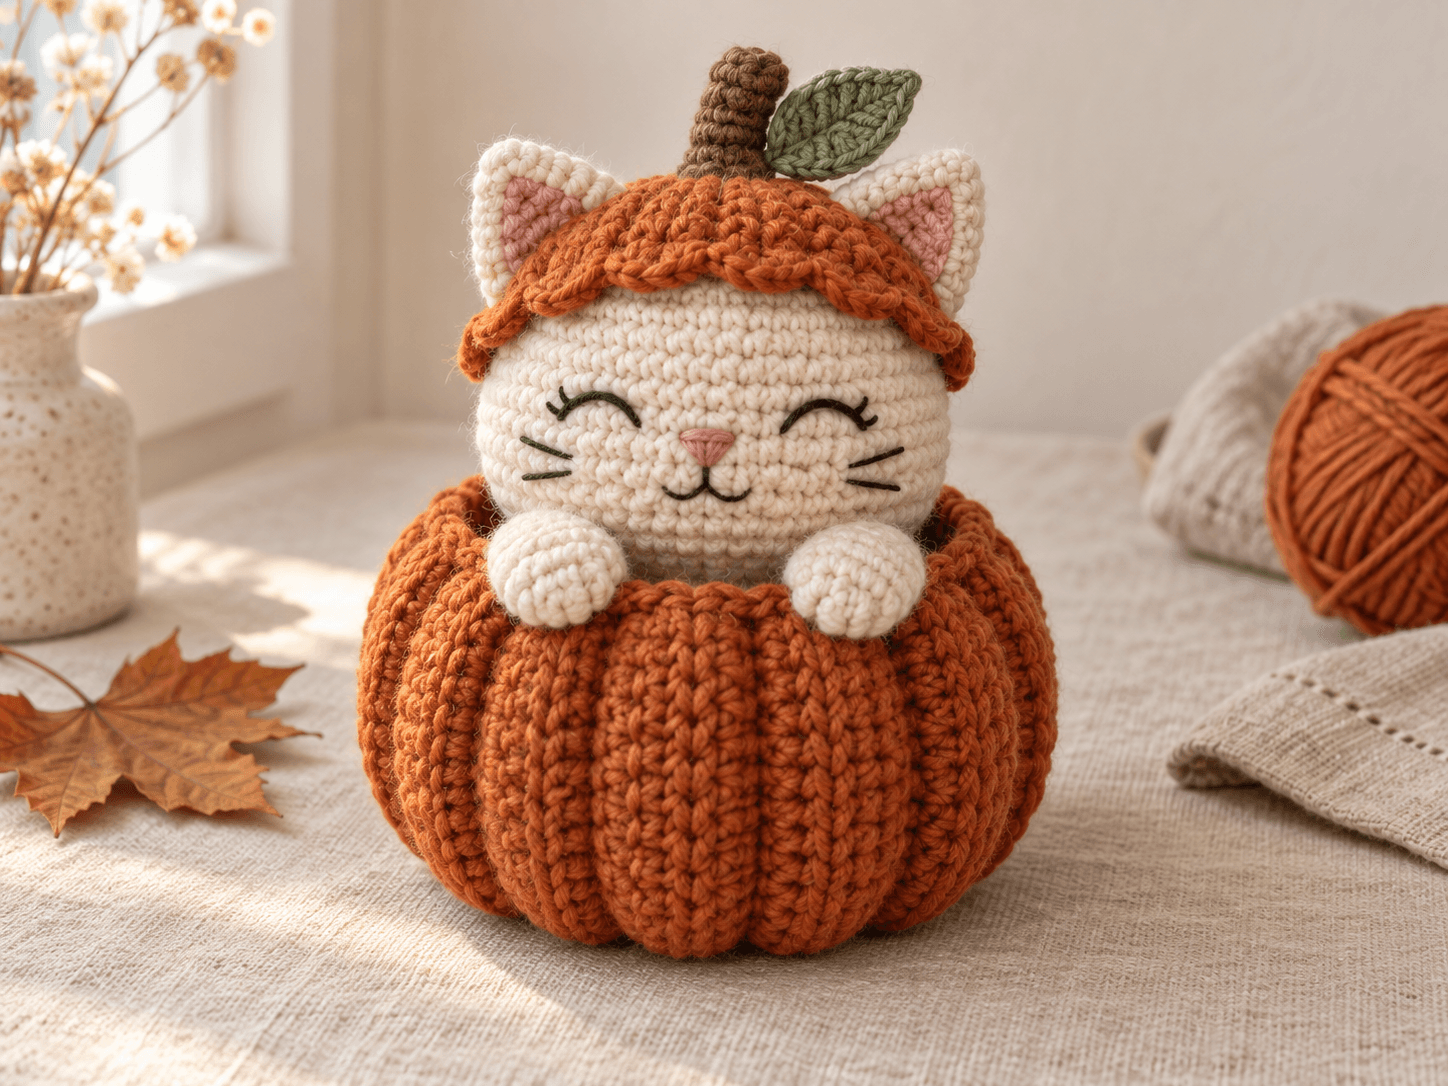
A pumpkin cat amigurumi combines a small crocheted kitten with an orange pumpkin-shaped shell and a matching stemmed hat. This guide breaks the project into separate parts, explains how they fit together, and shows the stages where shaping and placement matter most.
Our version uses a cream kitten with embroidered sleepy eyes, a rust-orange ribbed shell, two little paws on the rim and a shallow pumpkin cap with a brown stem and sage leaf. This illustrated construction guide explains the individual pieces, fit decisions and assembly sequence. Use the illustrations as shape and placement references.
Pattern, Pinterest & resources
- Craft Yarn Council: yarn weight system
Standard yarn categories and guidance on the limits of generic hook and gauge ranges.
- Craft Yarn Council: US crochet abbreviations
Terminology used in this guide, including single crochet and back-loop-only work.
- PlanetJune: invisible decreases
Technique reference for single crochet worked in unturned rounds; includes limitations for fabric visible on both sides.
- PlanetJune: amigurumi troubleshooting
Help with stitch markers, loop selection, round counts and visible gaps.
- Lion Brand: 24/7 Cotton yarn specifications
One manufacturer example of medium-weight cotton. Its published gauge and care refer to that yarn, not this assembled project.
- Amy Gaines: Cat in a Pumpkin
An independently authored pattern option for readers seeking complete instructions; this guide does not reproduce it.
- The Mary Jay: Salem the Hat-Topped Kitty
A separate designer's cat-and-removable-hats concept, included as further reading.
What this project includes
- The kitten body is closed and stuffed separately, so the open pumpkin shell needs no loose filling.
- The shell is fitted around the finished kitten rather than relying on a universal opening size.
- Embroidered eyes and nose give the face its expression without plastic eye hardware.
- The hat is checked against both ears before its stem and leaf are sewn on.
Detailed project guide
- 1
Understand the parts before picking up your hook
Plan a closed kitten body with a separate rounded head, two triangular ears and two short front paws. The lower body sits inside an unstuffed pumpkin shell. A shallow cap rests between the ears, while a short stem and one leaf finish the silhouette. A tail is optional and is omitted here so it cannot push the kitten forward inside the shell.
Draw the pieces as simple shapes and mark the intended front. The visible head must sit above the rim, the paws must reach it, and the shell must be wide enough to support the head. In this design the pumpkin is clothing around the kitten, not a second stuffed body. Keeping that distinction clear avoids a common assembly problem: a full pumpkin with no room left for its occupant.
- 2
Choose yarn for readable stitches and check both fabrics
Smooth yarn makes the stitches, facial placement and orange ribs easier to see. Use compatible cream and orange yarns; two balls bearing the same weight category can still make different-sized fabric. Craft Yarn Council places worsted yarn in category 4 and describes its hook and gauge ranges as guidelines. Choose the hook by the firmness and flexibility of your own swatch.
Make a plain single-crochet sample and a separate sample of single crochet worked through the back loops in turned rows. Check the plain fabric with a little filling behind it: the stuffing should not visibly push through. Check that the ribbed fabric bends around a curved shape without becoming stiff. Record the hook and relaxed measurements for each. If the hook is painful to insert, change the hook or yarn rather than forcing unusually tight stitches.
- 3
Plan the head and body as a matched pair
For the kitten, the broad shaping sequence is expansion, an even section and gradual narrowing. Expansion makes the head wider; additional even rounds add depth. The body needs a flatter sitting area and a narrower neck so that the head has a defined attachment point. Decide the proportions in a sample before choosing the shell dimensions.
Use a marker at the beginning of every continuous round and move it as you go. An increase as defined here adds one stitch to the total, while a decrease removes one. For any shaping round, the expected total is the previous total plus increases minus decreases. That arithmetic can catch a counting mistake, but it cannot establish whether a head is proportionate. Write down the actual sample counts and check its shape from the side as well as the front.
- 4
Stuff the kitten gradually and close the openings
Add filling in small amounts while you can still reach the inside. Shape the cheeks with your fingers and check that neither side is noticeably fuller. A head that feels hard while its stitches stretch apart needs less filling or denser fabric; pulling the closing yarn tighter will not solve gaps over the whole head.
For the intended unturned single-crochet rounds, an invisible decrease is an option for a less conspicuous narrowing section. PlanetJune explains that this technique leaves unused loops on the reverse, so it is less suitable for turned fabric or parts whose two sides remain visible. Keep that technique choice separate from the ribbed shell. Secure the head and body openings, leaving sufficient yarn for the planned seams. All filling should remain enclosed within the cream kitten parts.
- 5
Place the face, ears and paws before sewing
Mark the front centre of the head with a removable thread. Position two short curved embroidered eyes at the same height, then a small pink nose beneath their midpoint. Add a short mouth and short stitched whiskers. Work a few stitches at a time and look from the front; a tight embroidery thread can dent the head or pull an eye out of alignment.
Match the ears by folding one against the other before attachment. Pin or baste them symmetrically and check the hat space between them. Leave the ears unstuffed or only lightly shaped so their bases can sit against the head. Make a matched pair of short paws, with softer upper ends for sewing. Keep both paws temporarily attached until the pumpkin rim is present; otherwise they may end above it or disappear inside it.
- 6
Measure the stuffed body for a ribbed pumpkin shell
Measure around the widest part of the stuffed body without compressing it. Separately measure from the intended rim down to the sitting surface. The first measurement guides the shell circumference; the second helps plan its height, including the fabric drawn underneath to close the base. The crown of the kitten's head and most of the face should remain above the rim.
This shell starts as a rectangle of back-loop single crochet worked in turned rows. Orient it so the raised ridges run from the eventual rim toward the base. The foundation direction sets the shell's height; the accumulated rows wrap around the kitten. Count the same working stitches on each row and treat the turning chain consistently. Fit the rectangle around the actual body with clips or basting before deciding its final row total. Allow for the joining seam and a little clearance, checking that the body still enters without distorting the ribs.
The tape measure in the illustration shows the measuring setup only; its markings are not the project dimensions. Use measurements from your own stuffed kitten.
- 7
Join the shell and gather only the bottom
Join the two short ends of the ribbed rectangle to form an open tube. Align the foundation and final row so that the join does not twist the ribs. Put the seam at the intended back. Run a gathering strand through the lower edge, drawing it in gradually until the base closes. Secure and bury the strand. Leave the upper edge open for the kitten.
A gathered base creates a soft bowl rather than a rigid basket. Test it on a flat surface and redistribute the gathered folds if it rocks. The back-loop ridges supply the vertical texture; they do not automatically produce the deep lobes of a firmly stuffed pumpkin. Keep the illustration's ribbed-shell concept distinct from a sculpted closed pumpkin. Do not pack loose filling into this open shell to imitate deeper lobes.
- 8
Test the kitten inside the shell and set the paws
Place the closed kitten body into the shell, then baste the head onto its neck. Check the silhouette from eye level. If the rim reaches the chin, reduce the shell height in the next sample. If the shell stretches horizontally and flattens its ribs, increase its circumference. If the kitten tips forward, check head placement and the gathered base before changing the stuffing.
Drape both paws over the front rim and compare their heights. Attach the upper paw ends to the body using small secure stitches. For a fixed display piece, discreet tacks between the body and the inner shell can prevent rotation. For a removable kitten, omit those tacks and test that the paws lift clear when it is removed. Complete the head-to-body seam after this positioning check. A rim should not be the only thing holding the head upright.
- 9
Fit a shallow pumpkin cap between the ears
Build the hat as a separate shallow orange crown, starting from its centre and expanding to cover the top of the finished head. Compare the crown with the actual head before adding depth. A cap that is too wide may slide over the face; one that is too narrow may perch awkwardly or press the ears outward. Both faults should be corrected before adding a decorative edge.
For this concept, the ears remain outside the hat and the brim rests above the embroidered eyes. A modest scalloped edge can echo a pumpkin top, but its repeat must fit the actual edge count. Mark equal sections first; do not force an extra partial repeat into the final gap. The stem and leaf add weight, so check the cap again after attaching them. No ear slots are assumed in this version.
- 10
Finish the stem and leaf, then assemble
Keep the stem short and light. A small brown crocheted tube can be attached at its base with stitches spread around its circumference, which reduces leaning. Position one sage leaf beside it and stitch the leaf base securely through the crown. Skip wire, glue and a long dangling vine for this simple display concept.
Put the hat on the assembled kitten and confirm that both ears, the eyes and both paws are visible. If the hat is decorative and meant to stay put, add discreet stitches to the head only after its position is settled. If it will remain removable, lift and replace it several times to check that it rests naturally. Weave in every end and remove all placement pins and basting that are no longer needed.
- 11
Troubleshoot shape before adding more decoration
A head that looks pear-shaped usually needs its widening, even and narrowing sections rebalanced; embroidery will not change that profile. A crooked face should be corrected before the hat is fixed in place. A shell that collapses may be too wide for the kitten or made with fabric too loose to support the intended shape. A tight top edge may come from a firm finishing round even when the shell itself fits.
Compare the two ears and paws before blaming the assembly. Differences in stuffing, yarn tension or seam tension can create asymmetry even when the counts match. Make one change at a time and keep notes. When a rim flares after edging, undo that edging and reassess its stitch spacing rather than adding a tighter round over an already distorted edge.
- 12
Care, display and what to record from a test make
Treat this version as seasonal display decor. The care of the finished piece depends on every material, including filling and embroidery thread. Check all labels and test the orange yarn for colour transfer on a damp white cloth before wetting an assembled cream-and-orange project. A yarn labelled machine washable does not by itself establish the washability of the assembled object. Reshape gently and allow the filling to dry fully after cleaning.
Before turning the concept into a complete written pattern, record hook sizes, gauges, every row and round total, colour changes, seam positions, stuffed dimensions and yarn usage for each part. Have another maker follow those instructions and document corrections. Readers who need a complete designer-authored pattern now can use the independently authored options linked below; their instructions and finished sizes belong to their own designs.
Tips for success
- Fit the shell to the stuffed body; an unstuffed crochet tube has different dimensions.
- Use contrasting removable thread to mark the head's front centre before embroidering.
- Baste the paws with the kitten already in the shell so their length and placement work together.
- Check hat fit after adding the stem and leaf, because their weight can change how the cap rests.
Pattern at a glance
- Time to make
- Work in separate sessions for the kitten, shell and hat, then assembly; total making time has not been measured.
- Skill level
- Intermediate
- Hook
- Select with a small stuffed swatch for firm, flexible fabric.
- Yarn weight
- Smooth medium / worsted cotton, using compatible coloursCYC standard
- Yardage
- Not measured. Weigh yarn before and after making each component.
- Gauge
- Record stitches and rows per 10 cm in both plain single crochet and back-loop ribbing; fit the shell around the actual stuffed kitten.
- Finished size
- Varies with yarn, gauge and the proportions you choose.
Free ebook
Get new patterns, and the ebook
New patterns as they land, plus our free beginner's crochet stitch guide. No daily blasts, unsubscribe in one click.
Frequently Asked Questions
Is this a complete pumpkin cat crochet pattern?
This is a detailed construction guide covering the pieces, fit decisions, assembly sequence and common problems. Measure your work and record counts and yarn usage as you go. For complete stitch-by-stitch instructions, see the separate designer-authored patterns linked in the resources.
Can I use plush chenille instead of cotton?
You can explore it in a new sample, but it is not a direct substitution. Its texture can hide the small facial and ribbing details, and its thickness changes the shell opening and hat fit. Use the same fibre range for related parts and recheck each fit with the stuffed pieces.
How does the kitten stay inside the pumpkin?
The closed stuffed body rests in an open shell with a gathered bottom. A fixed display version can have discreet tacking stitches from the body to the inside of the shell. A removable version needs enough clearance to lift out, with paws positioned so they do not lock over the rim.
Why does my pumpkin look ribbed rather than deeply segmented?
Back-loop rows create surface ridges; they do not create the deep sculpted lobes of a closed stuffed pumpkin. This version deliberately uses a ribbed open shell around the kitten. Stronger segmentation would need a separately developed structure and additional fit testing rather than more loose stuffing inside the opening.