Accessories · Joined motifs
Autumn Granny Square Scarf: Colour, Joining & Sizing Guide
By Looplader · Project guide · Updated
- Skill
- Easy
- Hook
- Choose by the selected pattern's gauge and your sample
- Yarn
- Light / DK for the illustrated concept; follow your chosen pattern
- Time
- Plan separate sessions for sampling, motifs, joining and finishing; duration depends on your pattern and scarf length.
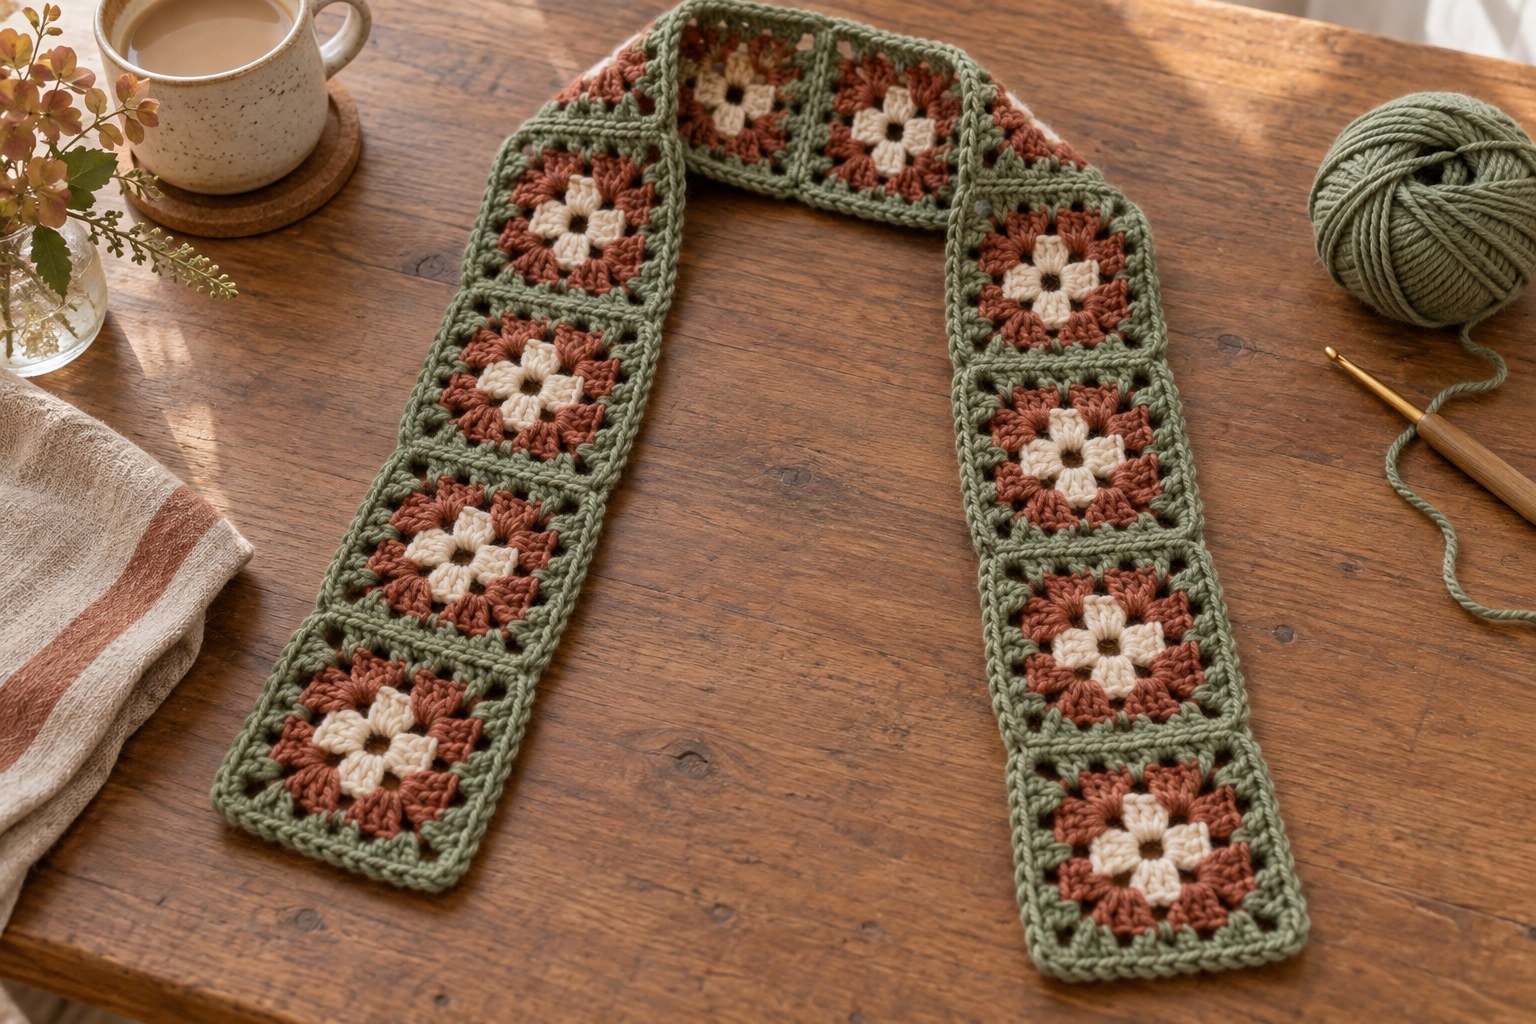
A granny square scarf is made by joining crochet motifs into a long strip, then finishing the outside edges. This autumn version pairs cream centres with muted rust and sage, using a narrow, one-square-wide layout that lets the repeating shapes show against a plain coat.
This project guide takes you from the first square to a wearable scarf, covering colour, gauge, joining and finishing. Use a complete motif-and-scarf pattern for stitch instructions and the illustrations for a visual overview. Measurements below are labelled planning examples.
Pattern, Pinterest & resources
- KnitPro: autumn 2026 crochet trends
Current trend context, published 21 September 2026; not search-volume data.
- I Like Crochet: October 2026 issue
Current issue includes a granny scarf; individual patterns may require membership.
- Craft Yarn Council: yarn-weight system
Yarn categories and general gauge guidance.
- Craft Yarn Council: crochet terminology
Abbreviations and US/UK term differences.
- Craft Yarn Council: checking crochet gauge
Swatching and hook adjustment reference (PDF).
- Lion Brand: blocking methods
Choose finishing methods that suit the yarn and fibre.
- Yarnspirations: Patons Granny Square Scarf
Free complete scarf-pattern download; uses a different yarn and includes fringe.
- Simply Hooked by Janet: Skinny Granny Square V Scarf
Independent shaped scarf pattern using join-as-you-go; a different design from these illustrations.
- Hobbycraft: Autumn Granny Square Scarf
Independent motif-and-stripe scarf pattern in UK terms; a different design.
- Looplader: crochet bandana guide
A related guide to a smaller triangular accessory.
- Looplader: hook and yarn converter
Hook-size and yarn-weight reference.
What this project includes
- Six process illustrations covering the sample, foundation, layout, seam, border and blocking.
- A sizing method that accounts for the joins and edging instead of multiplying a square measurement blindly.
- A restrained sage, cream and rust palette with one consistent colour around every motif.
- Troubleshooting checkpoints before a small tension problem repeats along the whole scarf.
Detailed project guide
- 1
Why a granny-square scarf makes sense this autumn
Granny-square fashion is a current editorial trend, not just a nostalgic project idea. KnitPro's 21 September 2026 autumn report includes granny squares among the season's crochet directions. I Like Crochet's October 2026 issue also includes a granny tassel scarf. Those are recent, identifiable signals for the topic; they do not establish search-volume growth or prove that any particular scarf will be popular.
For this guide, the design decision is a slim strip with quiet green edges and warm centres. There are no tassels, flowers or attached ornaments. That keeps attention on the repeated squares and gives the maker a useful place to practise consistent seams. The colours are an editorial choice for this concept, rather than a claim that sage is the season's leading colour.
- 2
Choose the construction before choosing the colours
A straight scarf made entirely from squares, a shaped V scarf and a striped scarf with motif ends are different projects. Their photographs may share the same granny texture, but their joins, edge treatment and length measurements are not interchangeable. Choose a complete pattern whose silhouette matches the scarf you want.
Two resources below show that range. Simply Hooked by Janet's Skinny Granny Square V Scarf uses join-as-you-go construction and a shaped layout. Hobbycraft's Autumn Granny Square Scarf combines flower motifs with a striped centre and uses UK terminology. Neither is the exact scarf illustrated here. They are attributed alternatives for comparing construction, not sources of counts for our concept. For a straight all-square version, use instructions that explicitly show an end-to-end strip and its finishing.
For another complete starting resource, Yarnspirations offers the Patons Granny Square Scarf as a free download. Its yarn, proportions and fringe differ from this concept. Read its full instructions and schematic before choosing it; follow its own gauge and finishing, and treat this article as a companion for planning and checking the work.
- 3
Build a palette that can survive the joins
Assign each colour a job: cream at the centre, rust around it and sage at the outside. Keeping every final motif round sage makes it easier to choose a discreet seam yarn. Test the sequence in a complete square before making a batch. A yarn that looks pleasantly muted in a ball can dominate when repeated along a whole scarf.
Use compatible yarns rather than assuming that all leftovers marked DK will behave alike. Craft Yarn Council places DK in Light, category 3, but the category is not an exact thickness or fabric guarantee. Compare the care instructions and metres per gram, then handle the sample against the neck. The intended fabric should bend comfortably where the scarf folds. If it feels board-like, resolve that in the swatch before committing to more motifs.
- 4
Check the foundation before the square grows
Follow the selected motif's starting-ring method, beginning-chain convention and corner instructions. In a traditional granny square, groups of stitches and corner spaces have different jobs: the groups build the fabric, while the four corners allow it to expand into a square. Mark the corners if they are hard to distinguish from the side gaps.
Read the stitch definition carefully. In this guide, a granny group means separate double crochet stitches worked into one space; it does not mean several unfinished stitches closed together as a cluster. Count the groups and spaces against your pattern before adding the next colour. The foundation illustration is an orientation aid, not a stitch chart. For terminology, US double crochet corresponds to UK treble; do not combine abbreviations from the two systems midway through a motif.
- 5
Make two matching sample squares
Complete one square using the pattern's full round sequence, including any round that belongs to the motif rather than the scarf border. Make a second using the same hook and colour sequence. Count each side separately and compare the corner spaces. Equal overall stitch totals can still hide an extra group on one side and a missing group on another.
Finish the samples according to the yarn label and the pattern's gauge instructions, then measure them dry without stretching. Record both dimensions, the hook, the round count and the measuring method. If the pattern gives a whole-motif gauge, compare the whole motif; if it specifies stitches over a window, measure that instead. The Craft Yarn Council recommends changing hook size and reswatching when the stated gauge does not match. A larger hook generally helps when there are too many stitches per measured length; a smaller one helps when there are too few.
- 6
Plan length from a joined sample
Measure a scarf you already wear comfortably and decide whether you want it hanging open, loosely crossed or wrapped. Then join the two samples with the intended seam and finish them as you will the scarf. The join may add visible space or draw the edges inward. That effect repeats at every seam, so measure it rather than assuming it is zero.
Here is a worked planning example. Suppose each dry square is 12 cm long, a two-square joined strip measures 24.2 cm, and the border will add 0.5 cm at each end. The net contribution per join is 24.2 − 24 = 0.2 cm. A strip of N squares is approximately N × 12 + (N − 1) × 0.2 + 1 cm long. Twelve squares give 147.2 cm; thirteen give 159.4 cm. The single-square width becomes about 13 cm if the same border adds 0.5 cm to each side. Verify those assumptions with your own samples.
- 7
Budget yarn by colour, including the finishing
The outer colour often needs more yarn than the small centre, and it also has to cover the joins and border. Avoid dividing a total yarn allowance into three equal shares. Start with the chosen pattern's quantities, then record your own usage if you change the number or size of the motifs. Weigh each colour before and after several identical squares; using a small batch reduces the effect of a scale that rounds tiny amounts.
For a hypothetical calculation, four squares using 28 g of sage average 7 g per square. Twelve would use about 84 g for their sage portions alone. That is not the scarf's total sage requirement: add measured seam and border use, tails, swatching and a practical reserve. If the label says 250 m per 100 g, 84 g represents about 210 m. Use your actual label and measurements rather than treating these numbers as a shopping list.
- 8
Lay out the whole strip before sewing
Arrange the squares in a single line with the intended right sides facing up. The layout illustration shows only a short section. Check that the colour sequence, size and corner orientation are consistent along the full planned length. If you have deliberately varied the centres, move them around now and take a quick reference photograph before picking them up.
Stack the motifs in order and mark the first one. Keep an especially small or large square out of the pile until you understand the difference. If its counts are correct but its dimensions differ, check hook size, yarn and tension. If its counts differ, remake the affected round. Pulling the smaller motif to match its neighbour while sewing stores that mismatch in the seam; it does not make the two pieces equivalent.
- 9
Test the seam where it will touch the neck
Use the joining method in your chosen scarf pattern. A sewn join allows you to finish and rearrange the motifs first; join-as-you-go makes the connections during a motif round. Changing between those methods can change the edges and finished dimensions, so it is not simply a different way to use the same final instructions. Our illustrations use a discreet sewn join as the planning concept.
Match the two corner endpoints and the corresponding positions along the edge before sewing. Pass the needle through the loops specified by the joining method, keeping the thread relaxed enough for the fabric to flex. Stop halfway, lay the pair flat and check both faces. A ridge, a hard cord or a diagonal pull is easier to fix now than after eleven seams. The image shows seam placement; follow your selected method for the exact needle path.
- 10
Keep the strip straight as you add squares
After each join, place the growing strip on a table with its long edges relaxed. Check that successive motifs lie in the same plane and that the corners meet without a step. A twist may come from attaching a motif with the wrong face or orientation; a narrowed waist at every join suggests that the seam tension needs attention.
Record how many squares are actually attached. An open strip of twelve squares has eleven joins between motifs, not twelve. Recheck length after several seams and compare it with the joined-sample estimate. Add or remove complete motifs before working the perimeter, using the pattern's repeat rules. Adding another round to every square also changes width and yarn use, so it is a much bigger adjustment than adding one more square at the end.
- 11
Treat the border as a finishing test
The concept uses a slim sage edge rather than fringe or a deep decorative border. Follow the selected pattern's distribution of stitches into stitch tops, chain spaces and motif junctions. A chain space is not automatically equivalent to one ordinary stitch. Keep the four outside corners of the complete rectangular strip distinct from the many motif corners now sitting along its edges.
Lay the scarf flat while the first border round is still easy to undo. Ripples may mean too many edge stitches or looser border tension; inward pulling may mean too few stitches or tighter tension. Check the placement and the pattern's specified counts before changing hook size. A border should not be used to disguise a row of mismatched squares. Once it lies comfortably, finish the join and weave the tail into the fabric without cinching the corner.
- 12
Block to the fabric, not to an invented size
Follow the care directions for the actual yarn and the blocking method allowed by its maker. Lion Brand's blocking guidance stresses matching the method to the fibre. Do not assume that hot steam, immersion or direct heat suits every yarn. If a label permits wet finishing, support the fabric when lifting it and remove excess moisture gently with a towel rather than wringing it.
Arrange the scarf straight on a suitable surface, keeping the width even without forcing it larger. Use rustproof pins where appropriate and allow it to dry fully. Compare the dry measurements with your notes and inspect the seams, border and colour-change ends. Keep the yarn labels or write down the care instructions for the recipient. Fold the scarf for storage; a stretched hanging display is not a reliable finished-size measurement.
- 13
Wear the texture without losing the pattern
Try the finished scarf against a plain coat or jumper before adding more accessories. Letting both ends hang shows the repeat; a loose cross at the front uses more length and folds the squares differently. Check comfort where a seam sits at the neck, not just how the scarf looks laid flat.
If you want a warmer, broader scarf next time, choose a pattern designed for that width or test a larger motif before starting. Two squares across introduce a long central seam and different border junctions. For a lighter neck accessory, compare the band's drape and scale with our crochet bandana guide. Keep the successful square, joining notes and dry measurements together so the next version starts from your own recorded results.
| Squares in one strip | Joins | Calculated length |
|---|---|---|
| 10 | 9 | 122.8 cm |
| 12 | 11 | 147.2 cm |
| 13 | 12 | 159.4 cm |
Tips for success
- Finish and join two sample motifs before making a batch; the seam is part of the gauge experiment.
- Reserve the outer colour for the perimeter and joins before allocating every remaining gram to more squares.
- Match stitch counts and corner positions first. Blocking cannot repair a missing group or an extra corner.
- Keep one square beside your work as a colour and size reference, and weave colour-change tails in as you go.
Pattern at a glance
- Time to make
- Plan separate sessions for sampling, motifs, joining and finishing; duration depends on your pattern and scarf length.
- Skill level
- Easy
- Hook
- Choose by the selected pattern's gauge and your sample
- Yarn weight
- Light / DK for the illustrated concept; follow your chosen patternCYC standard
- Yardage
- Use the base pattern and measured sample usage; include joins, border and reserve
- Gauge
- Measure two finished motifs and their joined length.
- Finished size
- Custom planning guide; 147.2 × 13 cm is an arithmetic example only
Free ebook
Get new patterns, and the ebook
New patterns as they land, plus our free beginner's crochet stitch guide. No daily blasts, unsubscribe in one click.
Frequently Asked Questions
How many granny squares do I need for a scarf?
Use the dry size of your motifs and a joined sample to calculate the number. Include the border at both ends and the effect of each seam. In this guide's hypothetical example, twelve 12 cm squares produce about 147.2 cm overall. That example is not a universal scarf size.
Can I use leftover yarn for a granny-square scarf?
Yes, if the yarns produce compatible fabric and share a suitable care method. A matching weight label alone is not enough. Make a sample with the actual colours, check the dry dimensions and comfort against your neck, and reserve enough of the outer colour for joining and edging.
Why does my scarf narrow at every join?
The joining thread may be too tight, or the paired edges may have different counts or dimensions. Undo one seam and compare the unjoined pieces. Match the corners and stitch positions, then sew a short section with relaxed tension. If the pieces differ, correct the motifs before rejoining.
Is this a complete free granny-square scarf pattern?
This is a free-to-read planning and construction guide covering colour, gauge, joining and finishing, with links to independent pattern resources. Follow one complete pattern for stitch counts and use the illustrations as a visual companion.