Baby & Nursery · Worked in the round
Baby Pumpkin Crochet Booties: A Detailed Halloween Guide
By Looplader · Project guide · Updated
- Skill
- Intermediate
- Hook
- Follow the selected pattern; adjust after gauge sampling.
- Yarn
- Light / DK for the concept illustrations; follow your chosen pattern.
- Time
- Plan separate sessions for sampling, the two soles, uppers and finishing; drying time varies.
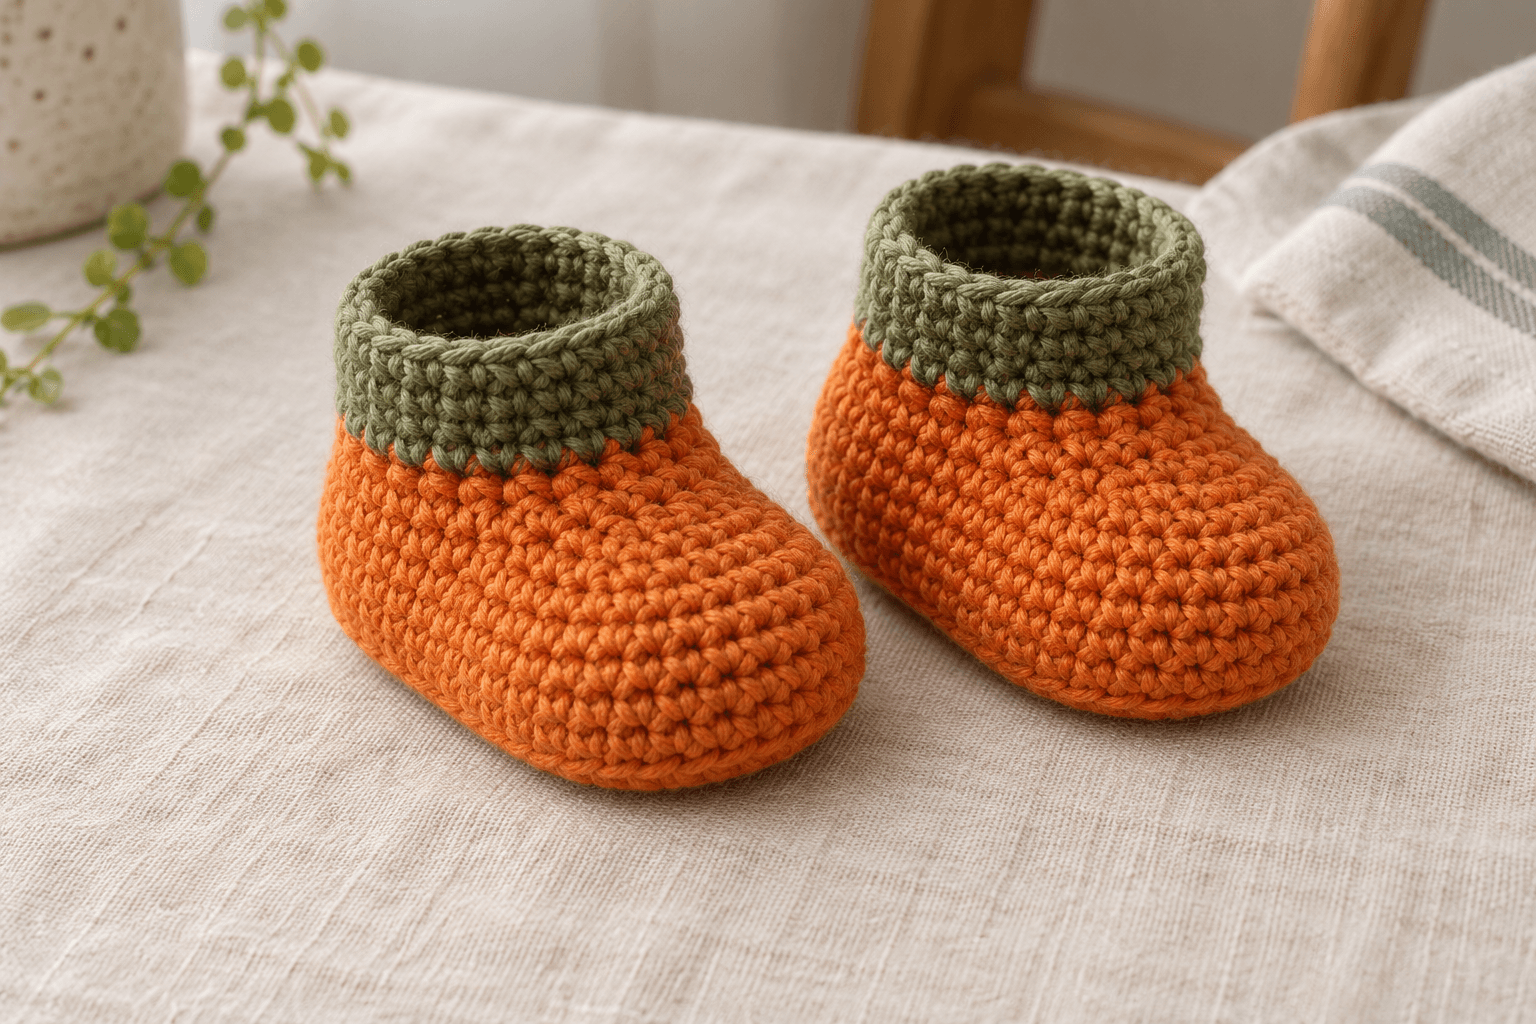
Baby pumpkin crochet booties use orange feet and green ankle cuffs to suggest Halloween without separate decorations. This guide explains an oval-sole construction, from checking gauge and matching two soles to shaping the toes, finishing the cuffs and inspecting the inside.
This technique guide covers bootie construction, sizing checks and finishing. Follow your chosen complete pattern for size grading, stitch sequences and yarn quantities, and use the illustrations to follow the construction stages.
Pattern, Pinterest & resources
- Foot size chart — Craft Yarn Council
Separates foot circumference, sock height and length; its broad baby group is not a newborn size prescription.
- Crochet gauge — Craft Yarn Council
Sampling with the specified yarn, hook and stitch and counting both dimensions.
- Yarn weight system — Craft Yarn Council
DK classification as Light, category 3; category guidance is not a pattern gauge.
- Crochet abbreviations — Craft Yarn Council
US crochet terminology and decrease abbreviations.
- Orange Pumpkin baby flats — Croby Patterns
Independent oval-sole pattern example. Confirm its conflicting yarn/gauge descriptions with the designer; no counts reproduced here.
- Pumpkin baby booties PDF — Twisted by the Sea
Independent paid pattern listing; its design differs from these concept illustrations.
- Shoes for Active Toddlers — American Academy of Pediatrics
Footwear guidance distinguishing young babies from children walking outdoors.
What this project includes
- A clear distinction between foot measurements, flat soles and finished fit.
- Eight process illustrations covering the sole, upper, cuff and finishing.
- Count-check arithmetic and a practical way to compare both booties.
- Pumpkin colours without dangling decorations.
Detailed project guide
- 1
Choose a simple pumpkin palette and a complete pattern
Pumpkin orange for the foot and olive green for the cuff make a Halloween bootie without attaching a miniature pumpkin. The illustrated concept has a smooth oval sole, an upper shaped over the toes and a short green ankle cuff. Colour carries the theme; there are no stems, trailing vines, faces or separate appliqués.
Choose one complete baby-bootie pattern before beginning. Read its gauge, size measurements, terminology and finishing instructions together. A flat worked and seamed design, an oval-sole design and a separately attached upper do not share interchangeable counts. This guide concentrates on an oval sole worked around a foundation chain, followed by sides and toe decreases. The illustrations explain that general construction; they do not reproduce either of the independent designs linked below.
- 2
What the research does—and does not—establish
The pattern landscape includes simple baby flats as well as more sculptural pumpkin booties. Croby Patterns' Orange Pumpkin page is an example of an oval sole followed by a shaped upper. Twisted by the Sea offers a separate paid pumpkin booties PDF in several baby sizes. These resources show different design choices; a pumpkin name alone does not establish the same yarn, stitch structure or fit.
Read current notes and errata before selecting a pattern. At the research date, the Croby page contains conflicting yarn descriptions between its materials and gauge sections. Confirm those details with the designer rather than guessing which instruction to follow. This article does not resolve that discrepancy or transplant the page's counts. Its calculation examples below are independently chosen teaching examples, not a replacement baby-size pattern.
- 3
Gather yarn that makes the stitches easy to inspect
Use the yarn weight specified by the complete pattern you choose. The concept illustrations show smooth DK-scale yarn; the Craft Yarn Council places DK in its Light, number 3 category. A weight category groups yarn thicknesses, but it does not promise identical fabric. Two yarns with the same number can make different sole dimensions and different ankle openings.
For this colour treatment, select orange and green yarns with compatible care instructions. Keep both labels. A smooth, plied yarn makes missed stitches and split strands easier to spot than an eyelash or very fluffy yarn. Set out removable markers, a tape, scissors and a blunt needle before you begin. Use the pattern's yarn quantity for a pair, not its quantity for one bootie, and include whatever extra it specifies for sampling.
- 4
Measure both feet and record what each number means
Ask the caregiver for current measurements of both feet: heel to longest toe, plus the width or circumference requested by the chosen pattern. Keep the foot relaxed; do not pull the toes straight to produce a longer reading. Note the date and whether a measurement is of the bare foot or over the intended sock. A baby's age is useful context, but it cannot substitute for these measurements.
The Craft Yarn Council foot chart separates foot circumference, sock height and total foot length. Its baby column covers a broad 6–18 month group, so it should not be read as a newborn sizing prescription. A listed body measurement is also not a finished crochet sole measurement. Label your notes clearly: foot length, flat sole length, finished interior length and opening are four different checks.
- 5
Allow for the shape of the finished upper
A sole measured from its outside edges can look long enough while the completed bootie is cramped. The upper rises around the foot, the toe shaping curves over the front, and fabric thickness takes up room. Do not assume that a flat 10 cm oval supplies 10 cm of usable interior length once the upper is finished. Compare your work with the finished measurements and fit guidance supplied by the designer.
Avoid adding a universal amount of extra length or applying the negative-ease rule from a hat. Footwear has to accommodate toes and the route through the opening as well as the foot's length. If the caregiver cannot provide measurements for a gift, identify the pattern size honestly and include its stated finished dimensions. Do not promise that an age label guarantees a Halloween fit.
- 6
Make and wash the gauge sample first
Work the sample specified by your pattern, using the actual yarn, hook and stitch. The Craft Yarn Council's crochet gauge guidance emphasizes this combination. A single-crochet sample cannot automatically stand in for a half-double-crochet upper, and a tightly worked sole can behave differently from a loose decorative cuff. Measure in the condition the pattern requires and record the result before adjusting anything.
Wash and dry the sample according to the yarn label if you need to understand its post-care dimensions. Count stitches and rows across a central measured area, with the fabric relaxed unless the pattern expressly calls for stretching. Do not pull the swatch until it matches a target. Record the hook size, counts and measurement unit, then make another sample if necessary. Keep the first sample until the pair is finished so you can compare texture and tension.
- 7
Use gauge arithmetic to diagnose, not to invent a size
Suppose a practice swatch has 18 stitches across 10 cm. That is 1.8 stitches per centimetre, so a straight span of 9 stitches would measure approximately 5 cm at that gauge. This is a simple straight-fabric example. It does not mean that a nine-chain foundation produces a 5 cm bootie: chains, curved ends, round height and stitch placement change that relationship.
A more useful diagnostic compares your sole with the pattern's stated checkpoint. If a target sole is 10 cm and yours measures 9 cm, yours is 10% shorter. That identifies a mismatch; it does not tell you to increase the hook diameter by 10%. Hook size and fabric dimensions are not linearly related. Recheck yarn, gauge, stitch count and measuring method before deciding whether to remake the sole.
- 8
Understand the route around a foundation chain
An oval sole commonly starts along one side of a foundation chain, turns around one end through an instructed cluster of stitches, then travels back along the other side. The chain acts as a central spine. You are not beginning a separate second foundation when you return along its underside. Keep the original orientation visible until you understand where the two curved ends will be.
Follow the pattern's exact starting-chain and end-group instructions. The two ends may have different counts or use different stitch heights to shape toe and heel. Mark the first counted stitch and keep the working loop distinct from completed stitches. If you lose your place at a curve, recount from the last marker instead of putting extra stitches into an apparently empty space.
- 9
Count consumed stitches and produced stitches separately
An ordinary stitch uses one existing stitch and produces one new stitch. A two-into-one increase uses one and produces two. A two-together decrease uses two and produces one. This distinction makes a shaping round easier to audit: starting count plus added stitches minus removed stitches equals the next count, assuming no other count-changing instructions.
For an independent practice example, a 30-stitch round with six two-into-one increases and ordinary stitches elsewhere produces 36 stitches. A later 36-stitch round containing eight two-together decreases produces 28. Those are arithmetic exercises, not consecutive rounds for these booties. A slip-stitch join or beginning chain counts only if the pattern says it does. When a round is off by one, inspect those two places before blaming every increase.
- 10
Finish and compare both soles before building upward
Complete one sole to the pattern's checkpoint, then make the second with the same yarn and hook. Place them side by side in the same orientation. Compare length, widest point, end shaping and perimeter count. The second sole can have the correct count yet differ in size if your tension changes. Do not stretch a smaller sole to make the pair appear matched.
Lay each sole down gently. A design intended to be flat should not need force to stay flat. Waves can point to extra increases or overly loose stitches; cupping can point to missed increases or tight tension, though some patterns intentionally shape the sole. Check against the actual instructions before correcting it. Resolve a mismatch now, while removing a few rounds is still straightforward.
- 11
Mark the toe, heel and round boundary
Identify the toe and heel using the pattern's instructions. The point where a round joins is not necessarily the geometric centre of the heel. Place temporary markers at the reference positions the designer uses, and use a different-coloured marker for the beginning of the round. This keeps counting information separate from shaping information.
Do the same on the second sole before moving on. If the design has distinct left and right booties, label them and follow the mirrored instructions. If it uses two identical pieces, do not introduce a left-right difference simply because you expect shoes to be mirrored. A short notebook entry for the final sole count, marker positions and completed round is more reliable than remembering them after a break.
- 12
Build the sidewall without adding accidental width
Many oval-sole booties change direction by working around the perimeter without the earlier sole increases. Some patterns specify a loop-only transition to create a defined edge; others do not. Follow that instruction exactly. Back-loop-only work refers to which loop receives the hook, not permission to skip every other stitch or change the perimeter count.
At the end of a round with no increases or decreases, compare the count with the previous round. Check that you did not crochet into the joining slip stitch as an extra stitch. The fabric should begin to rise into a shallow cup. At this stage, the entire oval opening remains visible; the toe has not yet been pulled inward. Compare the sidewall height on the two booties before beginning the shaping section.
- 13
Centre the toe shaping before working the decreases
Toe shaping removes stitches from a selected part of the upper so the front curves over the toes while an opening remains toward the heel. Find the exact beginning and end of the shaping zone in your pattern. Place removable markers at those boundaries and count the stitches between them. Do not move the shaping toward the round join simply to make the instructions easier to follow.
Work the specified stitch types in their written order. Half-double, double and single crochet decreases have different heights and are not interchangeable purely because each can remove one stitch. After a shaping round, check its total and compare the left and right sides of the toe visually. An off-centre upper is easier to correct before the cuff disguises where the drift began.
- 14
Practise a two-together decrease on a scrap
For a standard US single crochet two together, insert the hook into the next stitch, yarn over and draw up a loop. Insert into the following stitch, yarn over and draw up another loop. With three loops on the hook, yarn over and draw through all three. Two input stitches have become one completed stitch. Practise slowly on a spare sample so you can identify that new stitch on the next row.
This demonstration explains the abbreviation sc2tog; it does not replace the decrease your bootie pattern specifies. An invisible decrease, a half double crochet decrease and a double crochet decrease require different handling. Keep the working yarn controlled without wrenching the two stitches together. Split yarn strands or an unusually tight decrease can create a hard spot over the toes even when the count is correct.
- 15
Check the opening before adding the green cuff
Once the upper is shaped, compare the opening with the pattern's checkpoint. A bootie can have enough foot length but an opening too narrow for the heel to pass through comfortably. Conversely, an opening may gape because the toe shaping is incomplete or the upper is too large. Diagnose the upper before adding an edge that changes its flexibility.
When the pattern allows a colour change, draw the new colour through at its specified transition and leave ends long enough to finish securely. The illustrated green cuff is worked directly around the opening rather than sewn on as a separate trim. Keep the join tidy without pulling the first green stitch into a tight knot. Count the first cuff round independently; it is easy to gain a stitch beside a colour change.
- 16
Keep the cuff flexible without using ties
Use the cuff stitch, round count and tension specified by the selected pattern. A tightly worked final slip-stitch edge can reduce stretch even if the previous rounds feel flexible. After finishing an edge, gently compare how the opening moves with how it moved before. If the edge is the restriction, redo the edge rather than forcing the entire upper wider.
The orange-and-green palette does not need ankle cords, button straps or loose leaves to read as Halloween. Choose a pattern whose closure suits the simple look from the outset; removing a structural strap from an unrelated design may change retention. If the finished bootie falls off, reassess size and construction. Tightening something around the ankle is not a substitute for fit.
- 17
Finish the inside as carefully as the outside
Turn or gently open the bootie enough to inspect the sole, toe shaping and colour-change area. Weave each end through the fabric with a blunt needle, using a path that holds it without drawing the surrounding stitches together. Avoid leaving a tight lump beneath the foot or long loops inside the toe. The appropriate tail path depends on the yarn and stitch structure; a clipped knot alone is a poor finishing plan.
Run a fingertip around the inside to feel for snags, stiff spots and hidden temporary markers. Count the markers and needles back into your kit before a fitting. Check both booties, not just the one you finished last. Any exposed tail that could loop around a toe needs correction before the item is worn.
- 18
Wash the pair and compare it again when dry
Follow the care instructions for the yarns used. If one colour requires gentler care, choose a compatible routine for the whole item. Test unfamiliar colours together in a sample first; a green cuff bleeding into orange is easier to discover on a swatch than on a finished gift. Do not use hot water, steam or an iron merely to persuade the pair into a matching shape.
Dry as directed, supporting the booties without stretching their openings. Once fully dry, compare sole length, width, upper height and cuff opening again. A difference that appears only after washing is still a real difference in the pair. Record the final measurements and inspect the inside once more for loosened ends. Care is part of the making process, not a separate chore after sizing has been decided.
- 19
Check comfort and keep the intended use modest
For a first fitting, have the caregiver check that the foot enters without force, the toes are not crowded and the cuff does not compress the ankle or leave marks. Remove the booties if the baby seems uncomfortable, if the feet are too warm or if an end loosens. Recheck fit as the baby grows rather than assuming a pair that fitted once will fit throughout autumn.
These crochet pieces are seasonal clothing accessories, not protective walking shoes or a way to support foot development. The American Academy of Pediatrics notes that young babies do not need confining shoes and that children walking outdoors need protective footwear. Its guidance also discusses nonskid soles for walking children. Do not claim that an untreated crochet sole provides traction, and do not improvise a safety guarantee by adding dots of craft glue.
- 20
Troubleshoot one variable at a time
If both soles are too small with correct counts, return to the gauge and yarn choice. If only one is small, compare hook, tension and whether you counted the same checkpoint. If length matches but width does not, inspect the curved end increases and measuring orientation before adding a round. An extra sole round usually changes more than one dimension and affects all the upper counts that follow.
If the toe twists sideways, inspect the shaping boundaries and the location of the round start. If the upper is loose but the cuff is tight, making the cuff even tighter will not fix the upper. If a correct-looking pair changes substantially in the wash, revisit the sample's care treatment. Record the symptom, count and measurement before undoing anything; that makes the correction repeatable.
- 21
Prepare a useful gift note and project record
Keep the chosen pattern's title and version, yarn labels, hook size, washed gauge and actual completed counts in your project notes. Record any permitted modifications to the colour placement or cuff. Photograph the two finished pieces together and write down the dimensions after the final care cycle. A record of the first bootie helps you reproduce it; a photograph alone rarely explains a tension difference.
For a gift, include the fibre content, care instructions and the size information from the pattern, clearly distinguished from any measurements you took yourself. Remove all packaging strings before use. The pumpkin palette can accompany a simple outfit without turning the booties into a bulky costume. For another baby or another season, begin with new measurements and a fresh check of the yarn rather than automatically repeating last year's counts.
| Measurement | What it describes | When to record it |
|---|---|---|
| Foot length | Heel to longest toe of the wearer | Before selecting a pattern size. |
| Flat sole length and width | Outer dimensions of an unfinished crochet sole | Before building the upper. |
| Finished interior fit | Usable space after the upper curves inward | After finishing and care. |
| Ankle opening | Access and flexibility at the cuff | Before and after edging. |
| Starting count | Change | Result |
|---|---|---|
| 30 stitches | Six increases, each adding one stitch | 36 stitches |
| 36 stitches | Eight decreases, each removing one stitch | 28 stitches |
| Any count N | No shaping; joins excluded unless specified | N stitches |
| Stage | Compare | Fix before advancing |
|---|---|---|
| Soles | Length, width, count and end shaping | Gauge or increase placement. |
| Sidewalls | Round count and height | Missing or extra stitches at joins. |
| Toe | Shaping position and total count | Off-centre decreases. |
| Cuff | Opening, height and edge flexibility | Tight edging or a gained stitch. |
| After care | Dry dimensions and interior ends | Mismatch or loose finishing. |
Tips for success
- Complete and compare both soles before building the uppers.
- Use different markers for the round start and toe-shaping boundaries.
- Count each cuff after the colour change; joins can conceal an extra stitch.
- Inspect and measure both booties after the final wash.
Pattern at a glance
- Time to make
- Plan separate sessions for sampling, the two soles, uppers and finishing; drying time varies.
- Skill level
- Intermediate
- Hook
- Follow the selected pattern; adjust after gauge sampling.
- Yarn weight
- Light / DK for the concept illustrations; follow your chosen pattern.CYC standard
- Yardage
- Use the designer’s quantity for a pair plus the stated sampling allowance; not measured here.
- Gauge
- Pattern-specific washed gauge; numerical examples illustrate arithmetic only.
- Finished size
- Compare current foot measurements with the sizes in your chosen complete pattern.
Free ebook
Get new patterns, and the ebook
New patterns as they land, plus our free beginner's crochet stitch guide. No daily blasts, unsubscribe in one click.
Frequently Asked Questions
Is this a complete free pumpkin booties pattern?
This is a construction and troubleshooting guide. The linked designers supply separate patterns with their own counts, sizes and terms. Choose one complete pattern for the instructions, and use the orange-and-green illustrations here for colour and construction ideas.
Can I make the booties bigger by adding a sole round?
Not reliably without revising the rest of the design. Another sole round can change length, width and perimeter count together, which affects the upper and toe shaping. Use the designer’s larger size or approved adjustment method, then check gauge and the resulting sole measurements before continuing.
Why are my two booties different sizes with the same stitch count?
Different tension, hooks or care treatment can produce different dimensions from identical counts. Compare the soles at the same checkpoint, using the same measuring method. Check your hook and yarn first; do not stretch the smaller bootie to hide the mismatch or rely on washing to correct it.
Can these booties replace shoes for a walking baby?
No. This guide does not establish traction, durability or outdoor protection for crochet soles. The AAP recommends protective footwear for children walking outdoors and discusses nonskid soles for walking children. Treat this project as seasonal clothing and choose footwear appropriate to the child’s activity and environment.