Baby & Nursery · Worked in rows
Candy Corn Crochet Baby Blanket: A Detailed Halloween Guide
By Looplader · Project guide · Updated
- Skill
- Easy
- Hook
- Use the selected pattern’s hook and verify gauge.
- Yarn
- Medium / worsted for the concept; follow the complete pattern.
- Time
- Allow multiple making sessions plus sampling and drying; no timed sample has been completed.
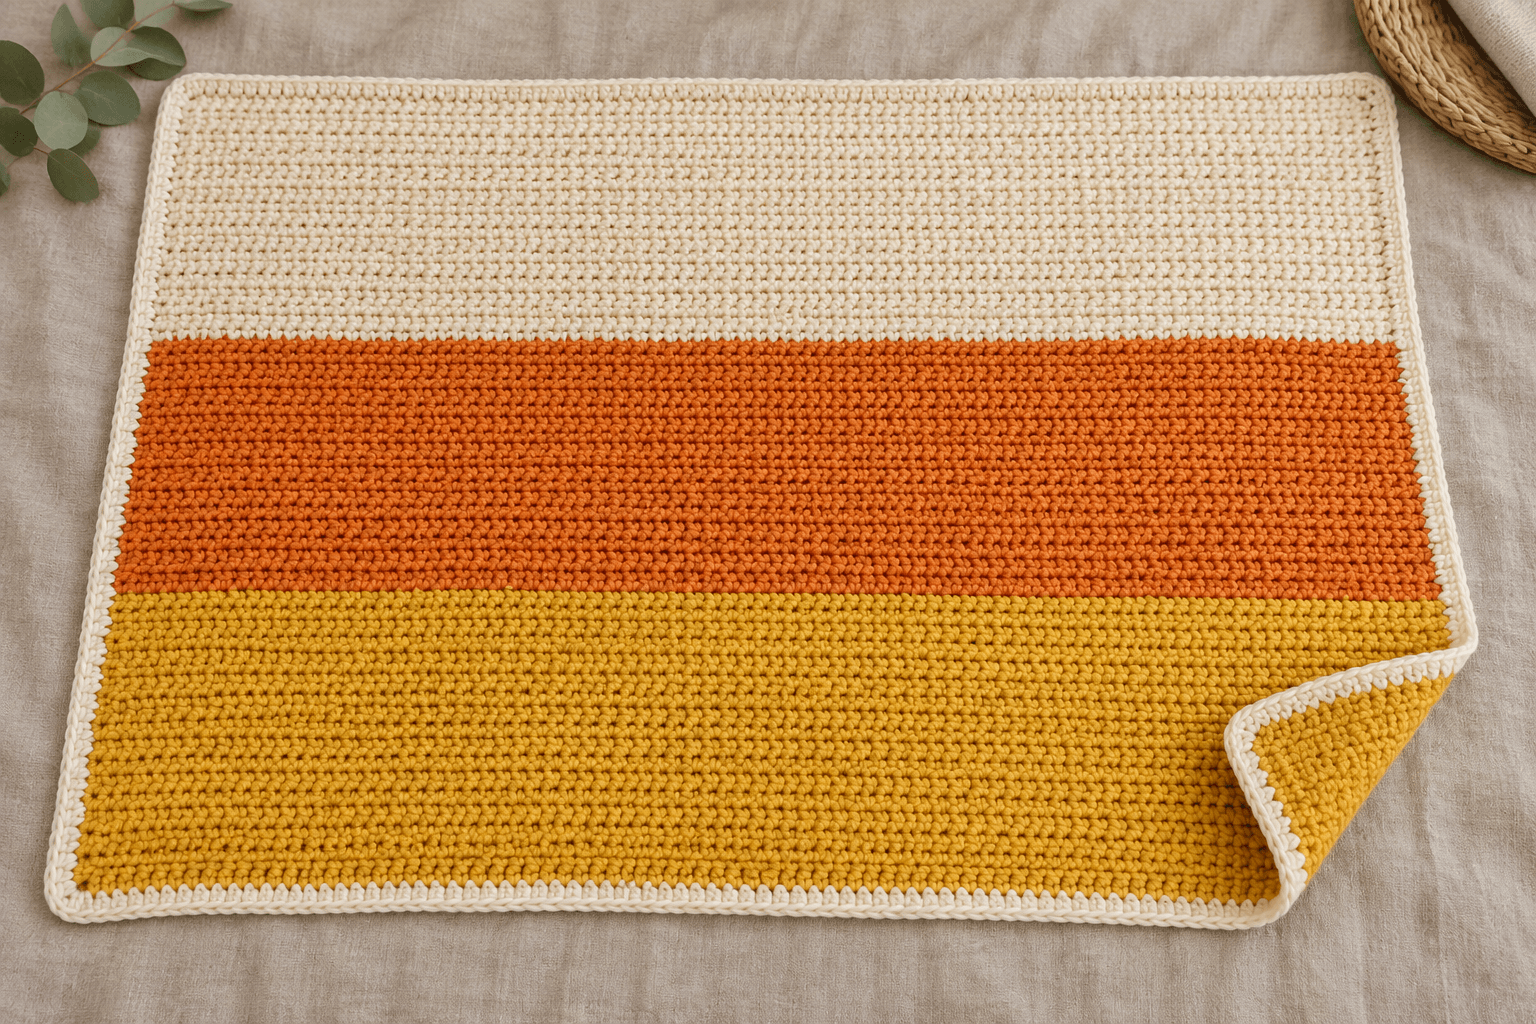
A candy corn crochet baby blanket uses golden yellow, orange and ivory colour blocks to bring a Halloween palette to a simple rectangle. This guide follows a body worked in rows, then a narrow border, with detailed checks for gauge, colour changes and flat edges.
This project guide covers planning, colour changes and finishing, with illustrations of each stage. Numerical examples explain the planning process; use your chosen complete pattern for stitch counts and quantities. Keep loose blankets out of an infant’s sleep space.
Pattern, Pinterest & resources
- Crochet gauge — Craft Yarn Council
Use the specified yarn, hook and stitch when measuring a gauge sample.
- Yarn weight system — Craft Yarn Council
Medium / worsted classification; general guidance does not replace pattern gauge.
- Crochet abbreviations — Craft Yarn Council
US terminology reference.
- Safari Stripes Baby Blanket — Daisy Farm Crafts
Independent front-loop single-crochet stripe pattern; its counts and colour schedule are not used here.
- Red Heart Candy Corn Throw — Yarnspirations
Independent graphic candy-corn project, different from the three-block concept.
- Infant safe sleep — American Academy of Pediatrics
Keep loose bedding and blankets out of infant sleep spaces.
What this project includes
- A different construction from pumpkin hats, booties and granny-square blankets.
- Eight illustrations showing sampling, colour changes, the body and border.
- Separate calculations for body size, stripe rows and border allowance.
- A three-colour design without attached ornaments or fringe.
Detailed project guide
- 1
A Halloween blanket made with colour, not attachments
A candy-corn palette gives a simple rectangle a Halloween identity: golden yellow at the bottom, orange through the middle and ivory at the top. The concept shown here uses three broad colour blocks with a narrow ivory border. It is worked back and forth in rows, rather than assembled from granny squares, and has no attached characters, fringe or tassels.
This guide covers planning and construction decisions. Use a complete blanket pattern for its actual stitch sequence, gauge and quantities, or work and measure your own samples before developing a design. The illustrations show ordinary single-crochet fabric; select the hook size, finished dimensions and yarn quantity from your chosen pattern.
- 2
What makes this a different Looplader project
This article moves from shaped baby accessories to a flat textile. The main problems are maintaining a constant width, making clean colour changes and preventing the border from rippling. Those checks are different from the crown gathering in a pumpkin hat or the toe decreases in baby booties. The three-colour body also differs from a joined granny-square blanket.
Research shows several ways to express a candy-corn theme, including shaped motifs, graphic throws and striped fabrics. Yarnspirations' Red Heart Candy Corn Throw is a separate graphic project, not this three-block rectangle. Daisy Farm Crafts' Safari Stripes Baby Blanket demonstrates a different striped design using front-loop single crochet. These are linked as independent pattern examples; their row sequences, photographs and colour schedules are not reproduced here.
- 3
Decide how the blanket will be used
Plan this as a handmade gift or a textile for awake, directly supervised use, with the baby's face kept clear. Its dimensions and weight should suit that purpose; a product described as a baby blanket is not automatically suitable bedding. Do not style it over a sleeping baby or place it in a crib for a photograph.
The American Academy of Pediatrics recommends keeping loose bedding, including blankets, out of an infant's sleep area. Crochet holes, a lightweight feel or the word breathable do not exempt a blanket from that guidance. The article's craft measurements concern the textile, not sleep safety. Keep that distinction on the gift note as well as in the project description.
- 4
Choose three compatible yarn colours
Choose ivory, orange and golden yellow in the yarn specified by your chosen pattern, ideally within one yarn line so thickness and care instructions are comparable. The concept illustrations show smooth medium-weight fabric. The Craft Yarn Council groups worsted yarn in Medium, category 4, but the category alone does not guarantee that two yarns produce the same gauge.
Read each ball band and retain the fibre content, colour and dye-lot information. Check that the colours tolerate the same care routine. If you substitute one colour with a different yarn, swatch that colour too; a slightly thicker orange can make the middle block wider even when the count never changes. Set aside enough ivory for the border separately from the ivory reserved for the body.
- 5
Make a sample that includes all three colours
Work a sample in the actual stitch you intend to use, large enough to measure away from its edges. Include a transition from yellow to orange and another from orange to ivory. This tests more than colour preference: it shows whether the yarns produce similar widths and whether the colour changes leave loose loops or tight spots.
The Craft Yarn Council recommends checking gauge with the specified yarn, hook and stitch pattern. If the chosen pattern uses front-loop single crochet, do not quietly replace it with both-loop single crochet and assume the dimensions remain identical. Wash and dry the sample according to the yarn directions, then record both stitch and row gauge in the state the pattern specifies. Assess the drape as well as the numbers; a stiff board of fabric is not improved merely by matching width.
- 6
Separate body dimensions from finished dimensions
Write down the intended finished width and length, then decide how much of each dimension comes from the border. A border adds fabric on two opposite sides. For an arithmetic example only, a 60 × 75 cm finished rectangle with a 2 cm border on every side would have a 56 × 71 cm body: subtract 4 cm from each finished dimension.
Choose your actual blanket dimensions to suit its intended use. Border thickness, corner treatment and care can change the finished measurements. If the pattern gives body dimensions, do not subtract its border twice. Use one measurement unit consistently and distinguish a planned number from a number measured on dry fabric. A small worksheet prevents a surprising amount of confusion near the end.
- 7
Use stitch gauge for width and row gauge for length
Suppose an illustrative sample measures 16 stitches and 20 rows across separate 10 cm spans. That gives 1.6 stitches per centimetre across a row and 2 rows per centimetre up the fabric. A nominal 56 cm body width corresponds to 89.6 stitches, so a design decision is needed to reach a whole count compatible with the stitch repeat. At that hypothetical gauge, 90 stitches would span about 56.25 cm.
A 71 cm body length at the same illustrative row gauge corresponds to 142 rows. These figures are teaching examples, not a foundation and row count for this blanket. Do not combine them with an unrelated pattern's turning chains or border. Reconcile the width with the pattern's stitch multiple and the height with its row repeat, then verify against your own washed sample.
- 8
Plan the three colour blocks on paper
Draw a rectangle and divide it into yellow, orange and ivory sections in the order you will crochet them. The pictured concept uses approximately equal block heights. Equal height comes from row counts only if the colours have the same row gauge and the stitch remains unchanged. A heavier yarn or tighter tension in one colour can upset the proportion.
Using the hypothetical total of 142 rows above, an even split could be 47 yellow rows, 48 orange rows and 47 ivory rows. The corresponding planning ranges would be 1–47, 48–95 and 96–142. Use this colour-planning example to work out block lengths at your own gauge. If your chosen stitch uses a two-row repeat, choose compatible block lengths instead of changing colour in the middle of that repeat.
- 9
Budget each colour rather than dividing the yarn equally
The ivory supply has two jobs: its body block and the border. Even with equal body blocks, buying equal quantities of all three colours can leave the border short. Start with the complete pattern's quantities and account for any change in its dimensions or colour distribution. Keep yarn for the sample and finishing separate from the planned body allocation.
For a rough planning method, weigh a representative sample and compare its area with the planned body area. If a hypothetical 15 × 15 cm sample uses 12 g, its area is 225 cm². A 56 × 71 cm body has 3,976 cm², giving an area-based estimate of about 212 g before border, ends and other allowances. This is not measured yardage for the project; changes in stitch, tension, fibre and sample edges limit the estimate.
- 10
Make an even foundation and count the first row
Follow the chosen pattern's foundation and turning-chain instructions. A standard practice strip in ordinary single crochet often starts in the second chain from the hook; each remaining chain receives a stitch. On such a practice strip, 21 chains produce 20 single crochet stitches. That explains the relationship without prescribing the blanket's width. The loop on the hook is not a completed chain or stitch.
Mark the first and last actual stitches of the first row. Look at the foundation after a few rows have been added. If it draws the fabric into an arc, it may be tighter than the body. Correct it while the work is short rather than assuming a border will stretch it straight. Do not change hook size halfway through the body to compensate for a foundation problem.
- 11
Keep a constant stitch count through the body
For a plain single-crochet rectangle without shaping, each new row should have the same number of stitches as the preceding row. Insert the hook into the stitch location specified by the pattern, pull up a loop, then yarn over and draw through the two loops to complete ordinary single crochet. Use the pattern's convention for whether the turning chain counts; do not alternate conventions between rows.
Move the end markers as you work. If the edge narrows, inspect whether the final marked stitch was missed. If it widens, check whether a turning chain has been treated as an extra stitch. Count at the end of the first several rows and whenever the edge changes appearance. Colour blocks make a width change conspicuous, so catching it before the next colour is especially useful.
- 12
Change colour on the final pull-through
For a standard single-crochet colour change at a row end, begin the last stitch in the old colour and draw up a loop. With two loops remaining on the hook, draw the new colour through both loops. The loop now on the hook is the new colour. Turn and begin the next row according to your pattern's turning-chain convention, keeping both yarn ends long enough to finish securely.
A slight difference between the two faces of a colour boundary is normal in rows; changing colour does not make both sides visually identical. The goal is an even transition without an enlarged last stitch or a cinched corner. On a broad colour block, cutting and later weaving the old colour is usually more practical than carrying it up a long side. Avoid loose vertical floats that the border would merely conceal.
- 13
Track rows at each colour transition
Record the completed row before setting the work down. After a colour change, note both the overall row number and the number of rows in the new block. A removable marker at the beginning of the block can help distinguish the first new-colour row from the boundary loops beneath it. Count actual rows, not the number of visible ridges, unless the stitch structure makes that relationship clear.
Measure the width at several places with the fabric relaxed. If the orange section grows wider than the yellow section despite matching counts, compare tension and yarn thickness before continuing. Do the same at the ivory transition. Do not try to conceal inconsistent gauge by working tighter only at the edges; that can curve the side while leaving the centre unchanged.
- 14
Inspect the full body before adding the border
Spread the unbordered rectangle on a level surface and let it rest naturally. Compare the top width, middle width and foundation width using the same measuring method. Inspect both long edges and all colour boundaries. Check the block heights against the plan, allowing for any finishing method your chosen pattern still requires.
If a section has a wrong count or a large tension change, correct the body before edging. A border frames a rectangle; it does not erase a wedge, a missing row or a bowed foundation. Turn the piece over and inspect the reverse for long carried strands or insecure joins. Decide which face you prefer as the front and mark that choice temporarily so the border starts with a consistent orientation.
- 15
Sample the border pickup along a row-end edge
The top and bottom edges offer identifiable stitches or foundation loops. The long sides offer row ends, which require a pickup plan. Do not assume that one border stitch per row end is universally correct: a tall body stitch and a short border stitch can need a different distribution from two stitches of similar height. Start with the chosen pattern's method and test whether the edge lies flat.
Place temporary markers at intervals to distribute pickups evenly. Work a short section, lay it down and inspect it before edging the whole blanket. If the edge flares outward, too many border stitches or loose border tension may be responsible. If it pulls inward, too few stitches or tight tension may be responsible. Adjust the actual cause and record the distribution so the opposite side can match.
- 16
Turn each border corner without creating a ruffle
A border corner needs enough additional fabric to turn through the angle. Different patterns use extra stitches, a chain space or another corner sequence. Follow one coherent method through all four corners. Mark the corner stitch or space so it remains identifiable on the next round; the brightest-looking loop is not necessarily the centre of the corner.
Pause after each side and corner to check the blanket on a flat surface. A corner that curls upward may be short of room, while an oversized fan may have too much. Do not prescribe three corner stitches for every yarn and every border merely because it worked on a different project. Use the narrow ivory edge as a style reference and follow your chosen border's corner instructions.
- 17
Weave ends into the matching colour
Thread a yarn tail onto a blunt tapestry needle and weave it through a suitable path in the fabric without drawing the stitches together. Work orange ends into orange and yellow ends into yellow where possible, so a darker strand does not show through the ivory. Change direction to help resist slipping, choosing the path and embedded length for the actual fibre and stitch structure.
Do not rely on clipping a tail beside a knot, or on covering a loose end with one border round. Inspect the reverse as you work and check that no long loops remain. The three-block layout keeps the number of colour changes modest, so there is little reason to rush this stage. Count all temporary markers and needles back into your tools before the blanket goes near a child.
- 18
Finish according to the yarn label
Use the care method specified for the actual yarns, and test unfamiliar colours together on the sample first. Do not assume that all acrylics, cottons or blends respond identically to heat and agitation. Follow any blocking instructions in the selected pattern only when they are compatible with the yarn's care directions. A more aggressive finish is not a dependable repair for a counting error.
Support wet fabric so its own weight does not stretch it. If flat drying is appropriate, arrange the rectangle gently on a suitable surface without forcing it to a planned measurement. Let it dry fully before recording the final width, length and border depth. Inspect colour boundaries, corners and woven ends again after care. A loose end or distorted edge that appears now needs correction before the gift is finished.
- 19
Diagnose common problems before remaking a section
A blanket that narrows row by row usually calls for an edge-stitch count check. A sudden width change at one colour suggests comparing yarn thickness and tension. A curled foundation points you back to the starting edge. A border that waves all the way along a side suggests looking at pickup density and border gauge before changing the body. Check more than one possibility when the count is correct.
If only one corner is distorted, compare its treatment with the other three. If the colours bleed, return to the yarn's care information rather than promising that a home fix will make it colourfast. Write down the problem and the measured difference before undoing work. Changing one variable at a time makes it easier to know whether the correction actually helped.
- 20
Label the gift and keep the useful measurements
Include fibre content, the exact care instructions from the labels and the final dry dimensions. Describe it as a handmade blanket for appropriate supervised use, with the infant sleep-space note kept clear. Remove ribbons, tags and packaging strings before use. The Halloween palette is complete without adding loose decorations at the last moment.
Keep a maker's record of the full pattern source, yarns, hook, washed gauge, completed body counts, colour ranges and border pickup plan. Record changes honestly rather than presenting planned dimensions as measured results. Those notes make a future blanket easier to reproduce and help you estimate how much extra ivory the border actually consumed. A later version in a different yarn still deserves a new sample.
| Question | Example calculation | Meaning |
|---|---|---|
| Body size with a border | 60 − 2×2 = 56 cm; 75 − 2×2 = 71 cm | Subtract border on both opposite sides. |
| Width at illustrative gauge | 56 × 1.6 = 89.6 stitches | Choose a repeat-compatible whole count. |
| Rounded width example | 90 ÷ 1.6 = 56.25 cm | Only valid at that assumed gauge. |
| Length at illustrative gauge | 71 × 2 = 142 rows | Check stitch-repeat compatibility. |
| Area estimate | 12 × (56×71)/(15×15) ≈ 212 g | Body estimate only; not measured yardage. |
| Block | Illustrative row range | Rows |
|---|---|---|
| Golden yellow | 1–47 | 47 |
| Orange | 48–95 | 48 |
| Ivory | 96–142 | 47 |
| Stage | Check | Reason |
|---|---|---|
| Sample | All colours and care treatment | Detect gauge and colour-transfer differences. |
| First rows | Count and foundation tension | Avoid a widening or bowed body. |
| Colour change | Last stitch and new row count | Prevent loose joins or edge increases. |
| Unbordered body | Widths and block heights | Resolve body errors before edging. |
| Border | Pickup density and corners | Avoid ripples or a pulled-in edge. |
| After care | Dry dimensions and ends | Record the actual finished result. |
Tips for success
- Measure each colour sample; matching weight labels do not guarantee matching gauge.
- Reserve ivory for the border as well as the body.
- Check the first short section of border before completing a whole round.
- Use the arithmetic examples to plan, then check dimensions against your own gauge.
Pattern at a glance
- Time to make
- Allow multiple making sessions plus sampling and drying; no timed sample has been completed.
- Skill level
- Easy
- Hook
- Use the selected pattern’s hook and verify gauge.
- Yarn weight
- Medium / worsted for the concept; follow the complete pattern.CYC standard
- Yardage
- Use the pattern quantity and sample-based planning; reserve extra ivory for its border.
- Gauge
- Pattern-specific; all numerical gauge examples are hypothetical.
- Finished size
- Choose a size from your complete pattern and check the finished measurements.
Free ebook
Get new patterns, and the ebook
New patterns as they land, plus our free beginner's crochet stitch guide. No daily blasts, unsubscribe in one click.
Frequently Asked Questions
Does this article include a complete free blanket pattern?
No. It explains construction, colour planning and troubleshooting, with clearly labeled numerical examples. Use a complete designer pattern for its row sequence, quantities and finished measurements. The linked patterns are independent designs and differ from the illustrated three-block concept; this guide does not reproduce their instructions.
How do I keep the three colour blocks the same height?
Use compatible yarns and check their washed row gauge, then plan a repeat-compatible number of rows for each block. Equal row counts only give equal heights when row gauge stays consistent. Measure after every transition and correct a tension change before adding the next block.
Why does the border ripple?
Too many pickups or a looser border gauge can put excess fabric around an otherwise flat body. Check a short section on a flat surface and compare the corners separately. Follow the pattern’s pickup method, adjust the cause and repeat the corrected distribution on the opposite edge.
Can this crochet blanket go in a baby’s crib?
No. The American Academy of Pediatrics recommends keeping loose bedding, including blankets, out of an infant’s sleep area. Crochet construction and open spaces between stitches do not create an exception. Keep the blanket for appropriate awake, supervised use and follow the linked safe-sleep guidance.