Baby & Nursery · Worked in rows
Baby Pumpkin Crochet Hat: A Detailed Halloween Project Guide
By Looplader · Project guide · Updated
- Skill
- Easy
- Hook
- Use the chosen pattern’s hook; adjust after swatching.
- Yarn
- Light / DK for the illustrated concept; follow your selected pattern.
- Time
- Allow separate sessions for swatching, making and finishing; drying time depends on the yarn.
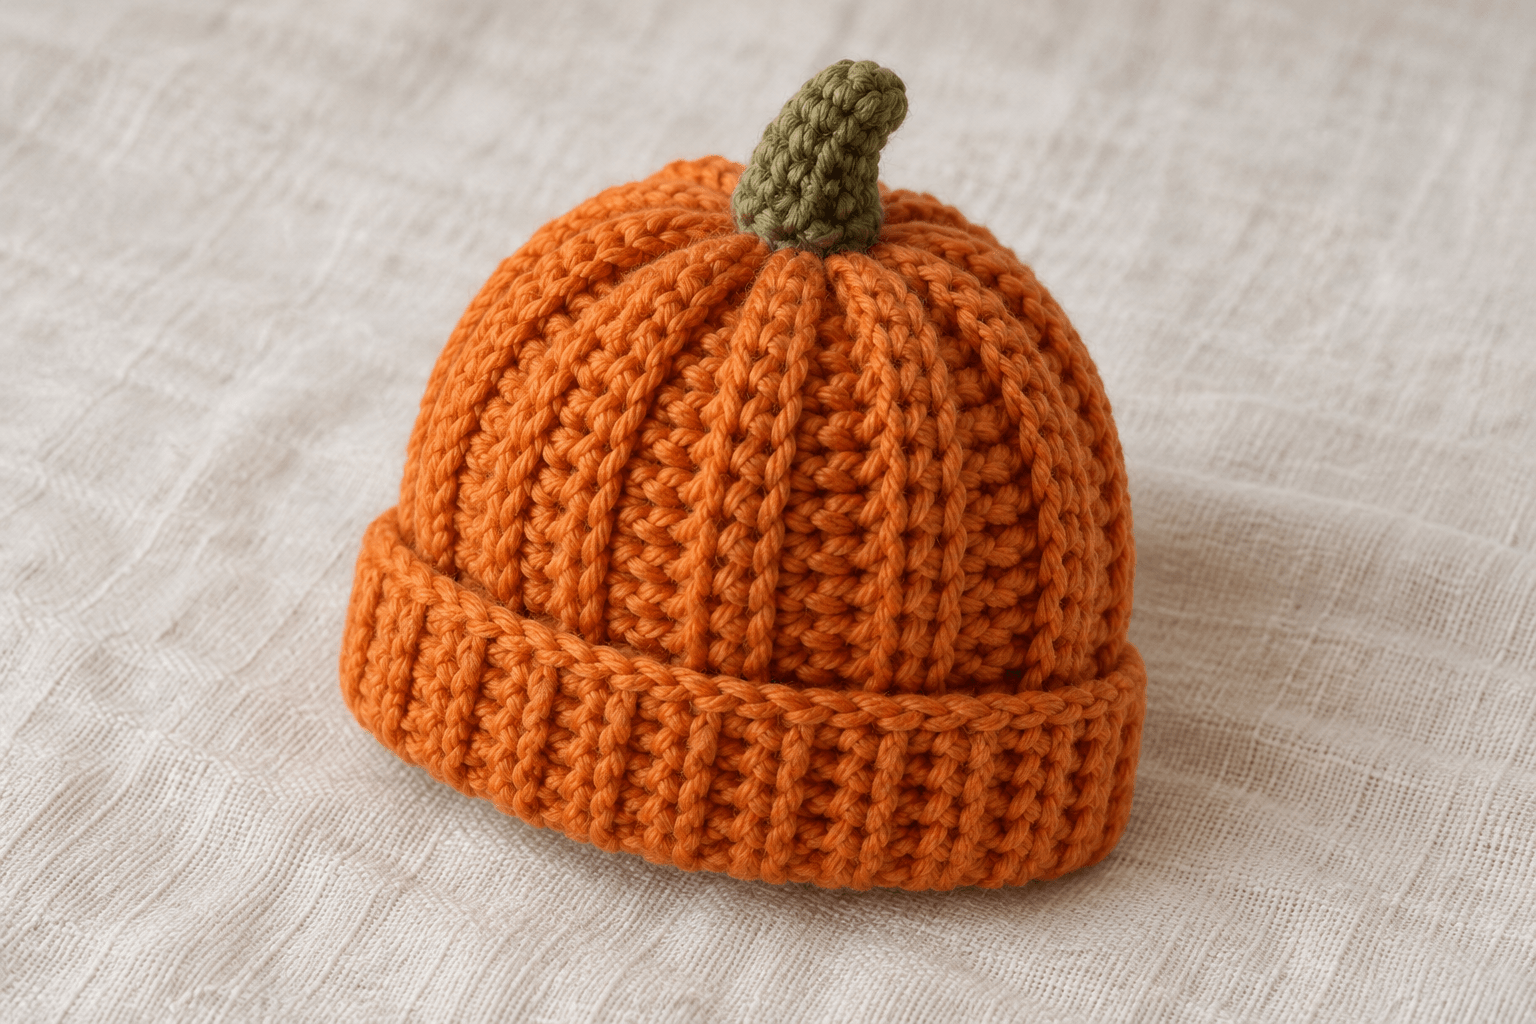
A baby pumpkin crochet hat combines orange ribbing, a gathered crown and a small green accent for a simple Halloween accessory. This guide follows a sideways panel construction and explains how to check sizing, join the seam, finish the crown and care for the completed hat.
This technique guide explains ribbed construction, sizing decisions and finishing. Use a complete designer pattern for exact stitch counts and quantities, with the process illustrations as a visual companion.
Pattern, Pinterest & resources
- Head circumference reference — Craft Yarn Council
Broad head measurements; not finished hat sizes.
- Crochet gauge — Craft Yarn Council
Why to swatch with the specified yarn, hook and stitch.
- Yarn weight system — Craft Yarn Council
Light/DK yarn classification.
- Crochet abbreviations — Craft Yarn Council
US terminology and abbreviation reference.
- Baby Pumpkin Hat — Granny Lawlor Crafts
Independent sideways hat pattern listing; obtain the complete pattern from its designer.
- Baby Pumpkin Hat — SewHappyCreative
Independent top-down alternative, written in UK terminology; not the illustrated construction.
- Safe sleep and overheating — American Academy of Pediatrics
Guidance on avoiding overheating and indoor hats.
What this project includes
- Separate checks for hat height and circumference.
- Eight illustrations covering the stages from materials to finishing.
- Worked sizing examples clearly separated from pattern instructions.
- Simple pumpkin styling without dangling costume pieces.
Detailed project guide
- 1
Choose the construction before choosing a size
A pumpkin hat gets its shape from an orange beanie, visible ribs and a small green accent at the crown. Two common approaches produce those ribs differently: crochet sideways in rows and join the fabric into a tube, or work from the crown downward with post stitches. Their sizing rules are different. Extra rows widen a sideways hat; extra straight rounds lengthen a top-down hat.
This guide illustrates the sideways approach: a ribbed panel, one vertical seam, a gathered crown and a folded cuff. It explains the decisions and checkpoints for each stage. Use a complete, appropriately sized pattern for the exact foundation, row sequence and finishing instructions. The linked Granny Lawlor Crafts listing is one sideways construction example; SewHappyCreative illustrates the separate top-down approach. These are independent designers, not Looplader patterns.
- 2
Choose smooth yarn and practical tools
Smooth orange yarn makes the stitch tops easier to see than fluffy novelty yarn. The illustrations use a DK-scale fabric. DK sits in the Craft Yarn Council's Light category, number 3; that category describes yarn thickness, not a guarantee that two yarns behave alike. Choose the yarn weight and quantity specified by your chosen pattern, including yarn for its swatch.
Check the actual ball band for fibre content and washing instructions. A machine-washable label is useful only if the finished item can follow that care routine, including its green accent. Compare the orange and green yarns before starting. Avoid mixing a shrink-prone accent with a body that keeps its size. Set aside a blunt tapestry needle, removable markers, scissors and a flexible tape; keep all tools away from the baby.
- 3
Measure the wearer, not just the age label
Ask a caregiver for the baby's current head circumference, measured with a flexible tape around the fullest part of the head and across the forehead. The tape should lie flat without compressing the skin. Repeat the measurement and record the date and unit. For a gift, ask for a current measurement rather than assuming a baby will fit an age band at Halloween.
The Craft Yarn Council lists a broad baby head-circumference range of 35.5–40.5 cm, or 14–16 inches. This is a body-measurement reference, not a finished hat size or a medical growth chart. Babies outside that range need a pattern size that fits their actual measurement. Do not use this craft chart to assess growth or health.
- 4
Separate head circumference, hat circumference and ease
Write down three separate values: the measured head, the pattern's intended wearer range, and its finished unstretched hat circumference. Ease is the difference between the last value and the first. Negative ease means the hat is smaller at rest and stretches to fit. The amount a ribbed fabric can comfortably accommodate depends on the actual fabric, not just the word stretchy.
For arithmetic only, a 40 cm head and a 38 cm finished hat differ by 2 cm, which is 5% of the head measurement. This example is not a recommendation to subtract 5% for every baby. Follow the chosen pattern's fit guidance and check the washed fabric's recovery. A hat that needs force to stretch, leaves pressure marks or slips toward the face needs adjustment; a chin cord is not a fit correction.
- 5
Swatch in the actual rib stitch
Make the gauge sample specified in your pattern with the yarn and hook you intend to use. If it calls for back-loop ribbing, a sample of ordinary crochet through both loops will not answer the same question. Leave enough fabric around the measuring area that the foundation and side edges do not dominate the reading. Label the hook size while you still remember it.
Wash and dry the sample according to the yarn instructions, then measure it fully dry in the condition the pattern specifies. Note both stitch gauge and row gauge. If the pattern calls for a relaxed measurement, do not stretch the ribs to make them match. Also stretch the sample gently and let it recover: permanently spread ribs are useful evidence that the finished opening may grow. The Craft Yarn Council gauge guide explains why the specified yarn, hook and stitch pattern belong together.
- 6
Read the two gauge directions correctly
In sideways construction, each row runs between the future brim and crown. The number of stitches in that row controls the panel height. Repeating rows adds width around the head. Turn the swatch to match the eventual panel before counting; a rib ridge is not necessarily one row. Some rib structures show a prominent ridge after a pair of rows, so use the actual row ends or your row record.
A hypothetical sample with 20 stitches across 10 cm has 2 stitches per centimetre along a row. A separate count of 24 rows across 10 cm gives 2.4 rows per centimetre in the other direction. Keep those numbers in different boxes on your notes. Swapping them changes both fit and height, even though the arithmetic can still look tidy.
- 7
Understand the sizing calculation without treating it as a pattern
Using the hypothetical row gauge above, a nominal 38 cm panel width corresponds to 38 × 2.4 = 91.2 rows. That fractional answer means the design needs a whole-row decision, usually constrained by its repeat and joining method. At the same hypothetical gauge, 92 rows span about 38.3 cm before any seam allowance or fabric changes. This is a worked calculation, not an instruction to crochet 92 rows.
Likewise, an illustrative panel height of 18 cm at 2 stitches per centimetre corresponds to 36 stitches along the row. Turning chains and foundation instructions still come from the pattern. The finished hat height will also be affected by the cuff and gathered crown. These examples show which measurement a count controls; they do not establish a newborn, three-month or six-month size.
- 8
Plan the folded cuff before starting
A folded cuff uses part of the panel's vertical length. If a flat panel is 18 cm tall and its lower 3 cm is turned outward, the visible distance from the folded lower edge to the original top edge is nominally 15 cm before crown shaping. It is not 12 cm: the fold creates a double layer, but moves the lower edge upward by the fold depth only once.
The crown gather then changes the shape, so the panel calculation is not a finished-depth guarantee. Check whether your pattern includes its cuff in the listed height. Mark the intended lower edge in your notes and maintain that orientation throughout assembly. A deeper fold may shorten the wearable body, but it cannot reliably rescue a hat whose overall size or crown shape is wrong.
- 9
Work the foundation and identify the row ends
Follow the foundation count and turning-chain convention in your chosen pattern. Make the chain with an even, relaxed tension, then count the completed stitches after the first row. The hook loop is not a finished stitch. Put removable markers in the first and last actual stitches so you can find the boundaries after turning.
For a plain single-crochet rib sample, working the back loop leaves the front loop unused and creates texture as the rows accumulate. The back loop is the loop farther from you when looking at the top of the current row. If the pattern treats edge stitches differently, follow that exception rather than applying back-loop placement everywhere. Before carrying on, compare the first row's width with the next few rows; a tight foundation can pull one side of the final seam.
- 10
Build the ribbed panel and check its shape
Continue the prescribed repeat, recording completed rows separately from stitch counts. On a plain rectangular section without shaping, the stitch count should stay constant. Count after the first few rows, then at regular stopping points. If an edge starts slanting, inspect the last stitch and turning chain before adding more fabric; accidentally skipping one edge stitch is easier to correct early.
Lay the panel down without stretching it. Its rows will become vertical ribs in the finished hat, while its growing width will wrap around the head. Compare the relaxed width with the pattern's target and your washed swatch. If the design uses short rows to narrow the crown, the panel may deliberately differ from the simple rectangle illustrated here. Do not remove that shaping just to match an illustration.
- 11
Pause for a fit checkpoint before seaming
Confirm which two edges will join: the first and final rows of a sideways rectangular panel. Bring those edges together loosely to understand the circumference without permanently sewing them. Measure on a flat surface; do not test an unfinished piece full of pins, needles or loose working loops on a baby.
If the panel is too wide, the correction usually involves row count in this construction. If it is too tall, the correction involves the stitches along each row or the pattern's height shaping. Changing hook size midway produces a different fabric rather than a clean size correction. Return to the swatch if both dimensions are wrong. Keep the pattern repeat intact and account for the join exactly as its designer specifies.
- 12
Join the side seam without twisting the tube
Lay the panel in its intended orientation and bring the first and last rows together. Check that the crown edge meets the crown edge and the brim edge meets the brim edge. Use removable markers to align the ends before making the join recommended by your pattern. The tube should have two open ends at this stage.
Match corresponding positions along the seam rather than stretching one edge to meet the other. After a short section, flatten the join and check that it has not become a stiff cord. If the seam looks puckered, loosen or redo that section before proceeding. A fold-up cuff may expose the reverse side of the seam, so inspect both faces. Remove alignment markers as the join is completed and keep a count of the tools you used.
- 13
Gather the crown in small, controlled adjustments
Identify the crown end before sewing. Following the pattern's closure method, distribute the gathering yarn evenly around that edge. Draw the opening inward gradually, moving the folds around the rim with your fingers rather than pulling hard on one spot. A baby hat made from a rectangle can collect substantial fabric at the top; forcing a bulky gather tighter can break yarn without improving its shape.
Inspect the closing area from the inside and outside. Secure the closure as directed and check for a remaining opening or a hard knot against the head. If the crown remains excessively thick, revisit the pattern's crown construction or choose a design with shaped rows. Do not use glue, a button or a tight decorative binding as a substitute for a sound closure.
- 14
Turn the cuff evenly and check the silhouette
Turn the lower edge outward to the planned depth. Measure the fold at several points around the opening rather than judging only the front. The vertical ribs should run through the fold without a spiral twist. Rotate the hat and inspect the seam area, where a thick join can make the cuff stand away from the body.
Lay the hat flat and record its finished depth and relaxed opening measurement using the method specified by the pattern. For a simply flattened opening, twice the flat width is only an approximation of circumference; thick seams, shaping and how you flatten it can affect the result. Avoid stretching the cuff over a large bowl to make it look smoother. That can conceal the fit you actually need to evaluate.
- 15
Keep the pumpkin accent small and simple
The orange ribs already suggest a pumpkin. A green accent can be omitted entirely, especially if you are uncertain about attachment. If your chosen pattern includes a short soft stem, follow its construction and fastening instructions. The illustrated version uses a compact green stem without leaves, trailing vines or a face; its appearance is an editorial example, not a measured stem pattern.
Check the attachment around its entire base and inspect the inside for uncomfortable knots or exposed ends. Do not add wire, beads, detachable eyes, glued embellishments or long ties to reproduce a seasonal look. A home tug check can reveal a loose seam but does not certify a baby item as safe. Recheck the accent after washing and remove the hat from use if any component loosens.
- 16
Weave ends into the fabric, then inspect both sides
Use a blunt needle to weave yarn ends through the existing stitches, following a path that does not cinch the ribs. Change direction to help resist slipping and leave enough yarn within the fabric for the chosen fibre and stitch structure. Avoid simply trimming a tail beside a knot. Where the cuff folds, place the finishing so neither face has a conspicuous loose strand.
Run your fingertips around the interior seam, crown closure and cuff. Look for a trapped marker, a protruding tail, an open seam or a stiff lump. Inspect the hat under good light and remove every temporary tool before it goes near a child. Set the completed piece aside for its final wash; newly finished crochet can change after that first care cycle.
- 17
Wash, dry and measure the finished hat
Use the care directions for the yarns actually used. Test unfamiliar colour combinations in the swatch first, particularly when green yarn meets orange. Do not assume that every acrylic, cotton or wool yarn tolerates the same temperature, agitation or drying method. Support the hat when wet and avoid pulling on the stem.
Allow it to dry completely before recording the final measurements. If laying it flat is appropriate for the yarn, arrange the cuff gently and let the ribs sit naturally rather than stretching them open. Compare the result with the pre-wash notes. A substantial change means the sizing decision needs another look. Include the exact care instructions and fibre information when giving the hat to someone else.
- 18
Use it as seasonal clothing, not sleepwear
Keep the baby's face clear and remove the hat if it slips, feels tight or the baby becomes too warm. This is an outdoor seasonal accessory for suitable conditions and an awake, supervised baby, not a sleep prop. Do not leave a sleeping baby wearing it for a photograph.
The American Academy of Pediatrics advises against putting hats on babies indoors after coming home from hospital and recommends avoiding overheating. Follow your clinician's individual advice where applicable. The linked AAP guidance is the source for this brief use note; crochet fit checks and soft yarn do not override it. A simple outdoor outfit can provide the Halloween theme without adding cords, masks or loose costume parts.
- 19
Troubleshoot the problem before changing the count
If the hat is too tight, first check the relaxed circumference, whether the seam restricts stretch, and whether the foundation is much tighter than the body. If the circumference is correct but the hat rides upward, examine the depth and crown bulk. If it slides toward the eyes, both excess depth and a loose opening can contribute. Diagnose on the finished, dry fabric before deciding what to remake.
If ribs fan outward, count the row-end stitches and look for accidental increases. If the panel narrows, look for missing edge stitches. If the cuff flares only at the seam, review seam tension. A decorative border should not be used to hide an unresolved sizing problem. Write down which variable changed so the next sample teaches you something useful.
- 20
Make the next hat easier to reproduce
Keep a short project record with the yarn name, fibre, colour, hook size, washed stitch gauge, washed row gauge and the full pattern source. Record the actual completed row count, the pattern size used and any permitted modifications. Add the final dry measurements and care instructions. A photo beside a ruler can document scale, but written measurements remain easier to compare.
For a later Halloween, take a new head measurement rather than adding a guessed number of rows to last year's hat. Keep the pumpkin palette if you like it, but make a fresh swatch when the yarn changes. The useful result of this guide is a clear process: measure, sample, follow the selected construction, inspect the join and crown, then recheck the finished fabric.
| Decision | Primary effect | Checkpoint |
|---|---|---|
| Stitches along a sideways row | Panel height | Allow for the pattern’s cuff and crown. |
| Number of sideways rows | Panel width / hat circumference | Measure relaxed fabric at the specified gauge. |
| Cuff fold depth | Visible body depth | Check evenly around the opening. |
| Seam tension | Local stretch and bulk | Inspect both sides before closing the crown. |
| Example | Calculation | Meaning |
|---|---|---|
| Row gauge | 24 rows ÷ 10 cm = 2.4 rows/cm | Counts rows, not rib ridges. |
| Nominal width | 38 cm × 2.4 = 91.2 rows | Requires a repeat-compatible whole-row choice. |
| Rounded example | 92 ÷ 2.4 ≈ 38.3 cm | Before join allowance or finishing effects. |
| Stitch gauge | 20 stitches ÷ 10 cm = 2 stitches/cm | Along one row. |
| Panel height example | 18 cm × 2 = 36 stitches | Does not specify foundation chains. |
Tips for success
- Count rows separately from visible rib ridges.
- Check width before seaming and measure again after washing.
- Keep foundation and seam tension flexible; do not force a tight opening.
Pattern at a glance
- Time to make
- Allow separate sessions for swatching, making and finishing; drying time depends on the yarn.
- Skill level
- Easy
- Hook
- Use the chosen pattern’s hook; adjust after swatching.
- Yarn weight
- Light / DK for the illustrated concept; follow your selected pattern.CYC standard
- Yardage
- Use the selected pattern’s quantity plus its swatch allowance; no measured sample yardage.
- Gauge
- Pattern-specific; measure washed stitch and row gauge. Numerical examples are hypothetical.
- Finished size
- Measure the wearer and select the appropriate size from your chosen pattern.
Free ebook
Get new patterns, and the ebook
New patterns as they land, plus our free beginner's crochet stitch guide. No daily blasts, unsubscribe in one click.
Frequently Asked Questions
Is this a complete free baby pumpkin hat pattern?
This is a technique and planning guide with process illustrations. For a size chart and full row sequence, choose one of the independent patterns in the resource links. Follow that pattern consistently for counts, shaping and quantities.
Can I use cotton instead of the recommended yarn?
Only after checking a washed sample against the pattern’s gauge and fit requirements. A matching weight label does not guarantee matching stretch or recovery. Compare both stitch and row gauge, the feel of the opening and the care requirements before committing to a full hat.
Why is my sideways hat wider but not taller as I add rows?
That is how sideways construction works: each extra row adds fabric around the head. The stitches within each row determine the panel height. To correct height, revisit the row length or shaping specified by the pattern; adding more full rows generally changes circumference instead.
Can a baby sleep in this Halloween hat?
Do not use it as sleepwear or a sleeping-photo prop. The AAP advises avoiding overheating and not putting hats on babies indoors after coming home from hospital. Use appropriate outdoor clothing for the conditions, keep the face clear and follow individual medical advice when needed.