Seasonal & Holiday · Mixed construction
Crochet Bat Garland: Illustrated Halloween Decor Guide
By Looplader · Project guide · Updated
- Skill
- Intermediate
- Hook
- 4.0 mm (G/6) starting point; adjust after testing the fabric
- Yarn
- Smooth cotton, worsted / aran (CYC 4)
- Time
- Plan separate sittings for sampling, assembly, blocking and hanging.
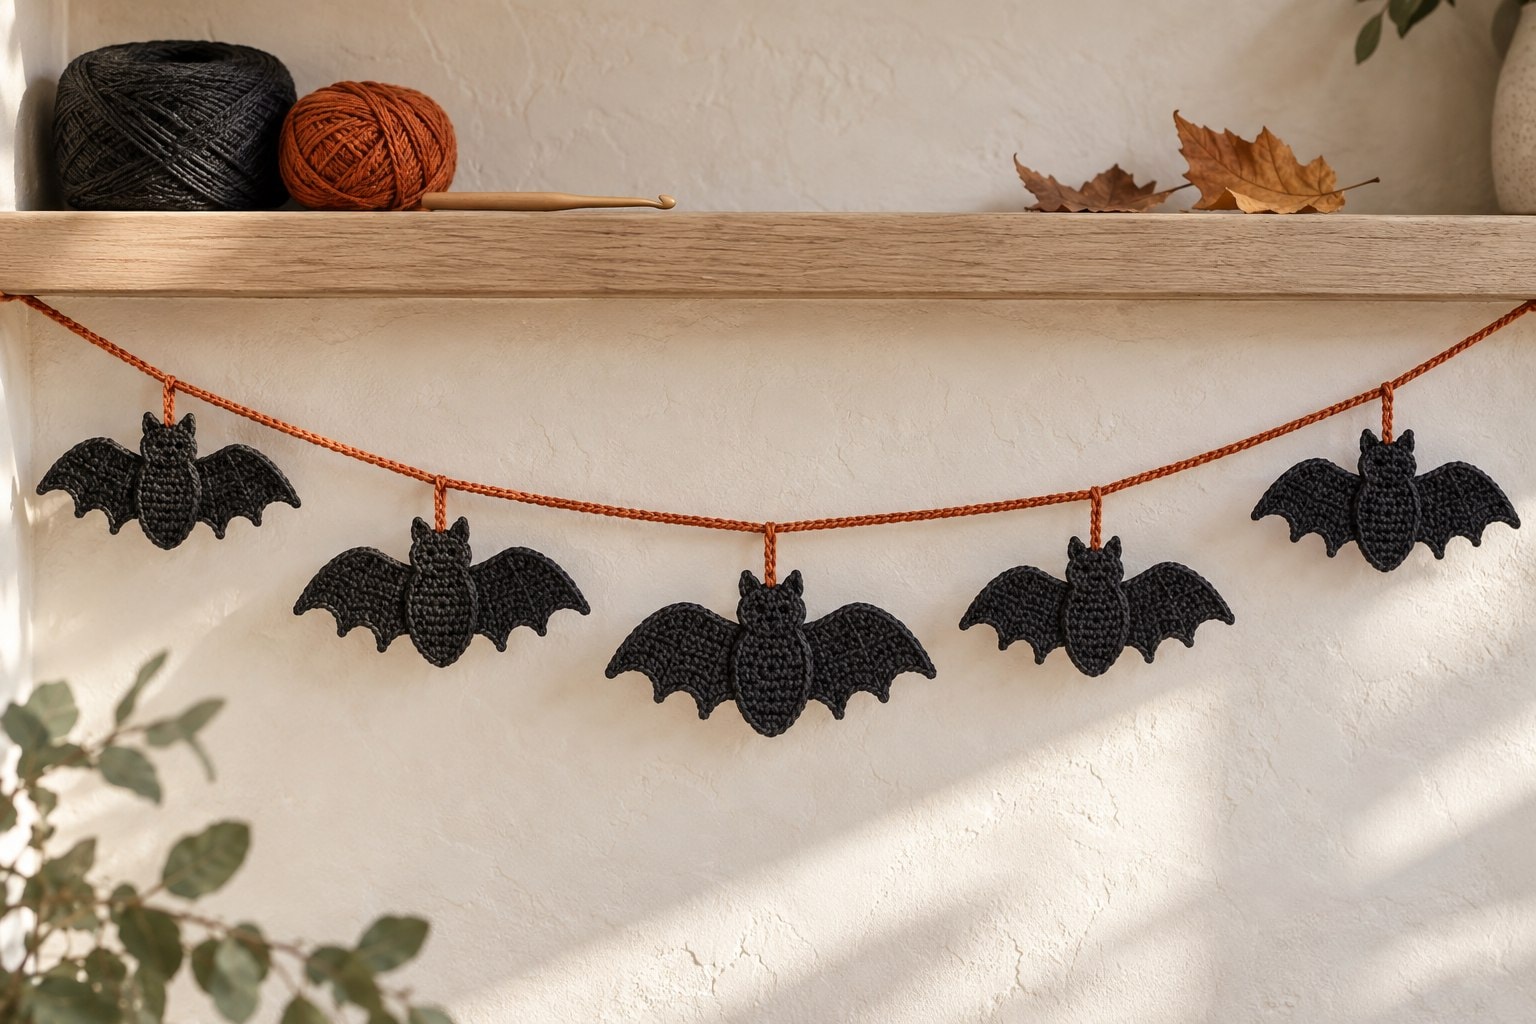
This crochet bat garland is built from five flat ornaments on a contrasting cord. Each bat uses a narrow ear-tipped center panel and two separate mirrored wing wedges, so the body and wing shapes can be adjusted independently before assembly.
This illustrated construction guide covers the three-piece bat structure, seaming, blocking and spacing. Use the checkpoints below to make and measure one bat before completing the set, recording counts, size and yarn usage as you work.
Pattern, Pinterest & resources
- Craft Yarn Council: standard yarn weight system
Use the category number as a starting point, then compare the actual strand and blocked fabric before substituting yarn.
- Craft Yarn Council: crochet abbreviations
Reference for the US crochet terms used when developing and recording the sample.
What this project includes
- The three-piece construction makes it possible to correct one wing without remaking the whole bat.
- Flat cotton pieces block into crisp silhouettes and store without the bulk of stuffed ornaments.
- Two attachment points near the ears help each bat face forward instead of spinning on the cord.
- The number of bats and the cord length can be planned around the actual mantel, shelf or wall space.
Detailed project guide
- 1
What this guide covers
The finished design is a row of five flat charcoal bats hanging from one burnt-orange cord. The bats have no faces, filling, wire or beads. Their silhouette comes from three pieces: a slim center panel with two ear points and a pointed lower end, plus a mirrored pair of broad wing wedges with three lower points on each side.
That structure is deliberately different from a one-piece circular appliqué. It adds two seams, but it also separates the difficult decisions. You can refine the body length without changing the wings, compare both wings before sewing, and replace one uneven part instead of unpicking a whole ornament. The guide explains those checkpoints. Record the counts for your first bat and use them for the remaining pieces.
- 2
Plan the display before choosing counts
Measure the usable display width rather than the whole wall. Leave clear space around picture frames, cabinet doors, heat sources and anything that must open. Sketch a shallow hanging curve and mark an odd number of positions so one bat can sit at the visual center. Five ornaments make the construction easy to read without turning the cord into a crowded row.
Draw one bat as three simple shapes. The wings should be wider than the center panel but shallow enough that adjacent bats do not touch. Mark the outer wing tips, three lower points on each wing and the two attachment areas beside the ears. This paper plan is a proportion check, not a crochet template. The yarn and stitch pattern will determine the real measurements once the first sample is blocked.
- 3
Choose yarn for a flat, readable silhouette
Smooth cotton makes stitch edges and wing points easier to inspect than fuzzy yarn. The Craft Yarn Council classifies worsted, afghan and aran yarns as CYC 4, but the number is a category rather than a guarantee that two yarns will produce the same fabric. Compare strand thickness, twist and blocked behavior. Begin with one yarn line for all five bats so material changes do not look like shaping errors.
A 4.0 mm hook is a conservative starting point for a structured CYC 4 cotton sample. The finished fabric should bend without collapsing and should not have large openings at the seams. If it is stiff enough to fight the hook, move up a size or relax your tension. If the wing edges look loose and cannot hold a point after blocking, test a smaller hook. Record the choice before making the second bat.
- 4
Develop the ear-tipped center panel
Work the center as a flat panel rather than a stuffed tube. Start at the pointed lower end, widen gradually through the body, then narrow towards the head. The final upper edge divides into two small points with a shallow notch between them. Keep the points short; tall ears become weak attachment loops and can pull out of shape when the garland hangs.
Make a second trial panel before committing to five ornaments. Lay the two pieces together and compare length, widest point, row direction and ear height. If the sides lean differently, check where the increases and decreases were placed rather than trimming the shape with an improvised border. Once the panel lies flat and repeats reliably, write down every row and the count at the end of each shaping row. Those notes become the basis of a testable pattern later.
- 5
Build the first wing as a separate wedge
The inner wing edge is the seam edge, so keep it straight enough to align with the side of the center panel. The upper edge sweeps outward to the widest point. Shape the lower edge into three deliberate points separated by two curved valleys. Put shaping on planned rows instead of adding isolated tall stitches at the end; a single unsupported spike can twist even after blocking.
Stop and lay the wing beside the center panel before finishing the tail. The inner edge should cover most of the body side without reaching above the ears or below the pointed end. The outer tip should sit slightly above the lowest wing point. If the proportions are wrong, adjust the wing now. Lengthening the center panel later to fit an oversized wing changes the silhouette and the hanging balance.
- 6
Mirror the second wing instead of copying its row direction
A matching pair needs mirrored shaping, not two identical pieces flipped over without inspection. Depending on the stitch texture, the right and wrong sides may catch light differently. Decide which surface will face forward, then reverse the shaping sequence or the working direction so both finished wings present the same texture.
Place the straight inner edges together and compare the outer tips, upper curves, lower valleys and all three points. Small differences are easier to see when the pair is isolated from the body. Count rows along the seam edges and measure from the upper seam corner to the outer tip. Correct an extra row or misplaced point before assembly. Blocking can settle mild curl; it cannot turn unequal construction into a mirrored pair.
- 7
Baste, inspect and seam all three pieces
Lay the center panel face-up and position a wing beneath each side so the straight wing edges meet the body edges. The upper seam corners should begin below the ear bases. Pin or baste both wings before making a permanent seam, then lift the piece vertically. This reveals drooping, overlap and unequal angles that can be missed on the table.
Sew with the same charcoal yarn and a blunt needle. Catch corresponding edge loops without pulling the seam into a ridge. Work from the upper seam corner towards the lower body, alternating sides every few stitches if that helps maintain symmetry. The seam should secure the entire inner wing edge, not only the corners. Stop if the center panel cups or the wing gathers; loosen the last stitches and redistribute them instead of stretching the finished bat to compensate.
- 8
Check whether the silhouette needs an edge finish
An extra border is optional. It can smooth a rough perimeter, but it also adds weight and may blunt the three wing points. First weave in the assembly tails and look at the unblocked silhouette against a light background. If the stitch edges are already consistent, leave them alone. Less yarn at the perimeter usually makes a flat ornament easier to block sharply.
If the sample needs an edge pass, use the same stitch and tension around every bat. Place extra stitches only where the fabric must turn a corner; do not add them at random to fill visual gaps. Work a test around one wing and compare it with the unfinished side. If the edged wing ruffles or loses its valleys, remove the border and correct the underlying wing construction rather than adding another finishing round.
- 9
Block the bat before judging its final shape
Follow the care instructions for the actual yarn. For a washable cotton sample, dampen the piece evenly and press out excess water in a towel without twisting. Lay it on a clean blocking mat. Pin the lower body point and ear tips first, then set the outer wing tips. Pin the three lower points on each wing while keeping the two valleys curved rather than stretched into straight lines.
Measure from the center panel to each outer tip and adjust until both sides match. Pins should hold the edge, not pull the fabric beyond its natural reach. Let the bat dry completely before removing them. If the wing springs back into a severe curl, revisit hook size, row tension or edge construction. Repeated aggressive stretching is not a substitute for a stable fabric.
- 10
Repeat the sample without letting the shape drift
Use the blocked first bat as a physical reference while making the remaining four. Keep the same yarn, hook, working direction and finishing method. After each component, stack it over the matching reference piece. A small difference at one edge may be harmless; repeated extra height across five center panels will produce an obvious stagger when the garland hangs.
Do not trim or force pieces to match. Check the written row notes and identify where the drift began. Make both wings for one bat as a pair, then assemble that bat before starting another pair. This reduces the chance of mixing right and left wings from different tension sessions. Block every ornament to the same measured width and let all pieces dry before planning the cord.
- 11
Make a cord that supports the ornaments
A twisted or crocheted cord is more stable than a loose chain that can stretch under the weight of five cotton bats. Make the cord longer than the measured display width so there is room for end loops, knots and a shallow hanging curve. Test it under light tension before attaching anything. If the cord keeps lengthening, choose a denser structure or make a fresh sample with firmer tension.
Finish both ends with generous hanging loops and secure the tails through several stitches. Do not rely on a decorative bow as the load-bearing closure. The burnt-orange contrast makes the attachment points visible, which is useful while spacing. A matching charcoal cord gives a quieter look but can make the bat tops and repairs harder to inspect.
- 12
Mark spacing from the center outward
Lay the cord in its intended shallow curve on a large table. Put the center bat below the midpoint, then place two bats on each side. Work outward in pairs so the spacing remains balanced. Use removable markers on the cord for all five positions before sewing. The outer bats need enough clearance from the end loops that they do not collide with hooks or wall hardware.
Step back or photograph the layout from directly above. Check the negative space between wing tips, not only the distance between body centers. Wider bats may need more room even when the center measurements match. Adjust the markers until no wings overlap and the center ornament is visually lowest in the curve. Record the final marker-to-marker spacing from the physical sample rather than treating the illustration as a scale drawing.
- 13
Attach each bat at two points
A single long loop lets a flat ornament spin and tilt. Use two short attachment passes near the upper back edge, one beside each ear. Sew around the cord rather than through it so the strand is not split. Keep both connections the same length and check that the ears remain distinct instead of being pulled together.
Attach the center bat first, hang the cord temporarily, and view it from the front. If the body leans, correct the two connection lengths before adding the other four. Continue from the center outward, checking the curve after each pair. Secure and bury the orange tails along the back of the center panel. Do not carry one long attachment strand behind the whole bat; it can pull the fabric into a horizontal fold.
- 14
Hang and inspect the finished garland safely
Use secure indoor hooks suitable for the wall or shelf material. Support both ends of the cord; do not drape it over a candle, fireplace opening, heater or moving door. The finished display should hang freely with every bat facing forward and no wing pressed against a rough surface. This is seasonal décor, not a toy, costume or climbing line.
Check the center first, then compare the paired ornaments. If one bat twists, inspect its two attachment passes and the seam balance before adding weight. Do not hide a problem with wire or clips. Shorten one attachment loop or reseat the ornament on the cord. After the first day, check the end loops and cord stretch again because cotton can settle under load.
- 15
Troubleshoot the construction point that caused the problem
Curling wings usually begin with fabric tension or uneven edge shaping. Block one sample, then change hook size or the wing notes if it will not stay flat. Unequal wing angles usually come from seam placement; compare the upper seam corners and the number of edge loops caught on each side. A cupped center panel points to shaping or seam tension, not a need for more blocking pins.
If bats collide after hanging, compare wing-tip spacing along the curved cord rather than the straight table measurement. If an ornament spins, shorten and balance its two attachment passes. If the cord sags more than planned, test its stretch without the ornaments and remake it in a denser structure if necessary. Correct one variable at a time and record the change on the project card.
- 16
Change color or scale as a new sample
Aubergine, deep brown or midnight blue can replace charcoal while keeping the restrained silhouette. Make the cord contrasting enough that the attachment points remain visible during assembly. For a softer palette, try oatmeal bats with a rust cord, but hold the bat against the intended wall before committing; low contrast can erase the wing points from a distance.
Changing yarn weight is not a shortcut to a guaranteed larger or smaller garland. It changes stitch height, edge firmness, seam bulk and cord stretch. Make and block one complete bat, measure it, and test one attachment before producing the set. Recalculate the number of ornaments from the actual display width. Keep a much smaller version away from children and pets; flat decorations and loose cords are not tested toys.
- 17
Store the garland without crushing the points
Remove dust according to the yarn label and let the garland dry completely before storage. Lay the bats flat in a shallow box with acid-free tissue or clean cotton fabric between layers. Coil the cord loosely around the group instead of winding it tightly across the wings. Heavy seasonal decorations should not sit on top of the bat points.
At the next use, inspect the end loops, attachment stitches and seams before hanging. Lightly reblock a wing only if the yarn's care instructions allow it. Replace a damaged attachment strand rather than tying a visible knot around the ear. Keeping the first sample, row notes and measurements with the stored garland will make a matching second strand much easier to reproduce.
Tips for success
- Make both wings for one bat in the same sitting, then compare them before cutting the second tail.
- Block one complete sample before repeating it; the unblocked width is not the final spacing measurement.
- Use two short cord attachments beside the ears so the flat ornament faces forward.
- Photograph the full layout from above before sewing; wing-tip gaps are easier to compare in a still image.
Pattern at a glance
- Time to make
- Plan separate sittings for sampling, assembly, blocking and hanging.
- Skill level
- Intermediate
- Hook
- 4.0 mm (G/6) starting point; adjust after testing the fabric
- Yarn weight
- Smooth cotton, worsted / aran (CYC 4)CYC standard
- Yardage
- Varies with bat size and cord length; measure yarn usage for one bat before making the set.
- Gauge
- Measure rows and stitches on one blocked bat before making the set.
- Finished size
- Five-bat garland; final dimensions depend on bat size and display space.
Free ebook
Get new patterns, and the ebook
New patterns as they land, plus our free beginner's crochet stitch guide. No daily blasts, unsubscribe in one click.
Frequently Asked Questions
Is this a complete free crochet bat garland pattern?
This is an illustrated construction guide covering the three-piece bat structure, seaming, blocking and layout. Develop one bat to suit your yarn and display space, then record the row counts, measurements and yarn usage before making the remaining bats.
Why do my crochet bat wings curl?
Persistent curl usually comes from fabric tension or uneven edge shaping. Block one wing, then compare hook size, row tension and the placement of the three lower points. If it springs back sharply after drying, correct the construction; adding more pins or stretching harder will not make an unstable wing reliable.
How do I keep the bats facing forward?
Attach each bat to the cord at two short, balanced points beside the ears. One long center loop allows the ornament to spin. Hang the first bat before attaching the rest, then adjust the connection lengths until the center panel sits vertical and both wings face forward.
Can I use acrylic yarn instead of cotton?
Yes, but treat it as a new sample. Acrylic may have more spring and may respond differently to blocking, so follow its label care instructions. Make one complete bat, test the wing points and cord stretch, then measure the blocked result before producing all five ornaments.
How many bats should I put on the garland?
Use the display width and blocked bat width to decide. An odd number gives you a clear center ornament. Lay the cord in its hanging curve, place the blocked bats below it and check wing-tip gaps. Add or remove pairs from the outside rather than crowding the center.